 This is an improved and expanded version of my previous article on this topic, aiming to give more information and also some helpful background about the computer jargon that underlies the seemingly mysterious business of using the MFC10 MIDI controller with your PSR. (A PSR-S970 will be used for the examples, throughout this document). The use of other foot switches will also be briefly discussed. Click here to download a pdf version of this article.
Using foot switches with the PSRs
There are many functions that can be assigned to a footswitch with the PSR range. In the case of the S970 you can use a footswitch to control Articulation, Bass Hold, DSP Variation, Ending 1–3, Fade In/Out, Fill Break, Fill Down, Fill Self, Fill Up, Fing/On Bass, Glide, Harmony/Arpeggio, Intro 1–3, Left On/Off, Lyrics Page +/-, Main A–D, OTS +/-, Pedal (Arp. Hold), Pedal Control (Wah), Percussion, Portamento, Right 1 On/Off, Right 2 On/Off, Score Page +/-, Soft, Song Play/Pause, Sostenuto, Style Start/Stop, Sustain, Synchro Start, Synchro Stop, Talk, Tap Tempo, Text Page +/-, Vocal Effect, and Vocal Harmony. In addition to that, if you have an FC7 controller you can assign it to Modulation, Pitch bend, or Volume. (These options are all explained on pp. 114- 117 of the Reference Manual).
However, there is also an important function that isn't included in the above list, and that is the ability to use a footswitch to control the sequence in which your registrations are called. Since that's slightly confusingly covered in the manuals I'll discuss it briefly in Appendix 1.
 Given the number of available functions, you may be asking yourself why an additional controller is needed. The answer, of course, is that there are many possibilities — but only two sockets into which a footswitch can be plugged. Happily, though, the MFC10 enables you to add another ten footswitches, as well as an additional pedal. Read on to find out how.
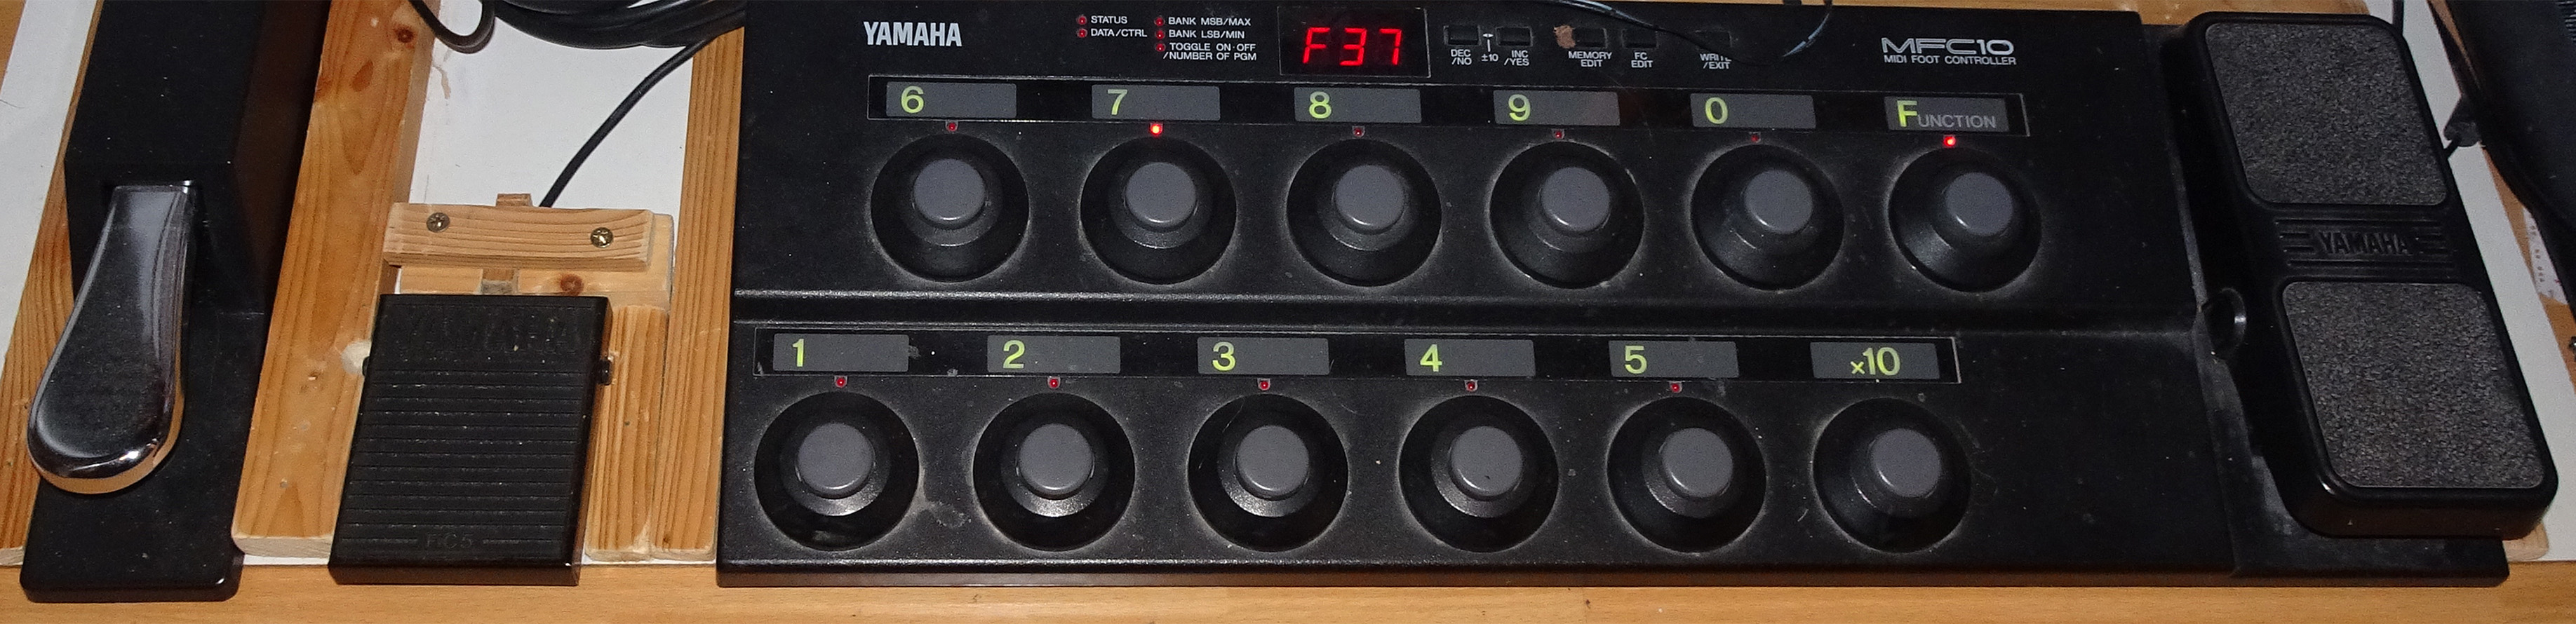
The MFC10 controller
Since the MFC10 is a generic MIDI controller that can be used with various instruments, we need to make it work by means of setting it up to send MIDI messages that will be understood and acted upon by the PSR-S970. The trouble is that these messages aren't too easy to discover, or to understand, so this document aims to try and shed some light on the topic, with just a little of the underlying mechanisms to help you understand exactly what you need to do. Hopefully, there's enough information here for you to be able to continue exploring the topic on your own, and if necessary know how to deal with other PSR models.
Suggested MFC10 options with the S970
I will discuss the MFC10's foot switches first, and then move on to its pedal. Finally (in Appendix 1) I'll discuss adding other switches — notably, to control the sequence of registrations (mainly for those who use one registration bank per song).
Let's start by acknowledging the fact that the MFC10 is designed as a general-purpose MIDI controller. It follows, therefore, that it can be set up to send various commands that will be understood by the PSR-S970 (but also many that will not). Here is the table that shows the commands that the MFC10 can send. (This is for "Section Control (F0) [STATUS=F0]" — as found on page 15 of the MFC10 manual).

Now if you have ever looked through the S970's Data List manual, then it may come as no surprise to find that the above data looks strangely similar to some data in there (on page 102, under the cryptic heading "System Exclusive Messages (2)"). I've reproduced that table below: take a look at the hexadecimal (don't panic — more on that soon!) values in the "Switch No." list, and then check out what they refer to:
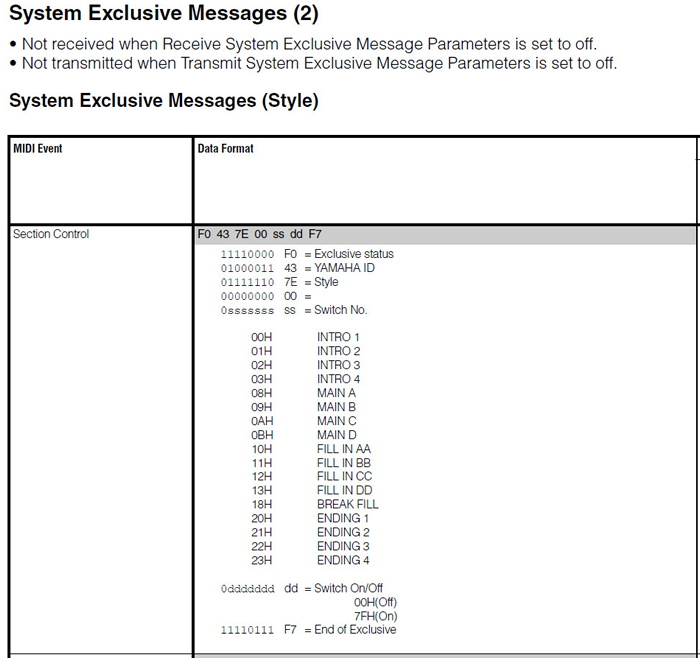
If you now compare the details in the two lists above, you may notice certain similarities. Although, to be able to do so you will need to be familiar with hexadecimal notation, and so I have added some information about that (including a conversion table covering the range of values we're interested in) as Appendix 2.
- The numbers given for the codes for each function are identical — apart from the fact that there's a difference of 1. So Intro 1 is C01 (i.e. one) in the MFC10 manual, and it's 00H (i.e. zero) in the Data List. The H indicates a hexadecimal (base 16) number — again, see Appendix 2 for details. Or take Ending 4, for example, and you'll find that the code in the MFC10 manual (C36 (decimal)) is in fact the same code as for the Ending 4 that is given in the Data List — which lists 23 Hex, which is 35 in decimal, so that if you add 1 to that then once again you get the same MFC10 code.
(This stuff about whether you count starting from zero or starting from one is something that you may have encountered elsewhere in the MIDI/Yamaha world, but if you haven't, please be assured that that it's a known phenomenon. Or for most of us, an irritating difference that we just have to work around and remember.) - The other thing to notice is that the MFC10 manual also talks about a lot of generic stuff that isn't at all relevant to PSR-S arranger keyboards, such as odd things (to us) like Intro 7, Main 5, or Ending 6. It also talks about "Fill in AA1", Fill in AA2" and so on all the way up to "Fill in AB8" — so what are they? In fact, the Data List decodes those things for us, since for the S970 it lists only Fill Ins AA – DD, using the same codes (with a difference of 1, as usual) as those described in the MFC10 manual as Fill Ins "AA1 to AA4".
So now we know where these mysterious codes come from, and what they mean.
From experience, we also already know that "Fill In BB", for example, means the fill-in for the Main B variation, which (as long as we have a hand free) we can produce by pressing the Main B button whilst variation B is playing. (Getting the timing just right, so that you trigger the fill on the correct beat of the bar to give you the exact amount of fill that you need, is left to the skill of the player). ![]()
So now we know what we can work with: so the next question is — given that the MFC10 has ten usable footswitches (i.e. excluding the two on the right hand side — the Function switch on the back row and the "x10" switch on the front row, since I have never used these during live performance), what are you going to use your ten MFC10 footswitches for? As mentioned above, the only possibilities that we can choose from are the ones shown in Yamaha's Data List document for our keyboard — the S970, in this case. The question now is, which of the ones in the list are most useful to us? Well, whichever you choose is up to you: I decided to approach this by checking which of them I use the most.
Now the quick analysis that I did is simplistic, and clearly it may not be at all representative of the way you play, but I carefully counted my actions during a few dozen of the pieces I play most regularly, in order to ascertain which controls I actually use —and I have to admit that I was slightly surprised at the results. Out of the things that are available to be used (i.e. those shown in the [S970] Data List) the ones that I actually used the most were as follows (with the most frequently used at the top of the list):
Ending 3
Intro 2
Main 2
Main 3
Fill In BB (known as AA2, in the MFC10 manual)
Main 1 and Main 4
Intro 1
Intro 3 and Fill In CC (AA3, in the MFC10 manual)
Ending 1 and Ending 2 and Fill In DD (AA4, in the MFC10 manual)
Fill In AA (AA1, in the MFC10 manual)
(I was a little surprised not to find the Break fill in my list: but then realised that this is because I always trigger that using an available hand when I'm playing — again, you may well do things differently). That gave me fourteen possibilities: but, of course, on the MFC10 there aren't fourteen footswitches available for use.
Deciding which switches to program
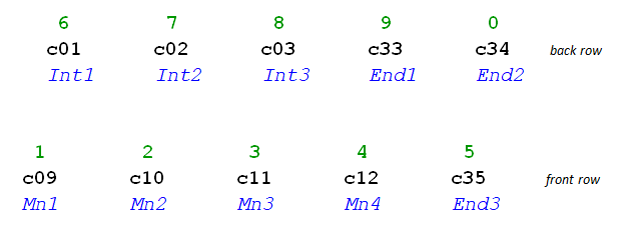
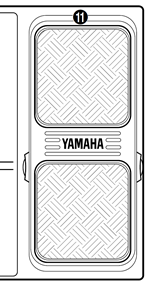
There are effectively 10 footswitches (1 - 5 on the front row, 6 - 9 and 0 on the back row — see the diagram below) that can usefully be programmed for toe-touch actions. I don't think the right-hand foot switches (notably "x10" on the front row) are useful in live performance: I find one bank of ten footswitches enough to cope with, without nine more — but if you'd like to try, see page 9 of the MFC10 manual.
.png)
So (bearing in mind that the front footswitches are a little faster and easier to reach than the rear ones, and also that it makes sense to group similar functions together), to cut to the chase I finally decided to configure my footswitches to control Main 1 – 4, Intro 1 – 3, and Ending 1 – 3. (The Fill-Ins I'll just have to do the old-fashioned way). I then decided to use the front five switches for Main 1 – Main 4 and Ending 3 (the most often used), and the back five for Intros 1 – 3 and Endings 1 & 2.
In terms of the MFC10 codes, then, these were assigned to the switches as follows:
Quite obviously, it's entirely up to you which functions you feel you need, and how you want to assign them to the foot switches on your MFC10. I've described my choices and how I arrived at them as an example, but you will need to change the assignments to be the ones you prefer.
Now we need to program the MFC10 accordingly, and you might want to make yourself a simple diagram similar to the one above before you start, so that you're clear in your mind which codes are being programmed to each foot switch. OK, now it's time to program your MFC10 to make it all happen.
Programming the MFC10's foot switches
Make sure that there's a MIDI cable between the MFC10's MIDI out and the PSR-S970's MIDI in, and off we go. We use Function commands to do this (so check that the red light by the Function footswitch is on — if not, press the Function footswitch,). Now follow these five steps for each footswitch you want to program:—
- Press the foot switch to be programmed (the associated red LED comes on and the display shows "F" + the footswitch number).
- Press the Memory Edit button: the display should say F0, but if not use the Inc or Dec buttons to change the status to F0. (You may find that the display doesn't change in hexadecimal sequence: e.g. to reach F0 you may first have to cycle through F3, FA, Fb, and FC…. Who knows why? )
- Press Memory Edit again and use Inc/Dec to change the data to the C-number for that particular switch (as shown on your diagram, if you made one). Holding these buttons down cycles through the values rapidly.
- Press the Write/Exit button (the display starts blinking to indicate that you have made a change and hence need to save it).
- Finally, press the Inc/YES button to save the setting.
Follow the same procedure for each of the footswitches you want to program. That's all you need to do as far as the footswitches are concerned, but before testing the result let's program the MFC10's footpedal, as well. Although first let me mention a couple of practical points about using the footswitches —
- Although this is fairly obvious when you think about it, be aware that if you tap the footswitch to arm Main Variation 1 and then subsequently override it by pressing MV2 but from the keyboard, the red light on your MFC10 will still be on above switch 1, since that's the last command you sent from there.
- One final practical comment about the toe switches — if you have large feet, and/or your shoes have thick soles, then you may find the foot switches a little lacking in feel. If you don't mind about the possible damage to your street cred, and/or if your feet are invisible to the audience, then you could always try the old pipe organists' trick of playing in slippers. You're unlikely to encounter the only problem with that technique: I can recall occasions when the church was so cold that I began to lose all feeling below the knee, but hopefully you won't be playing in very low temperatures! (Your PSR probably wouldn't like that, either).
Programming the pedal
 (For this section, see p. 22 and following, in the MFC10 manual.) Since I sometimes use a Yamaha FC7 Expression pedal, I decided to use the footpedal that's fitted to the MFC-10 for Pitch Bend. I find that I much prefer controlling this effect from a pedal, since the result is a lot smoother (simply because I'm not snatching my left hand back to the keys again after stabbing at the pitch bend wheel). In my setup I use the setting 'fully toe down' to correspond to zero pitch bend, with increasing amounts of heel down providing increasing amounts of pitch bend down for a maximum of a whole tone with the heel fully down — I use pitch bend up less frequently, so I can use the wheel for that.
You could arrange to use it for pitch bend up and down if you were brave, although in the absence of any centre detent you would be likely to find that your 'board sounded out of tune unless the pedal was exactly in the middle of its range. Hmm…. If, in view of that danger, you have concerns about the idea of using the footpedal for Pitch Bend, you could perhaps consider using it for an Expression pedal instead, or some other available function on your keyboard. But to use it for either pitch bend down or pitch bend up seems reasonable to me — it's very easy to check that the pedal is either fully toe down or fully heel down (depending on the way you chose to configure it), and then you can always be quite sure that you're exactly in tune.
Page 23 of the MFC10 manual tells us —
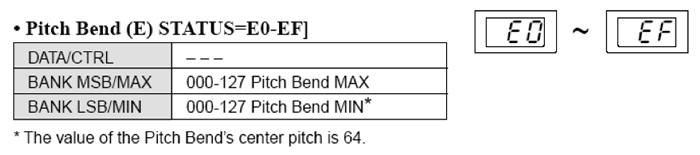
So to assign Pitch Bend to the pedal, the method is as follows —
- Press the Function pedal to turn the red light on.
- Press FC EDIT to select Foot Control.
- Press footswitch 1 to select the on-board pedal as the one to be edited.
- Use the Inc or Dec buttons to select E0 bF (pitch bend information on MIDI channel 1, as shown above) — the STATUS light will be flashing.
- Press FC EDIT to reach the data, which in this case is not applicable, so it displays as three dashes ( - - - ) — DATA/CTRL light will still be flashing.
- Press FC EDIT again and set the maximum value to 64 (i.e. no pitch change at all when the pedal is fully toe down) — the BANK MSB/MAX light will be flashing.
- Press FC EDIT and set the minimum value to zero (this reduces the pitch when the heel moves down) — the BANK LSB/MIN light will be flashing.
- Press Write/Exit and then Inc/YES.
If you'd prefer to only bend by a maximum of a semitone, then adjust the values to suit — in the above example I'd set the max value to 64 and the min value to 32.
Obviously, if you would prefer to configure the pedal in other ways, you will need to adjust the above to suit. If, for example, you would prefer to use toe down to trigger a pitch up, then you would set the maximum value to 127 and the minimum to 64.
The final step — setting up your keyboard
So far, so good — but there's one last essential step before you can try it out — you need to tell your PSR (S970, in this case) what you expect of it. (The procedure needed to save your preferences may be different on other PSRs, of course.) So go to the MIDI settings on the PSR-S970 (see page 118 of the downloadable S970 Reference Manual):
- Press the Function button and Tab to MENU 1, select MIDI, then (on the S970's User tab) NEW (or EDIT if you have a previous version to change).
- Tab across to the RECEIVE tab. See p.122 of the S970 Reference Manual (or the equivalent in your 'board) for full details about this tab. By default, 'All Parts' will be selected, so press the Edit key (don't worry, we're saving this config to the USER area).
- Check that the inverse highlight is on PORT 1 CHANNEL 1.
- Use button 3 to change the PART from SONG to KEYBOARD.
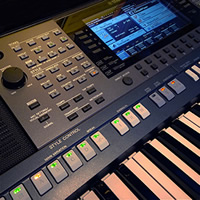
- Use buttons 4, 5, 6, and 8 to clear the check marks from Note, Control Change, Program Change, and After Touch — when you've done this, on Part 1 Channel 1 you should have only PITCH BEND with a check mark. The result should look like the screenshot below, where I've highlighted the relevant line for channel 1 in yellow.
- Press the Exit button to get back to the previous (MIDI) screen.

- Double-check that you're on the USER tab (which you should be).
- Press Save, and enter whatever filename you like (I use "Pitch bend pedal" to give me a chance of remembering what it was for). However, if you are editing a previously saved file, then the change will be registered to that file automatically (and Save will be greyed out, so just press Exit and you're done).
- SAVE.
- Exit back to your main screen.
OK, each time your PSR-S970 wakes up it will now load those MIDI settings for you.
One final but important practical point — when you're using the MFC10's foot pedal for pitch bend you obviously have to be very careful to always leave the pedal in the zero pitch bend position whilst you're playing if you don't want Right 1 to be out of tune. Happily, after a while it becomes automatic to just tap the pedal with your foot to be sure it's at the zero bend position before you begin playing — no big deal, and as far as I'm concerned this is a very small price to pay for the convenience of having your pitch bend foot-controlled. If you disagree, then hopefully there are other things you might use the pedal for, as mentioned above.
And that's all there is to it!
So now you can now go ahead and set up your MFC10 to give you additional options for controlling some aspects of your S970 using your feet. For the sake of completeness, I've also added a few comments about using additional pedals — see Appendix 1.
Good luck — hopefully, you can now keep your fingers on the keys for a greater percentage of the time!
 In conclusion
I hope that you found the foregoing to be useful. Here's wishing you enormous fun and huge satisfaction when playing your keyboard!
psr4ever
Appendix 1
Using other pedals with the MFC10
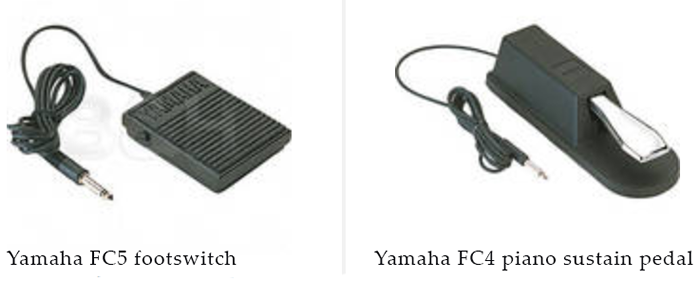
As someone who used to play the pipe organ (those beasts usually have a full pedalboard, one or more swell pedals, and foot pistons) I am naturally something of a fan of using one's feet for additional assistance wherever possible. So I also make use of the two jack sockets on the rear of the instrument to deploy two foot pedals, as well as my MFC10. Although I do use my FC7 expression pedal occasionally, I mostly use simple switches here — one of them a small Yamaha FC5 (dedicated entirely to registration sequencing), and the other a sustain pedal (that's used as such when I play piano across the whole keyboard, but is programmed to perform other functions at other times).
Once again I should mention that if your PSR is other than an S970 then you will need to check your manual(s) for information about what's possible for you.
But first — will they be where you want them?
Foot pedals being, in my view, a Good Thing, it nonetheless has to be said that left to their own devices they can be an irritation. Although the MFC10 is hefty enough, and surely heavy enough, to more or less stay where it's put, the other two are not: the FC5 in particular skidded merrily around on my wooden study floor, whilst the FC4 has a disconcerting habit of tipping over onto its side if a foot catches it in passing.
This wasn't acceptable, so within days of my S970's arrival I went and hunted around in my store of old offcuts of wood, following which I screwed together a very simple framework that I mounted on a piece of board — that was cut to size to fit solidly within the confines of my L7S stand. The result is that the pedals are now always exactly where my feet expect to find them. Admittedly, it doesn't look very pretty (see pic!; click on it for an expanded view), but hey — no one else sees it anyway, so that's not a problem.
Decision time again
So the question has to be asked — with two more pedals available, what are they going to be used for? As with the MFC10, everyone will have their own ideas on that, but just as an example, here's what I decided to do.
As the years have gone by I have found myself increasingly moving away from the "four-variations-with-OTS" model of playing to the "(at least) one-registration-bank-per-song" model. And in that context I find the S970's ability to set up a registration sequence to be incredibly useful, especially since it can be programmed to follow registration 8 by moving to registration 1 in the next registration bank in the same directory — which means that in practice you can set up as many registrations as you need. OK, I don't use more than eight all that often, but I do find that I need ten for a number of pieces, and even more than that occasionally. So my first decision was that I would dedicate the FC5 (the small pedal) entirely to sequencing registrations. (More about that in a moment).
As far as the FC4 sustain-style pedal goes, I use that for different functions at different times. Again, this is an area where you need to consult your own keyboard's manual: in the case of the S970 you'll find the table of "Assignable Pedal Functions" starting on page 115 of the Reference Manual. A quick practical suggestion at this point: if you do have two additional pedals be sure to label the two jack plugs clearly to identify the correct socket for them, so that if you do take your 'board somewhere to play you don't suffer the embarrassment of finding that you inadvertently swapped the two pedals over when plugging them in.
Dedicating a pedal for registrations
I mentioned above that I dedicate my FC5 to registration switching. This is pretty straightforward to do (see pp. 85 - 87 of the S970 Reference Manual) — but do be aware that there is some highly significant information at the end of point 4 that is easily overlooked:
"Note that the pedal settings here … will take priority over the settings in the FOOT PEDAL display (page 114)". (My emphasis).
In other words, if you set up a dedicated pedal for registration sequence switching as described on pp. 85 and 86 of the RM, that will override anything that might be set up for the same pedal on the foot pedal controller settings screen (pp 114 – 117).
And something that isn't explicitly stated (although it's not ruled out, either) is that not only can you assign the registrations in any sequence you like, you can re-use registrations, too. So if you've got, say, registration 4 set up for the chorus, with registrations 1 to 3 set up for the three verses, it's perfectly valid to specify:
1 4 2 4 3 4
…as your registration sequence. In other words, don't be misled by the word "sequence" — you're free to use the registrations numbers as many times as you like as well as in any order you like.
So let's get back to the process of actually doing the setup. The process is documented in the S970 Reference Manual, starting on page 85. It's pretty straightforward — although it's not made entirely clear, other than briefly in the NEXT BANK option, that when you reach the end of the sequence of eight registrations in the current bank, you can opt to then move on to the beginning of the next-named registration bank in the same folder (if the NEXT BANK option is set).
If you're one of those people who find a video easier to follow than my turgid prose (in which case, congratulations on getting this far!) you'll be happy to hear that when I searched YouTube on your behalf I was delighted to find that Fred Smith has posted a great video on exactly this topic. Point your browser at https://www.youtube.com/watch?v=D9gJOH1fK1c to watch it. Fred drives a Tyros in the video, but the same principles apply to the S970 and other PSRs. Thanks, Fred!
This is important, so I need to bring it to your attention: once you decide to go down this road you have to especially careful to get your Freeze settings and your Parameter Lock settings aligned with the setup you have chosen and the way you save your registrations. But that's a whole topic in itself….
One final comment on registration sequences: you will find by experience that once you decide to use a foot pedal to control your registration sequence, it's best to completely stop using the Tab buttons for that purpose. Load the registration, press the pedal once to load the first registration in the sequence and 'prime the pump', so to speak, and you're away. But don't mix pedal and Tab sequence controls, or you'll wind up not being too sure where you are in your sequence and exactly which control to use to move on to your next registration — which could be distracting, to say the least, in the middle of a live performance….
Appendix 2
Hexadecimal — a different number base
If you hated maths at school, the good news is that all you need is the following conversion table (the hexadecimal values are shown in bold immediately below the equivalent decimal value):
00 |
01 |
02 |
03 |
04 |
05 |
06 |
07 |
08 |
09 |
00 |
01 |
02 |
03 |
04 |
05 |
06 |
07 |
08 |
09 |
10 |
11 |
12 |
13 |
14 |
15 |
16 |
17 |
18 |
19 |
0A |
0B |
0C |
0D |
0E |
0F |
10 |
11 |
12 |
13 |
20 |
21 |
22 |
23 |
24 |
25 |
26 |
27 |
28 |
29 |
14 |
15 |
16 |
17 |
18 |
19 |
1A |
1B |
1C |
1D |
30 |
31 |
32 |
33 |
34 |
35 |
… |
etc. |
|
|
1E |
1F |
20 |
21 |
22 |
23 |
… |
etc. |
|
|
On the other hand, if you are one of those people who find it helpful to know how the system works, well here goes.
The decimal system is a numbering system where the base (which could be described as the number of unique digits used) is 10 — in other words, it deploys the digits 0 to 9 that we're all familiar with. To get beyond ten, we need to find a way to specify how many additional sets of ten are involved. So decimal 35, for example, means three sets of ten (30) plus five.
<digression alert> Of course, you can use any number as your base, if you can find enough digits. A long time ago (in the days of punched cards and paper tape, when computers occupied huge amounts of space and had about as much power as a pocket calculator) I was programming mainframes that internally used an octal system (base 8). If anything went wrong, the only diagnostic I had was that the machine vomited the entire contents of its memory onto the line printer in a thick printout of strings of octal digits. I was able to decode them at sight, too. But, happily, the world has moved on…. </digression alert>
More mathematically, this is (3 x 101) + (5 x 100). (Anything to the power zero is one, so the last digit is 5 x 1 = 5. Anything to the power one is itself, so 101 = 10).
From the table above we see that the hexadecimal equivalent of 35 is 23 — hmm, how does that work? Well, it works by applying exactly the same technique, only in base 16 (a system that uses 0 – 9 and then A, B, C, D, E, F as its 16 digits).
So 23 hexadecimal is (2 x 161) + (3 x 160) — so we get 32 + 3, which gives us 35 in decimal. ![]()
This page updated on May 20, 2021 .