The purpose of this article is to show how Non Registered Parameter Numbers (NRPN) are found, assembled and entered into a variety of sequencers to modify the output from the Yamaha PSR series keyboards. If you already know how to find the NRPN codes in the Datalist for your keyboard and how to assemble them, you may want to proceed to the end of this article for a look at how the code is entered into your particular sequencer before reading the entire article. The sequencers covered in this article are XG Works, Power Tracks, Cubase and Sonar.
What is NRPN?
NRPN stands for "Non Registered Parameter Number" as opposed to RPN for "Registered Parameter Number." RPN are those numbers identified by the MIDI Standard that will evoke the same response from every MIDI device designed to use them. NRPN numbers, on the other hand, can be used for any purpose a manufacturer wants in their devices. This can be a problem when the numbers of one manufacturer are used in a MIDI file run on another manufacturers MIDI device. All sorts of problems can crop up, such as locking up the keyboard, strange sound settings or crazy undesired responses to button pushes on the keyboard. No doubt, you have already had to do a reset of your keyboard due to this fault.
How to find the NRPN Code
All the Yamaha keyboards from the PSR740 up through the S-900 and both Tyros and Tyros 2 have the exact same NRPN Table. The NRPN Table can be found in the Datalist Manual for each of these keyboards under the title, "MIDI Channel Message (2)".
The numbers listed in the Datalist are in Hexadecimal (Hex) for the most part. Hex numbers are indicated by the letter "H" after the number. A Hex number is always two digits, example 3EH. The numbers start with 00H = zero (0) real number and end with FFH = 255 real number.
Hex 0 1 2 3 4 5 6 7 8 9 A B C D E FDec 0 1 2 3 4 5 6 7 8 9 10 11 12 13 14 15
So then, 00H = 0, 01H = 1, 09H = 9, 0AH = 10, 0BH = 11, 0FH = 15, 10H = 16, 11H = 17, 1FH = 31, 20H = 32, 30H = 48, 40H = 64, .. FFH = 255. To convert the Hex number 7FH to a real number, Multiply the first digit by 16 and add the value of the second digit to the first result, (7 X 16 = 112 and F = 15 so 112 + 15 = 127).
 Looking
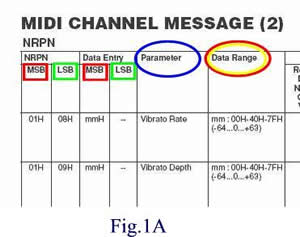
at the top of the NRPN table, Fig. 1A. The first column "NRPN"
has two sub columns MSB(Red) and LSB (Green). Think of this column as the
high byte and low byte of the address in the keyboard memory where you will
send the two bytes in the next column "Data Entry" - MSB (Red)
and LSB (Green). The data you send to that address will cause the action
listed in the next column "Parameter" (Blue). The value of the
data sent is derived from the next column "Data Range" (Red/Yellow).
Looking
at the top of the NRPN table, Fig. 1A. The first column "NRPN"
has two sub columns MSB(Red) and LSB (Green). Think of this column as the
high byte and low byte of the address in the keyboard memory where you will
send the two bytes in the next column "Data Entry" - MSB (Red)
and LSB (Green). The data you send to that address will cause the action
listed in the next column "Parameter" (Blue). The value of the
data sent is derived from the next column "Data Range" (Red/Yellow).
 Looking
on down the NRPN Table, we see the various Parameter change messages we can
send to the
keyboard. Fig 2A indicates the messages covered in this article and they
are used in the example MIDI
song. All the messages in this table are handled in the same manner.
Looking
on down the NRPN Table, we see the various Parameter change messages we can
send to the
keyboard. Fig 2A indicates the messages covered in this article and they
are used in the example MIDI
song. All the messages in this table are handled in the same manner.
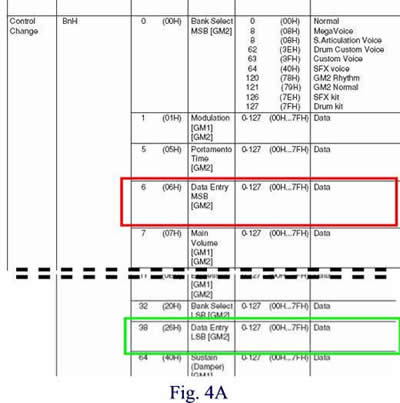
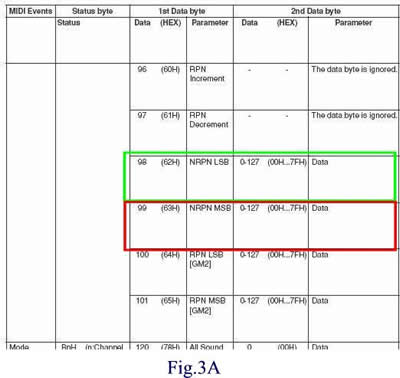 The
way we send the numbers listed in the NRPN Table to the keyboard is by way
of the Control Change message events found in the "MIDI Channel Message
(1)"
Table as shown in Fig 3A and 4A.
The
way we send the numbers listed in the NRPN Table to the keyboard is by way
of the Control Change message events found in the "MIDI Channel Message
(1)"
Table as shown in Fig 3A and 4A.
 When using these codes, remember to match
up the MSB bytes (Red) and the LSB bytes (Green) with each other.
When using these codes, remember to match
up the MSB bytes (Red) and the LSB bytes (Green) with each other.
These are channel Messages and they are to be entered in the channel (Track) and at the place where the events are to occur, which means these events can be entered more than once at different points along the track.
Since we will be changing the parameter of Drum events, we will first need to assign the drum set to the track, in this case using the "Standard Kit 1" on track 10. If you fail to assign a drum set for the track, the NRPN drum events for that channel (track) will be ignored.
 The
Parameter "Drum Reverb Send Level" (Blue box) from Fig. 2A will
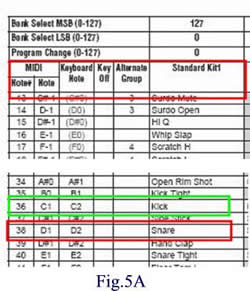
be the first parameter change explained here. The Reverb Send Level for the
Snare, MIDI Note #(38) or MIDI Note D1 as shown
in Fig. 5A from the "Drum/key Assignment List" in the Datalist
Manual, will be set to the max of 127. This would normally be way to much
reverb, but you will definitely notice the change when it comes into play in the demo MIDI.
The
Parameter "Drum Reverb Send Level" (Blue box) from Fig. 2A will
be the first parameter change explained here. The Reverb Send Level for the
Snare, MIDI Note #(38) or MIDI Note D1 as shown
in Fig. 5A from the "Drum/key Assignment List" in the Datalist
Manual, will be set to the max of 127. This would normally be way to much
reverb, but you will definitely notice the change when it comes into play in the demo MIDI.
It takes four Control Change messages for each complete NRPN Parameter change. One for the MSB part of the address, one for the LSB part of the address, one for the MSB Data byte to send to the new address and one for the LSB Data byte of the new address. Here are the four messages for the reverb max send level of the snare drum MIDI Note # 38.
MSB Address Message - B9 63 1D
LSB Address Message - B9 62 26
MSB Data Byte Message - B9 06 7F
LSB Data Byte Message - B9 26 00
(Numbers are Hex - letter H eliminated for clarity)
You will not have to enter all of these codes in most sequencing software programs, which I will demonstrate later in the article. First, here is an explanation of each of the messages above.
MSB Address Message:
B9H = Status Byte for Control Message on Channel (track) ten (10). Normally not entered in a sequencer.
63H = 99 Control for NPRN MSB Fig 3A. Red Box.
1DH = 29 for the MSB of the address byte. Fig 2A. Blue Box.
LSB Address Message:
B9H = Same as above.
62H = 98 Control for NRPN LSB Fig 3A. Green Box.
26H = 38 (rrH) for the Snare Drum Note # from Fig 5A.Bottom Red Box.
MSB Data Byte Message:
B9H = Same as above.
06H = 6 Control Data Entry MSB Fig 4A. Red Box.
7F>H = 127 (mmH) MSB Data Byte Fig 2A. Blue Box.
LSB Data Byte Message:
B9H = Same as above.
26H = 38 Control Data Entry LSB Fig 4A. Green Box.
00H = 0 No data byte is listeds Fig 2A. Blue Box. The entire LSB Data Byte Message does not have to be sent when there is no entry for it in the NRPN Parameter Table.
How to enter NRPN in the sequencer
Now you know how to find and assemble the data you need to use NRPN and it is time to show how to enter this code into your PC sequencer. The four PC sequencers I cover here are XG Works, Power Tracks, Cubase and Sonar. Right out of the starting gate the first thing you need to know is that the first three sequencers use real numbers instead of Hex code. You needed to know how to do the Real to Hex and back again because both numbering types are used in the Datalist. You Sonar users will want to have a calculator handy for your part.
The Drum-NRPN.MID file contains many NRPN messages for demonstration purposes, but only the entry of NRPN Code to change the "Level" setting of the Kick drum in each of the sequencers will be covered here because the other messages are just more of the same procedure.
The goal then will be to enter the NRPN code for changing the “Level” of the “Kick” drum in the Standard Kit 1 on Track 10 in each sequencer. Looking in the Datalist, the MIDI Note # for the Kick in the Standard Kit 1 is number 24H or 36 real number. Looking at the NRPN Table, we see that the Drum Level Parameter MSB number is 1AH or 26 real number. The “address” then is 1AH - 24H or in real numbers 26 - 36. The Level can be any number from 00H to 7FH or in real numbers from 0 to 127 and the level will be set at 6EH or 110 real number. Because the second data number is listed as blank in the Datalist, we will not have to enter that message.
The three messages then using real numbers: NRPN 99 - 26; NRPN 98 - 36; Data MSB 06 – 110
Enter NRPN in XG Works
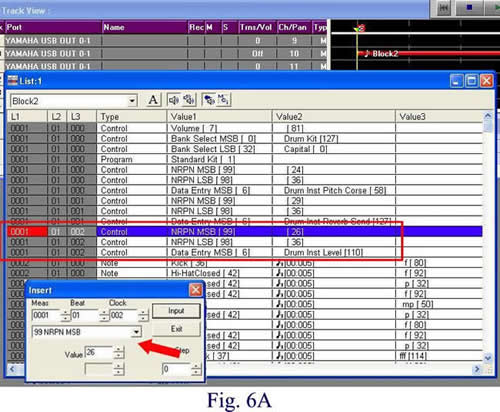 Looking at Figure 6A, which shows the List View for Track 10 in XG Works,
you can see clearly what the data looks like after it has been entered. To
enter the data, right click anywhere on the List View and select “Control
Change” from the Pop-up Menu. You will then see the Pop-Up “Insert Window”.
This window allows you to set the precise Bar, Beat and Clock position for
the event to occur in the track and using the drop down list (Red Arrow),
you select the Control to use, NRPN 99, followed by entering the value 26.
Repeat this procedure for entering the NRPN 98 and the Data MSB 06 entries.
That’s all there is to it.
Looking at Figure 6A, which shows the List View for Track 10 in XG Works,
you can see clearly what the data looks like after it has been entered. To
enter the data, right click anywhere on the List View and select “Control
Change” from the Pop-up Menu. You will then see the Pop-Up “Insert Window”.
This window allows you to set the precise Bar, Beat and Clock position for
the event to occur in the track and using the drop down list (Red Arrow),
you select the Control to use, NRPN 99, followed by entering the value 26.
Repeat this procedure for entering the NRPN 98 and the Data MSB 06 entries.
That’s all there is to it.
Enter NRPN in Power Tracks
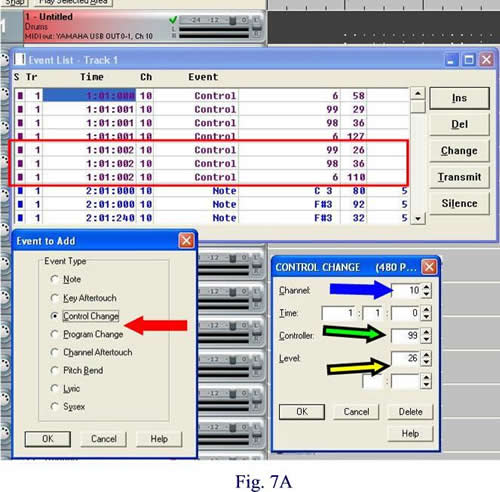 Looking at Fig. 7A, which shows the Event List for Track 1 Channel 10 in Power
Tracks, you can see whatthe data looks like after it has been entered.
To enter the data, click on the Ins button
in the upper right corner of the Event List and select Control Change
from the Pop-Up list. You will then see the Pop-Up “Control Change” Window.
This window allows you to set the precise Bar, Beat and Clock position
for the event to occur in the track and you set the Controller box, NRPN
99, followed by entering the value 26 in the Level box. Repeat this procedure
for entering the NRPN 98 and the Data MSB 06 entries. That’s all there
is to it.
Looking at Fig. 7A, which shows the Event List for Track 1 Channel 10 in Power
Tracks, you can see whatthe data looks like after it has been entered.
To enter the data, click on the Ins button
in the upper right corner of the Event List and select Control Change
from the Pop-Up list. You will then see the Pop-Up “Control Change” Window.
This window allows you to set the precise Bar, Beat and Clock position
for the event to occur in the track and you set the Controller box, NRPN
99, followed by entering the value 26 in the Level box. Repeat this procedure
for entering the NRPN 98 and the Data MSB 06 entries. That’s all there
is to it.
Enter NRPN in Cubase
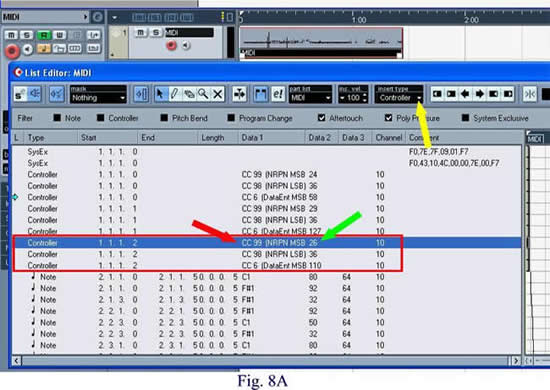 Looking at Fig. 8A, which shows the List Editor for Track 10 in Cubase,
you can see what the data looks like after it has been entered. To enter
the data, Select ‘Controller’ from the drop down list located at the Yellow
Arrow. Then, using the Pencil Tool, click in the
MIDI
window on the right at the location where you want the first event. You will
be able to edit the location, Data 1 (Red Arrow) and Data 2 (Green Arrow)
by clicking on them with the mouse and change to the numbers you want. Just
enter the real numbers and that’s it.
Looking at Fig. 8A, which shows the List Editor for Track 10 in Cubase,
you can see what the data looks like after it has been entered. To enter
the data, Select ‘Controller’ from the drop down list located at the Yellow
Arrow. Then, using the Pencil Tool, click in the
MIDI
window on the right at the location where you want the first event. You will
be able to edit the location, Data 1 (Red Arrow) and Data 2 (Green Arrow)
by clicking on them with the mouse and change to the numbers you want. Just
enter the real numbers and that’s it.
Enter NRPN in Sonar
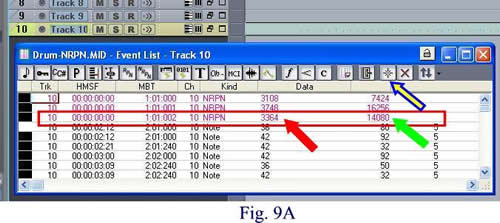 Looking at Fig. 9A, which shows the Event List for track 10 in Sonar,
you can see what the data looks like after it has been entered. Your first
thought might be – “Whoa! This doesn’t look anything like what I am prepared
to deal with”.
Looking at Fig. 9A, which shows the Event List for track 10 in Sonar,
you can see what the data looks like after it has been entered. Your first
thought might be – “Whoa! This doesn’t look anything like what I am prepared
to deal with”.
I think those guys at Twelve Tones must have ”Twelve Toes”. Relax – it’s not as hard as it looks. You first enter a new event by clicking on the Icon indicated by the Yellow/Blue Arrow. This will enter a duplicate of the event highlighted in the list at the same location. You can then change the location (MBT), Event Kind, Data and Value by clicking on the item to change and entering the correct numbers for the event desired.
So how do you get the numbers shown in the Figure? The first large number (Red Arrow) is found by taking the (MSB) of the “Address”, real number (26), multiplying it by 128 and adding the (LSB) of the “Address”, real number (36), – giving (26 X 128) + 36 = 3364. The second number (Green Arrow) is found by doing the same thing with the two Data Bytes. Taking the MSB data byte (110), multiply it by 128 and add the LSB Data byte if it exists. In this case we have (110 X 128) + nothing = 14080. Just remember, the MSB byte is always multiplied by 128 and you add the value of the LSB to the result of the multiplication. That’s the way it’s done in Sonar.
The Drum-NRPN.MID file
The included MIDI file has only a Drum track 10 with many NRPN entries for demonstration purposes. The first set of NRPN messages lowers the coarse pitch of the Kick drum by 6 semi-tones. The second set of NRPN messages changes the Reverb Send Level of the Kick Drum to Maximum of 127. The third set of NRPN messages set the Drum Level of the Kick drum to 110.
Then at Bar 7, Beat 1, Time 362 the pitch of the snare Tight is raised by 6 semi-tones. This changes is very audible when you run the MIDI . Then at Bar 7, Beat 3, Time 1 Reverb Send Level for the Snare tight is raised to maximum of 127.
Then at Bar 11, Beat 3, Time 1 the pitch of the snare is set back to normal. Now comes an interesting part of NRPN not yet discussed, notice at Bar 12, Beat 3, Time 240 only the Data byte has been entered. What happens in this case is that the Data bytes will continue to change the value for the last NRPN address entered, in this case the coarse Pitch for the Snare Tight is raised 2 semi-tones. Then at Bar 12, Beat 3, Time 360 Snare pitch raised 2 more semi-tones and the lowered back to normal pitch at Bar 13, Beat 1, Time 0. More Snare pitch changes in Bar 13 and then at Bar 14, Beat 4, Time 360 the Kick EG Decay Rate is set to 110.
Summary
You should now be able to find and use the NRPN for your keyboard. Keep in mind that NRPN can mess up keyboards of other manufacturers. The codes we have discussed and that are used in the demo MIDI are fine for all the PSR keyboards. If you have a midi file that is causing your keyboard to crash, it may well contain NRPN code intended for a different brand keyboard. Now you know how to find it in your sequencer and delete it, if need be.
This page updated on May 20, 2021 .