Why is this specifically about the PSR-3000?
Sadly, the 3000 lacks the special MFC10 facilities found on the Tyros and other keyboards. Here, for example, is the Tyros screen:
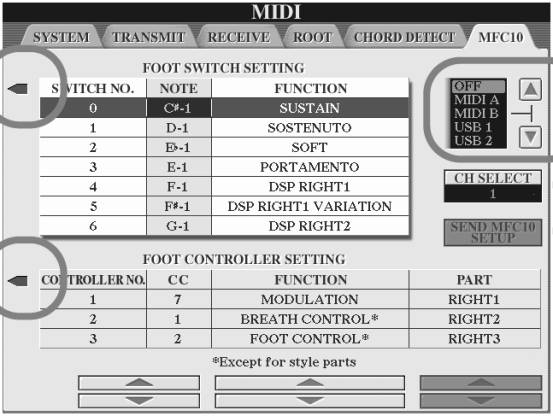
As you can see, this simplifies things a lot for those with a Tyros, and makes it possible to deploy a large number of functions on that keyboard using the MFC10. Sadly, those extended options don’t exist on the 3000, so all we can do is try and program a few MIDI messages into the MFC10 that will be understood by the keyboard.
So this lesson is all about making the most of what’s available for 3000 owners: if you do own a Tyros or other keyboard with special provision for the MFC10, then congratulations (and goodbye — you won’t need what follows).
MFC10 Options with the 3000
 I
will discuss the foot switches first, and then move on to the pedal.
I
will discuss the foot switches first, and then move on to the pedal.
The MFC10 is designed as a general-purpose MIDI controller, and there are some commands that can be sent that will natively be understood by the 3000. I conducted a few experiments (resulting in the need for several System Resets), but so far I have not been able to find any options other than the ones shown in the MFC10 manual. Here, for your convenience, is the table to which I refer. This is for “Section Control (F0) STATUS=F0]”
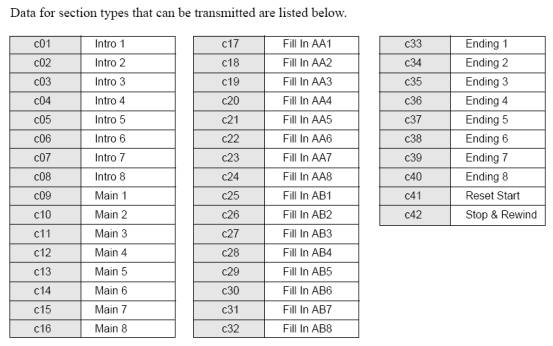
So the usable commands (for the 3000) seem to be:
- Main Variation 1 - 4 (with fill) [c17 - c20 in the above chart]
- MV 1 - 4 (without fill) [c09 - c12]
- Break [c25 — not immediately obvious!]
- Intro 1-3 [c01 - c03]
- Ending 1-3 [c33 - c35]
Obviously, it’s entirely up to you which of these you feel you need, and how you want to assign them to the foot switches on your MFC10. I’ll describe my choices as an example, but you will need to vary the options to suit your taste.
Deciding Which Switches to Program
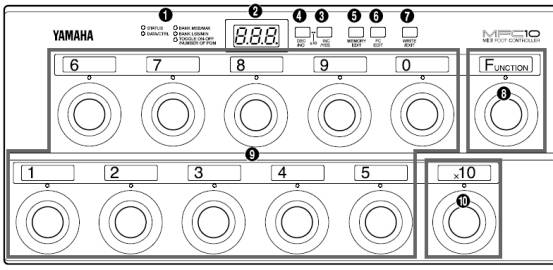
There are effectively 10 switches (1 - 5 on the front row, 6 - 9 and 0 on the back row) that can be usefully programmed, using the commands shown above, for toe-touch actions.
- Since it’s probably the most important function, IMHO, I assigned the Break command (c25) to foot switch 5. (I originally wanted it to be switch 1 and then the four variations assigned to switches 2 - 5, but discovered in practice that whilst playing it was irritating in the heat of the moment to have to remember to add one — i.e. hit switch 4 for MV3 — so I moved Break to the right-hand end of the front row).
- I therefore decided to use switches 1 - 4 for Main Variation (with fill) #1 to #4 (c17 - c20)
- I decided to be able to arm endings 1 - 3 (c33 - c35) and intros 2 - 3 (c02 - c03) using the five switches on the back row. The back row switches are that little bit harder to reach, which is why I put the commands I will be using most often in the front row.
You might want to make yourself a simple diagram similar to the one below before you start, so that you’re clear in your mind which codes are being programmed to each foot switch:
6 7 8 9 0
c33 c34 c35 c02 c03
1 2 3 4 5
c17 c18 c19 c20 c25
OK, having decided what to put where, it’s simply a matter of programming your MFC10 to make it happen.
We use Function commands to do this (so make sure the red light by the Function key is permanently on, and –- very obviously — that there is a MIDI cable between the MFC10 MIDI out and the 3000 MIDI in).
So (having ensured that Function mode is on) follow these four steps for each foot switch in turn:—
- Press the foot switch to be programmed (the red LED comes on and the display shows "F" + the footswitch number)
- Press the Memory Edit button and use the Inc or Dec buttons to change the status to F0 (if required)
- Press Memory Edit again and use Inc/Dec to change the data to the c-number for that particular switch (as shown on your diagram, if you made one)
- Press the Write/Exit button (the display starts blinking) and finally the Inc/YES button to save the setting
That’s all you need to do, so now you can go ahead and test it.
Be aware, of course, that if you tap switch 1 to arm Main Variation 1 and then subsequently override it by pressing MV2 but from the keyboard, the red light on your MFC10 will still be on above switch 1, since that’s the last command you sent from there.
One final practical comment about the toe switches — if you have large feet, and/or your shoes have thick soles, then you may find the foot switches a little lacking in feel. If you don’t mind about the possible damage to your street cred, or if your feet are invisible to the audience, then you could always try the old pipe organists’ trick of playing in slippers. You’re unlikely to encounter the only problem with that technique: I can recall occasions when the church was so cold that I began to lose all feeling below the knee, but hopefully you won’t be playing in very low temperatures! (Your 3000 probably wouldn’t like that, either).
Programming the Pedal
I originally wanted to be able to use the pedal to control the volume of the whole 'board, but in spite of considerable time spent trying, I was unsuccessful: without the specialist MFC10 page as featured on the Tyros and elsewhere, this seems to be impossible. But, on the other hand, the Yamaha FC7 foot controller does a splendid job, and perhaps is the obvious way of achieving that result. (If you would like to see whether you can succeed where I failed, however, a brief summary of my attempt is given in the Appendix as a starting point — do let me know if you manage to get it right!).
But it seemed a waste not to assign the pedal to something: so after reviewing a few possibilities I decided to assign it to Pitch Bend (heel down = pitch down). I subsequently discovered that I very much like controlling this effect from the pedal since I find that the result is a lot smoother (probably because I’m not snatching my left hand back to the keys again after stabbing at the pitch bend wheel).
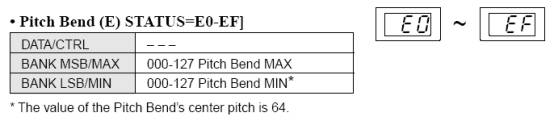
Page 23 of the MFC10 manual tells us —
So to assign Pitch Bend to the pedal, the method is as follows (still in Function mode, of course) —
- Press FC EDIT to select Foot Control.
- Press footswitch 1 to select the on-board pedal as the one to be edited.
- Use the Inc or Dec buttons to select E0 (pitch bend information on MIDI channel 1, as shown above)
- Press FC EDIT to reach the data, which in this case is not applicable, so it displays as three dashes ( - - - )
- Press FC EDIT again and set the maximum value to 64 (i.e. no pitch change at all when the pedal is fully toe down)
- Press FC EDIT and set minimum to zero (i.e. reduce pitch when the heel is down)
- Press Write/Exit and finally inc/YES.
Obviously, if you would prefer to trigger the bend in other ways, you will need to adjust the above to suit. If, for example, you would prefer to use toe down to trigger a pitch up, then you would set the maximum value to 127 and the minimum to 64.
So far, so good — but you can’t test it just yet, since you first need to tell your 3000 what you expect of it. So go to the MIDI settings on the 3000 —
- Press the Function button and select MIDI
- Press Edit and tab across to Receive
- Change Part 1 from the default of ‘Song’ to ‘Right 1’
- Turn off Note, Control Change, Program Change, and After Touch - leaving just Pitch Bend.
OK, now you can test it.
Once you’re happy, it would be helpful if your 3000 will “remember” your MIDI settings so that you don’t have to re-enter them next time you switch on.
So —
- (Just to check) use Function / MIDI /Edit again and make sure that the settings are definitely the ones you want.
- Exit back to the previous (MIDI) screen and use the Tab key to move to User.
- Press Save, using whatever filename you like (I used "Pitch bend pedal" to give me chance of remembering what it was for).
OK, each time your 3000 wakes up it will now load those MIDI settings for you.
(I would imagine that the midi programming will probably have to be repeated after any major form of system reset, but I wasn’t too keen to try it — not after finally getting everything working the way I wanted it to).
One final but important practical point: with my chosen arrangement you
will have to be careful to always leave the pedal fully toe down whilst
you’re playing if you don't want Right 1 to be out of tune! ![]()
Good luck — hopefully, you can now keep your fingers on the keys for a bigger percentage of the time!
Appendix
Here is my (unsuccessful) attempt
to use the pedal for a universal volume control, just in case anyone wants to experiment in this area.![]()
I started with the MFC10: —
- Press the FC EDIT button to select Foot Control.
- Press footswitch 1 to select the on-board pedal to be edited.
- Use inc or dec to select b0 (control change command to transmit the information on MIDI channel 1)
- Press FC EDIT again to reach the data, then used inc and dec to select 011 (Expression - not Volume)
- Press FC EDIT twice more to confirm max (127) and min (000) volume settings
- Press Write/Exit and finally inc/YES.
I then started to explore the MIDI settings on the 3000 (see page 204 of the manual). To do this -
- Press the Function button and select MIDI
- Press Edit and tab across to Receive
- Change Part 1 from the default of Song to KEYBOARD
But the Style (accompaniment) sounds were constant at max volume regardless
of the setting of the pedal. ![]()
<sigh>
I wish you the best of luck — and if you’re experimenting in this area don’t be too surprised if you need a few System Resets to unfreeze your 3000!
This page updated on May 20, 2021 .