Note: if you would like to experiment with multi pad files, download my World of Dance.zip file. It includes the following files: a Multi Pad Library, Phrase Library, a collection of dance styles, demo registrations, demo MIDI files and this Tutorial.
I often like using Multi Pads with styles. They can serve as musical motifs that embellish, enhance, and even change the character of a style. After much trial and error, I began developing ideas on ways I could create and use Multi Pads for contemporary Dance, Trance, R&B, Hip Hop, Chill, and Ambient music on my PSR-S910.
The focus of this tutorial is on using Multi Pads in registrations as a principal method to arrange contemporary Dance music, which often incorporates many musical transitions throughout a song. To accomplish this, a complete bank of eight registrations is used. Of course, this method can be used for all genre of music as well. To effectively play Club Dance and Trance music on my arranger keyboard, I had to create my own Pads and organized them in a way that I could easily construct custom Multi Pad Banks to use with specific styles.
Limitations of Multi Pads
- A limited database of contemporary Dance/Trance Multi Pads to choose from.
- Pads can "Sync Start", but must be manually stopped using the buttons.
- No dedicated commercial software for creating or in-depth editing of Multi Pads.
- Shortcomings of Multi Pad playback:
- Simple On / Off controls.
- No fade-in, fade-out or cross-fading (Morphing) of Pads is possible.
- Lack of real-time control during playback.
- Lack of editing in the Mixing Console similar to style editing.
Free Tools for Creating and Editing Multi Pads
PSR Tutorial member Michael Bedesem has produced PadMaker, PadMaker-Midi, and MixMaster, which are designed to work specifically with our arranger keyboards. These programs allow you to both create and edit Multi Pads. You can find these programs and other utilities by Michael on the PSR Tutorial website here: http://psrtutorial.com/MB/bedesem.html
Creating Your Own Pads
Methods for Creating New Original Multi Pads
- Record Pads in Yamaha's MULTI PAD CREATOR (found in the DIGITAL REC MENU).
- Record Pads to an external sequencer.
- Make Pads from style files using PadMaker (PM).
- Make Pads from MIDI song files using PadMaker-Midi (PM-M).
- Record the output of a hardware or software arpeggiator as a MIDI song file.
A Database of Pads
Yamaha refers to Preset Pads as "Multi Pad Banks". A Multi Pad Bank consists of four individual Pads in a file with each Pad assigned to a different Pad button. As an alternative, I have created a database consisting of more than 400 individual Pads that I refer to as my Phrase Library. Each file contains only one Pad (phrase) that is saved to all four buttons. My initial focus on "Dance Pads" is due to the fact that Yamaha has not provided these types of Pads in our keyboards. I will continue to build my Phrase Library to include Pads for many musical styles as time allows.
The Phase Library allows me to quickly create custom Multi Pads to use with a specific style but they can also be selected and played in any combination during performance. The pan positions of the Pads are set to correspond to the physical layout of the buttons on the keyboard panel as follows:
- Button 1: mid-left
- Button 2: left-of-center
- Button 3: right-of-center
- Button 4: mid-right
Naming Conventions
Pad names consist of a two-letter-plus-number ID, followed by the Voice name used by the Pad. A file icon also helps identify the type of instrument used. An example is the MA01 Matrix.S314.Pad. This Pad is "Melodic Arp" number 1 using the Panel Voice "Matrix". The S314 icon represents a Synth Lead. The icons used are for the PSR S910 and it is possible that a Tyros or other keyboard model may display a different icon.
The Pads are organized in folders by 14 types that include the following:
| Arpeggios Choir & Synth Pads Chords Drum-percussion Finger-pick |
FX (special effects) Gate Pads Melodic Pads Pulsing Pads Pumping Pads |
Shakers Step Sequence Strumming Pads Techno-Trance |
How to Use the Phrase Library
Assembling Phrases to Create Custom Multi Pads
If you load a Pad (phrase) from the Library and select button 1 to start it playing, you can then load a second Pad and select button 2 to hear both Pads together (You must press the Start button on the Style player to sync the two Pads). You can continue this procedure and play Pads from four different Pad files at the same time; but it is only temporary. If you stop Pad 1 and then start it again, the Pad from the last file loaded will begin playing on button 1.
This technique allows you to try combinations of Pads before assembling them into a single file as a Multi Pad. Once you have identified the Pads you want to use together, write down the order that you want to save them to the buttons. You are now ready to assemble your new Multi Pad on the keyboard or it can be done on your PC.
Copying Pads on the Keyboard Using MULTI PAD EDIT
To make things a bit easier, I created a template named NEW PAD. I keep this template in a folder named NEW PAD on my internal User Drive. Individual Pads will be copied to the NEW PAD file. I temporarily copy the source Pad files I want to copy from inside the NEW PAD folder and delete them when I'm finished creating the new Multi Pad. Doing things this way will makes the assembly operation go a lot faster with fewer button presses.
 Figure 1 shows the USER tab in the MULTI PAD screen with nine Multi Pad Banks stored in the NEW PAD folder. Select the first source Pad you wish to copy from and press EDIT (button 8).
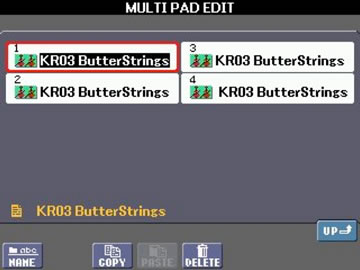 Figure 2 shows the MULTIPAD EDIT screen with each of the four multi pads in the KR03 ButterStrings Multi Pad Bank. Select the Pad button you want to copy and press COPY.
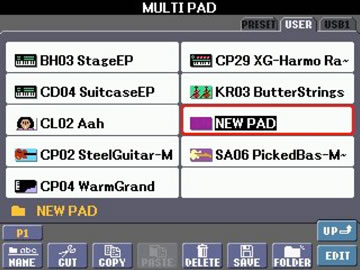 Now navigate to and select the NEW PAD Multi Pad Bank (Figure 3).
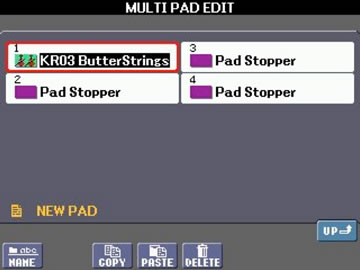 Press EDIT and select the button you want the Pad copied to and press PASTE (Figure 4).
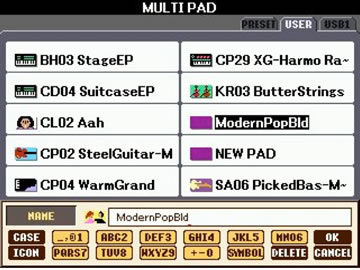 Now save the NEW PAD file with a different name. Figure 5 shows the Multi Pad Bank file being saved under the new name of ModernPopBld. Subsequent Pads will be copied to the new file. Continue the process until you have copied all four Pads.
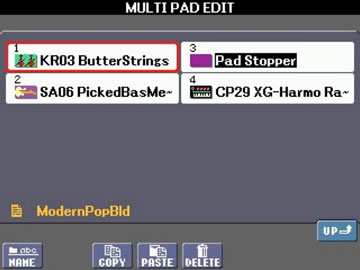 Figure 6 shows the final ModernPopBld Multi Pad Bank with 3 new multi pads stored.
Any button NOT replaced with a new Pad (button 3 in the example above) will have a Pad Stopper file assigned to it and be silent when played on the keyboard. The reason for this is discussed in the Section titled "Using Pads in Registrations" below.
Copying Pads on the PC Using PadMaker-Midi
When you load a Multi Pad Bank file into PadMaker-Midi, the pads are selected from the MIDI channels. Select the channel/Pad and set the Clip Length before copying the Clip to a button. Channels 1-4 correspond to buttons 1-4. The process is illustrated in the Figure 7 below. AU14 KickBass - MIDI Channel 1 is copied on Pad 1 (button 1). PM-M will automatically preserve the original Pad/Clipname and icon.

Load the next Pad/Phrase and follow the same procedure. Continue until all Pads are copied. If you want a Pad to be silent, load the NEW PAD file and copy any Clip to the button(s) you do not want to play. (See "Starting and Stopping Pads in Registrations".)

Fig 8. Above is a newly assembled Multi Pad created in PM-M. In this example, the new Multi Pad was loaded back into PM-M after being saved. The file name is displayed in the Title Bar at the top of the program window.
Using the Phrase Library during Performance
In addition to programming Multi Pads with styles in registrations, you can randomly select and load Pads from the Library in various combinations on-the-fly as a way to create to improvisations while playing along with styles.
Editing Pad Files
Multi Pad files can be edited using MULTI PAD CREATOR or PadMaker-Midi. Each has its strengths and weaknesses.
MULTI PAD CREATOR
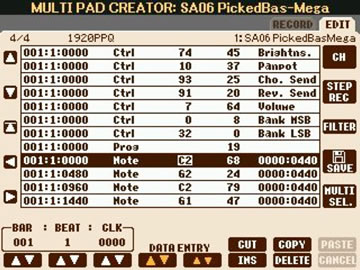 With MULTI PAD CREATOR (shown here) you can edit, insert, or delete any note. You can add MIDI control messages like Volume or Pan. MIDI messages can be inserted at any location in the Pad file. If you have a working knowledge of MIDI, you can for instance, add Expression, Resonance, Brightness, Attack, Decay, Release, Portamento, Sustain and other controllers to create nuances in the Pad playback.
When editing notes in MULTI PAD CREATOR, you will hear your edits as you make them. Note editing includes MBT (Measure-Beat-Tick), transposing notes by octave and semi-tone, gate time (note length), and note velocity. A major short-coming of MULTI PAD CREATOR is that there is no "global" editing of note data.
PadMaker-Midi
 With PadMaker-Midi you can easily make edits to Volume, Pan, Reverb, Chorus, and Brightness and select all or only a portion of the Clip in a user-friendly interface as seen above.
In the Main Screen (see above), PadMaker-Midi allows you to re-assign Pad locations when copying to the buttons and you can easily type-in Pad names and assign new icons before saving the file to disk.
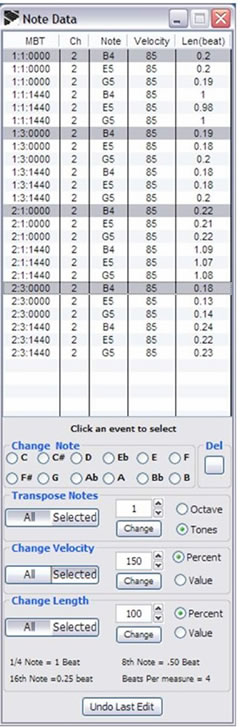
When editing in the Note View screen (shown at right), you will hear your edits as you make them. But unlike MULTI PAD CREATOR, PadMaker-Midi allows you to make changes to individual notes, a group of selected notes, or all notes (global) in a single operation.
Editing includes deleting notes, transposing notes by semi-tone or octave, changing note velocity and gate-time (note length) by a percentage amount or fixed value. The program also provides an option to "Undo last Edit" if you do not like the results or make a mistake.
Advanced Editing Techniques
If you are familiar enough with MIDI, you can insert many different kinds of MIDI messages to add variation and spice to your Pads. This can be done using MULTI PAD CREATOR or Michael Bedesem's MixMaster program on the PC. For example, you can:
- Animate Pads with multiple Pan, Expression, Brightness or Harmonic Content messages.
- Add DSP1 for additional effects processing.
- Insert Attack, Decay, or Release controllers to modify a Pad Voice.
- Add Portamento for special effects.
- Add Pitchbend to guitars, bass, and wind instruments.
- Insert blank measures to create variations.
- Combine two Pads into a single Pad to create a new Pad.
About the Demo Registrations
Starting and Stopping Pads in a Registration
A short-coming of our keyboards is the inability to both sync start and sync stop Multi Pads when selecting a registration. In order to accomplish this, I use a Pad Stopper file in the NEW PAD template. The Pad Stopper file is saved to each of the 4 buttons. The Pad is made up of a very short single C note with velocity, Volume and Expression set to minimum values. The Chord Match and Repeat switches are set to off. The result is that when Pad Stopper has been saved to a button the silent note plays once and the Pad then stops. The effect is that no sound will be heard.
The principal technique used in my demos is to set the Multi Pad Sync Start for all four Pads before memorizing and saving each registration. This method allows Pads to start and stop each time a registration is selected and eliminates the possibility of any individual pad playing when it is not wanted. When a registration is selected, individual Pads or multiple Pads will start or stop with the next chord played by the left hand.
Installing the Demo Registrations
IMPORTANT: My demo registrations have been converted to work properly on the Tyros 3, Tyros 4, Tyros 5, PSR S910, PSR S750 and PSR S950. Due to the limited number of Panel Voices, no support for SFF2 (SFF GE) styles, and the absence of the Multi Pad Sync Start function, my registrations are incompatible with keyboard models released prior to the Tyros 3. Before installing the demo registrations, please read the following installation instructions.
How to install
After you have unzipped the compressed file, open the main folder and you will see a folder named DEMO REG + MPad. The registrations and all files used by the registrations have been organized and setup on the USB 1 drive so they will work on different keyboards... as long as nothing gets changed.
- Do not change the name of any folders or files. Doing so will prevent your keyboard from finding the files used by the registrations!
- Copy the DEMO REG +MPad folder to the Root Directory of your USB1 drive.
- Use the J button to navigate to and open the DEMO REG + MPad folder. Select one of the registrations then EXIT.
- You will now be able to select any of the demo registrations using the Registration + / - buttons.
How the Registrations are Configured
When I setup the registrations, I kept in mind that I wanted to share them with others. Below is an overview of how I configured them. This is a good template for anyone wishing to do the same.
Panel settings that can be saved in a registration are found in the REGISTRATION MEMORY CONTENTS page. View Registration Memory Contents by pressing the Registration Memory button.
Recommended settings that should be saved (checked) from the GROUP SELECT menu include:
| SONG STYLE VOICE |
MULTI PAD HARMONY TEMPO |
TRANSPOSE SCALE |
Recommended settings that should NOT be saved in the GROUP SELECT menu include:
| PEDAL TEXT VOICE |
MIC SETTING AUDIO TEMPO |
OTS |
To preserve your personal settings for Split Points, Master EQ and Fingering when loading registrations created on another keyboard use the following procedure:
Press FUNCTION > UTILITY > CONFIG 1 > then scroll down to PARAMETER LOCK and check the box for these and any other parameters you do not want to change when a registration is selected.
The demos are setup to illustrate only some capabilities of the keyboard when using all eight registration buttons to arrange a song. Custom Styles, custom Multi Pads, and a few User Voices are used and saved in dedicated sub-directories/folders. It is for this reason the registrations were setup on the USB1 drive. And the registration folder must be copied to the USB1 drive AS IS to work properly.
The Style Sync Start and Multi Pad Sync Start / Stop technique is incorporated in all of the demo registrations. That means when you select any registration, the four Pad buttons will flash in time with the set Tempo. As noted above, newly loaded Multi Pads will start playing with the next chord played with the left hand. Previously loaded Pads may stop or continue, and additional Pads may begin playing.
Multi Pads are named and numbered to match the number of the registration selected. From the main screen you can observe which Multi Pads are loaded each time you select a new registration.
In the MIXING CONSOLE screen you can monitor changes in volume for some of the style parts. From the CHANNELS ON/OFF screen you will see some of the style channels turning on and off with each registration.
Because OTS is not used in the demos, be sure the OTS Link is set to OFF. AUTO FILL can be set to either ON or OFF.
Playing the Registrations
Registrations are the center-piece of our keyboards. This is where we can "arrange" a complete song. In each registration bank, registration #1 will play an Intro, and registration #8 will play an Ending with two exceptions, the Enoxy and Rekenium registrations use two full banks for a total of sixteen registrations. Registrations 2-8 and 9-15 will play the Main Sections and sometimes Multi Pads, and registration #16 is programmed with an Ending. You can toggle back and forth between Part 1 and Part 2 of the registration banks. In some registrations, a style Part may be turned-off and replaced by a chord, arpeggio, gated or pumping pad, or sequenced phrase. There are several examples of momentary changes to style Part and Voice settings in order to create variations and nuances within the arrangement.
Once a registration bank has been saved, registrations can be selected in any sequence desired and recorded to the MIDI on-board sequencer, an external sequencer, or recorded to the USB audio recorder.
The best way to grasp the Sync Start/Stop concept is to load my demo registrations and listen and watch what happens each time you select a registration. As noted above, some Pads will stop playing, while others continue, or are replaced with a different Pad. When a registration is selected the Pad buttons will continue to flash until you play the next chord with your left hand.
While the setups in my demos are fairly simple, far more elaborate programming can be accomplished by in-depth editing of styles using the MIXING CONSOLE, using variations of the same style, and creative editing and use of Multi Pads.
R1 and R2 Voices
Nearly all of the R1 and R2 Voices used in the demo registrations are Preset Voices with the exception of two User Voices in the Enoxy demo and two User Voices in the Rekenium demo. In many of the registrations I have "layered" R1 and R2 to create a new unique sound and/or a fuller sounding voice. The mix of R1 and R2 includes Volume, Pan position, Harmonic Content, Brightness and effects processor settings. R1 and R2 volume levels are programmed to match the soft and loud levels that are set for the styles with each registration button. Left voices were not used.
The Demo Songs
I have recorded some simple arrangements from a few of the registrations. There is no lead or melody line recorded so you hear only the styles and Multi Pads that are memorized into the registration buttons.
I hope you find my Phrase Library, Multi Pads, Dance styles and Demo Registrations interesting, and that they may stimulate ideas for creating your own song arrangements. The techniques used in my demos can easily be applied to all musical styles.
If the ideas presented here seem a bit complicated at first, I think you will find that these and other techniques get easier with practice. Our arrangers are incredible machines. I encourage you to experiment and try new things. You just might be surprised by what you can accomplish. I hope you will share your musical arrangements on the PSR Tutorial Forum. Music is the "universal language" that we all can understand.
My Styles – World of Dance
My custom Pads were created to work with and compliment my personal Dance styles collection. I spent many hours sorting through hundreds of styles that I have collected from the PSR Tutorial and other internet sources. The World of Dance is a remix of approximately 120 of my favorite dance styles that include Club Dance, Trance, Ballads, R&B, Hip Hop, as well as some traditional ethnic dance music from Europe, the Middle East, Asia, and Latin America. While the styles have been remixed on and for the PSR S910, they should play well on the Tyros 3 and newer keyboards with little or no editing necessary.
Many of the Multi Pads were created from my dance styles collection and are named after the style they were taken from. My Phrase Library was then built from my Multi Pads. A few Pads came from other sources such as a hardware arpeggiator, an LFO generator, or were edited versions of existing Pads that became a completely new Pad that no longer resembled the original.
Acknowledgements:
A sincere thanks goes to the following individuals who helped me directly and indirectly with my project:
Michael Bedesem: for his PadMaker, PadMaker-Midi and MixMaster programs. His software provides us the tools to be more creative and expressive in our music productions. A special thanks to Michael for incorporating suggestions for many new features and updates to PadMaker-Midi and MixMaster.
Jorgen Sorensen: for his Styles in YEP utility and various instructional documents that have helped me understand the architecture of Yamaha arranger keyboards and how to get the most out of them.
Many thanks to John K, Rick (Amiga1200), and Jan (Styles2psr): for their testing of my remix styles, custom Pads and review of this tutorial.
Murray Best: for his help with registration file conversion that enabled me to accurately convert my demo registrations to work on several Tyros and PSR keyboard models.
Joe Waters: for his ideas and suggestions on presenting and posting my project for download.
Demo original styles and remix styles Enoxy, Rekenium, ModernDisco, World Dance, and ReaggatonDJ are courtesy of PSR Tutorial Member Styles2psr. Thank you Jan.
Demo original style Moist Two is courtesy of PSR Tutorial Member ianmcnll. Thank you Ian.
Joe Hlifka
jhlifka@netzero.net
09 December, 2013
This page updated on May 20, 2021 .