The steps Gary outlines at several places in this article refer to operations on the Tyros or PSR-S models. I have added some additional material to illustrate the same steps carried out on the new touch-screen models with illustrations from the PSR-SX900. This additional material is highlighted with a light background as in this paragraph.
(May 1, 2010) -- Registrations are among the most powerful tools available on your keyboard. They are capable of storing an enormous number of command functions and use very little space. They can be stored in the keyboard's onboard memory, a floppy disk, a USB drive, and if available on your model of keyboard, on an internal hard disk drive.
What Is A Registration?
Much of the confusion pertaining to registrations centers around the difference between a Registration, and a Registration Bank. Yes, there is a difference.
-- A Registration is the command information stored under one (1) Registration [MEMORY] button.
-- A Registration Bank is the command information stored under eight Registration Memory Buttons.
What Information Is Saved In A Registration?
There are 10 parameter groups that can be saved to most PSR series of keyboards, and 11 or more in some Tyros-series keyboards. The list includes:
- SONG (midi file link)
- STYLE (onboard or User)
- VOICE (onboard or User instrument voice(s))
- MULTI PAD (onboard or User)
- HARMONY (instrument voice(s))
- TEMPO (style)
- PEDAL (functions you wish your foot pedals to perform when activated)
- TRANSPOSE (Master, Song, or Keyboard)
- SCALE (tuning scale of keyboard)
- MIC SETTING (all microphone settings)
All models since the Tyros2 include a TEXT group. The Tyros2/3 also include a LINEOUT and an HDR (Hard Disk Recorder) group. The PSR-S910 adds an AUDIO group.
How Do I Select The Information To Be Saved?
Press the [MEMORY] button on the right side of the keyboard. This will open the Registration Memory Contents Page. All of the above command function groups are listed on this page. They are activated by placing a check mark or tick on the box next to each of the commands. This is done by scrolling through the lot using the Data Entry Wheel, or pressing the bottom of the [#2] thru [#7] buttons at the bottom of the display, then using the top (On) or bottom (off) of the [#8] button to select or deselect the command function(s).
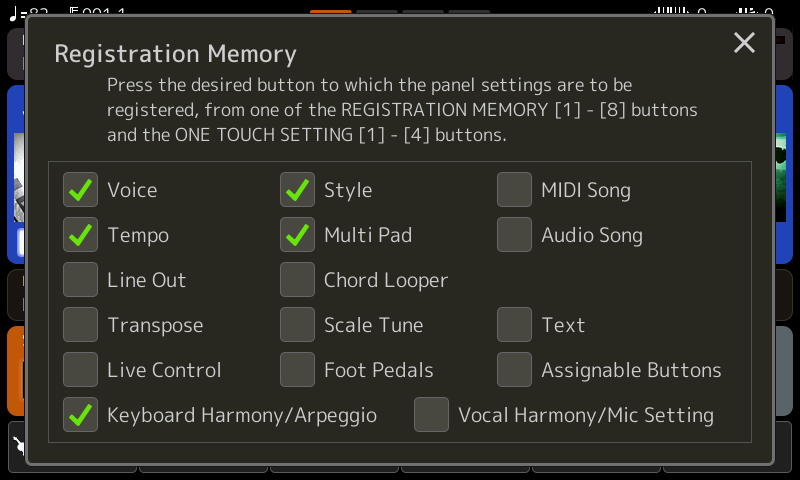 On the touch-screen models (Genos and PSR-SX900/700) there are more groups that can be saved. You select or deselect the groups to save by touching the box next to each group. As in earlier models, this screen appears when you press the [Memory] button.
Once the appropriate boxes have been selected, the next step is to select the location where you wish the command information saved. This can be any one of the eight Registration [MEMORY] buttons, which is saved by merely pressing the button. Keep in mind, however, the information is only saved temporarily — it is not permanent yet!
Saving the Registration Bank
The permanent save is not activated until you perform the following steps:
- From the keyboard's MAIN screen, Press the [J] button on the lower right side of the display. This will open the REGISTRATION BANK screen. You can also call up this display by pressing the [REGIST BANK] button found in many models in the Registration Memory set of buttons. If your model also has a [+] and [-] button under [REGIST], press both simultaneously.
- Press the [TAB] button and tab to the location where you wish to store the information, USER, CARD, USB, HD1, .etc.
- Select the SAVE option (bottom of the [#6] button) and a screen open to allow you to name your Registration Bank file.
- Using the [#1] thru [#8] buttons at the bottom of the display, provide the registration bank with a name. The name you provide will depend upon whether you saved a single song setup in each of the eight buttons, or whether you used all eight buttons for different parts of a single song. This procedure will be explained in more detail in the ensuing text. At this juncture, if you are new to creating registrations, or having some difficulty, I suggest naming each button with a Song Title. This can be changed at any time without losing the stored information.
- After naming the Registration Bank, select OK and the information is permanently stored.
On the PSR-SX900 and Genos
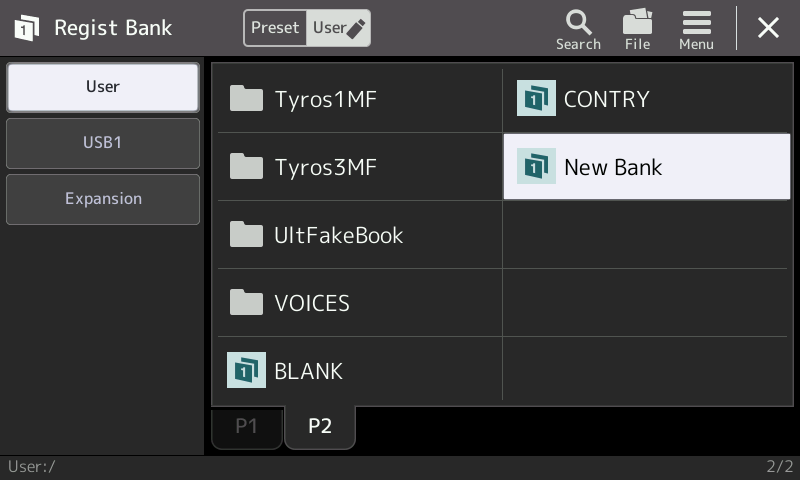
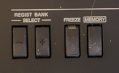 To save your registration file on the PSR-SX900 (or the Genos), simultaneously press the "+" and "-" Registration Bank Select buttons (or touch the Regist Box on the Home screen) to open up the Regist Bank screen. I started creating a registration using a blank registration file and the screen opens up with that file highlighted.
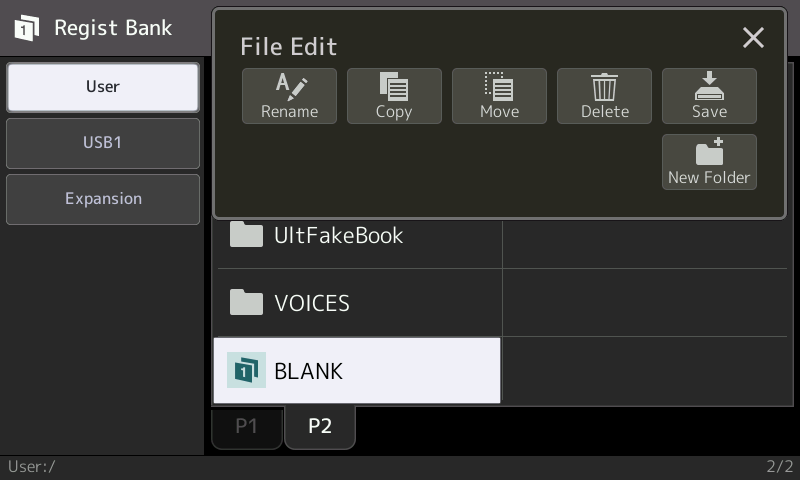 Now, press the File icon at the top of the screen to open up the File Edit box. You want to save your current registration file so you select the Save icon.
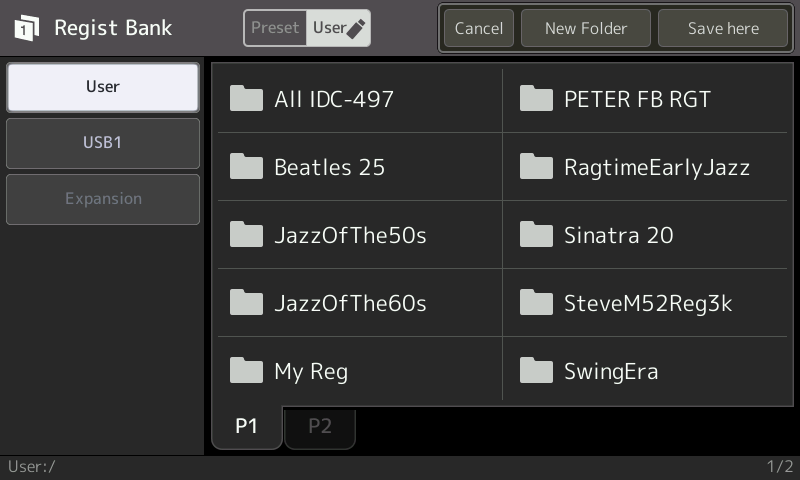 You now navigate to wherever you want to put your new registration file. This screen shot shows the User area with my three options: Cancel, New Folder, or Save here. I open up the "My Reg" folder, where I want to put this registration file, and then select the "Save here" option.
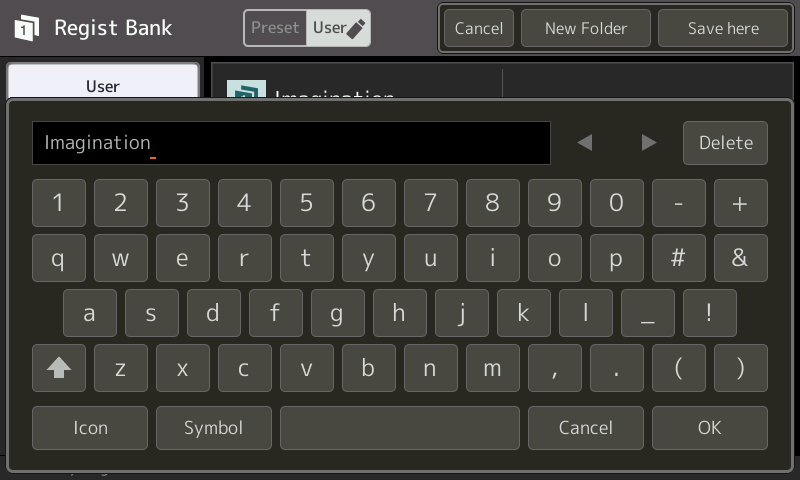 This opens up the typewriter keyboard. It shows the current name of your registration file and gives you the opportunity to change that name. In my case, the current name was "BLANK" -- an empty registration file that I used to create my new file. Use the Delete key to erase the current name and then enter a new name for your registration file. I was working on the song Imagination so I used that to name this registration bank. When you have completed the new name, touch the OK key to close this window and complete the save operation.
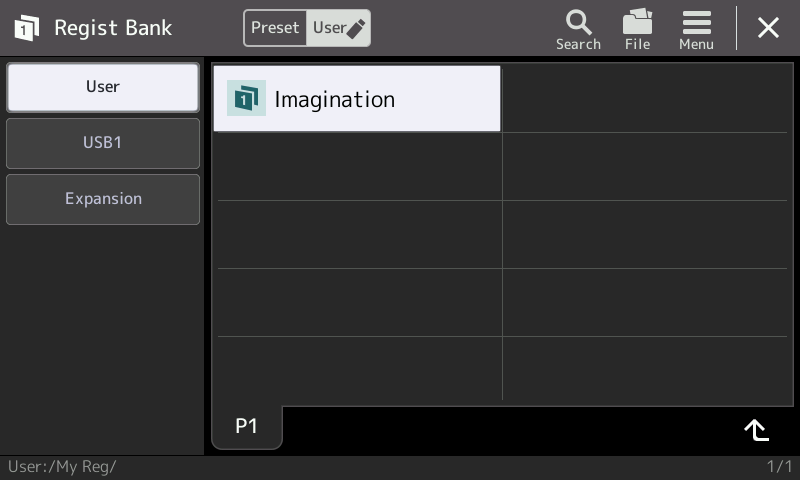 The registration file is renamed and saved in the "My Reg" folder. The path in the lower left part of the screen shows "User:/My Reg/". As you develop additional registrations for your songs, you can save them all here where they will be easy to find.
Creating A New Registration Bank
I suggest creating a special registration bank that will be used just to create a New bank of registrations, one where each of the 8 memory slots is blank and awaiting information. This is easily accomplished by performing the following steps:
- From the keyboard's MAIN page, Press the [J] button, which opens the REGISTRATION BANK screen.
- Select any previous registration file by pressing the button next to that registration. If you have saved your registrations in one or more folders, you may have to open the appropriate folder to get to the registration file you want.
- Select the SAVE option at the bottom of the screen (bottom of [#6]).
- When the REGISTRATION BANK's naming feature opens at the bottom of the display, use the DELETE option (bottom of [#7]) until all the characters in the name are deleted. Then, using buttons [#1] thru [#8], rename the registration bank as "NEW", and press OK.
- After renaming the bank, it will be highlighted on the REGISTRATION BANK page. At this point, press the EDIT button (bottom of [#8] on most keyboards), which will display information for each of the eight (8) individual registrations. All of the information from the previous registration bank will be on that page.
- Press the DELETE button (bottom of [#5] on most keyboards), select ALL, and press OK. This will temporarily remove all of the information from the current registration bank. It will not have any effect on the original registration bank, which is still stored under it's original name.
- After deleting the information on the NEW registration bank, press the UP button, which will return you to the REGISTRATION BANK screen. Then press the SAVE button at the bottom of the screen, followed by the OK button. A message box will open telling you that registration already exists and asking if you wish to overwrite the registration. Select YES and the "NEW" registration file will be overwritten. Now, you have a blank slate to create your new registrations from.
On the PSR-SX900 and Genos
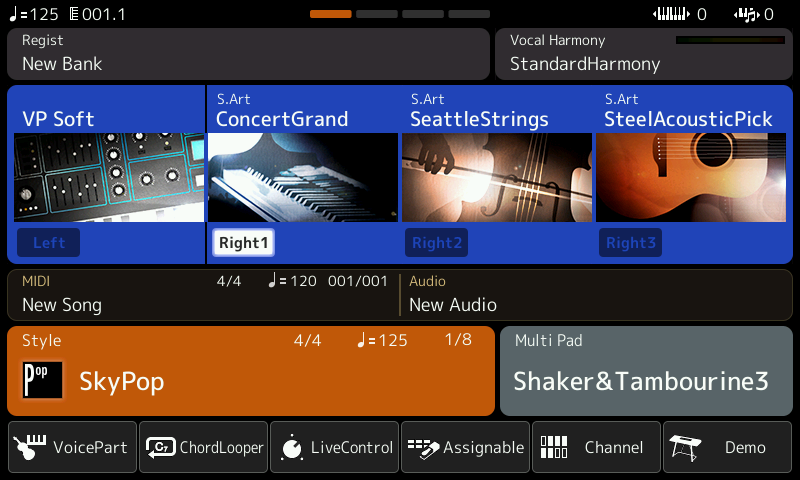 The easiest way to create a new, empty, registration bank is to hold down the B5 key (the 2nd key to the far right of your keyboard) as you power on your PSR-SX900. This will erase whatever was stored in the current registration bank and create an empty "New Bank" as seen on this home page.
 You might want to permanently save that "New Bank" so that you can call it up whenever you want to start with an empty registration. To do this, touch the Regist box to open up the Regist Bank window. Touch File to open the File Edit box. Touch Save to save the current registration file. The typewriter keyboard opens up to allow you to rename it. It shows 'New Bank" and you can keep that name, so touch OK. You now have this empty registration file in your User area.
![]() You can also convert any registration bank into an empty registration bank. Go to your Regist Bank screen and touch the File icon to open the File Edit box. Select Rename. Select any registration file. With the typewriter keyboard comes up, change the name to something that reminds you that this registration is empty. I choose the name "_BLANK" as seen in this screen shot.
You can also convert any registration bank into an empty registration bank. Go to your Regist Bank screen and touch the File icon to open the File Edit box. Select Rename. Select any registration file. With the typewriter keyboard comes up, change the name to something that reminds you that this registration is empty. I choose the name "_BLANK" as seen in this screen shot.
 You've renamed the registration, but you haven't emptied it yet. Select your renamed "_BLANK" registration file and then touch the Menu Icon right next to the File Icon in the Regist Bank screen. A new dialog box opens up showing several menu options. Select the Regist Bank Edit option. This shows you the names, if any, in your 8 registration buttons. This screen shot shows Buttons 1, 3, 6, and 8 have data. Select those four buttons by touching each one and then touch the "Delete" option to delete the contents of the button.
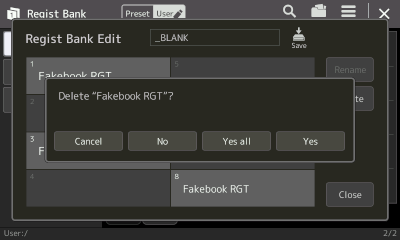 Since this permanently removes whatever is set in those four buttons, you are asked to confirm the delete operation. You can confirm each select registration button or respond "Yes all" to delete everything you've selected.
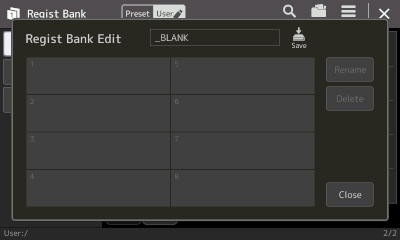 When that operation is done, you now have your empty "_BLANK" registration file. But you are not quite done. You've cleared the contents on the currently loaded file, but you must now SAVE that updated file to replace the original one. The SAVE option is conveniently located on the Regist Bank Edit screen. Touch that icon to save your empty registration file. You may want to keep this in your User area. If you inadvertently saved it elsewhere, use the File Edit Move option to move it to your User area.
Create A Startup Registration
A Startup Registration is one that instantly recalls pertinent commands that will be used every time you turn on the keyboard. This is among the easiest to create, yet it can be the most important registration. It will essentially tell the keyboard how you wish your foot pedals to operate and specialized settings for the keyboard's onboard vocal processor.
- From the keyboard's MAIN screen, press the [J] button and when the REGISTRATION BANK page opens select the "NEW" registration.
- Press the SAVE button at the bottom of the screen.
- When the naming feature opens at the bottom of the screen, hold down the DELETE button until NEW is gone, then rename the Registration Bank to "STARTUP" and press OK. Now exit to the MAIN screen.
- Press the [MEMORY] button, which will open the Registration Memory Contents page.
- Uncheck every box on the Registration Memory Contents page other than PEDAL and MIC SETTINGS — these two must remain checked. Then exit to the MAIN screen.
- Press the keyboard's [DIRECT ACCESS] button, then step on one of your foot pedals. (Be sure the pedal(s) are connected to the appropriate jacks.) This will open the CONTROLLER page, which will allow you to assign the functions you wish your pedals to perform. Once the functions have been selected, exit to the keyboard's MAIN screen.
- Press the keyboard's Mic Setting/Vocal Harmony button. This will allow you to select the type of vocal harmony you wish, and also select individual mic settings that are best suited for your mic and singing voice. After adjusting all of these parameters, exit to the keyboard's MAIN screen.
- Press the [MEMORY] button, followed by the first Registration Memory button [RM1]. NOTE: The only information (commands) that will be saved in this registration are PEDAL and MIC SETTING!
- Press the [J] button, which will open the REGISTRATION BANK page, press SAVE, OK and, when asked if you wish to overwrite the existing file, select YES.
- Press the [MEMORY] button and when the Registration Memory Contents page opens, UNCHECK the MIC and PEDAL BOXES, and recheck all of the other boxes. Now, exit to the MAIN screen.
This will allow you to create subsequent registrations without effecting any of your mic or pedal settings.
Additionally, upon turning on the keyboard, the very first registration you should load is the "STARTUP" registration. Pressing the first button [RM1] will instantly activate all of your specialized mic and pedal settings.
NOTE: Be sure to press the #1 Registration Button or the information will not be retrieved and features will not be activated. You would be amazed at the number of individuals that forget to press that single button.
Fred Smith authored a YouTube video called "How to create a setup registration" that shows you could use a registration to assign pedals, set the vocal harmony and microphone settings, etc. Many people create such a "setup" registration that they load every time they turn on the keyboard.
Creating STARTUP on PSR-SX900
 You've already created an empty registration like the "New Bank" or "_BLANK" discussed earlier. Load that registration. We will set the first registration bank to set your pedal and mic settings. Press the [Memory] button to bring up the Registration Memory screen. Uncheck everything except Foot Pedals, Vocal Harmony/Mic Setting, and Assignable Buttons.
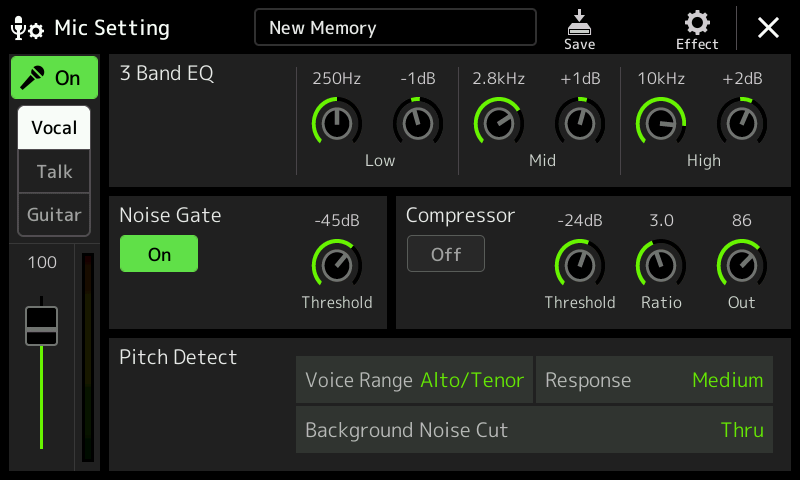
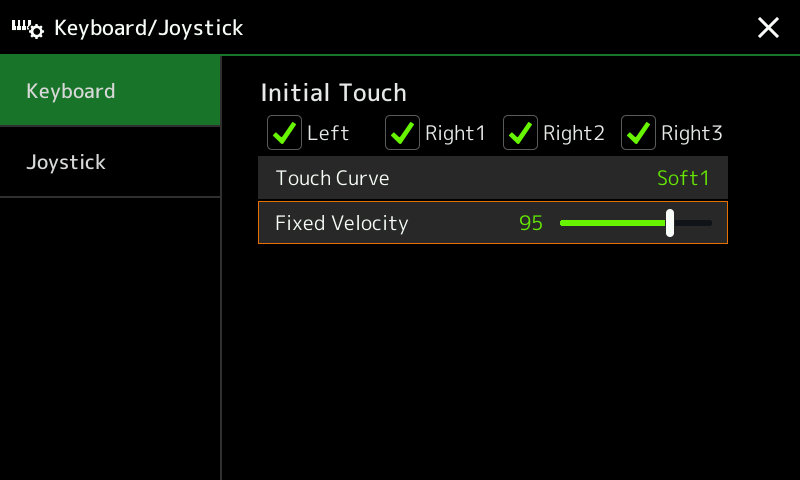
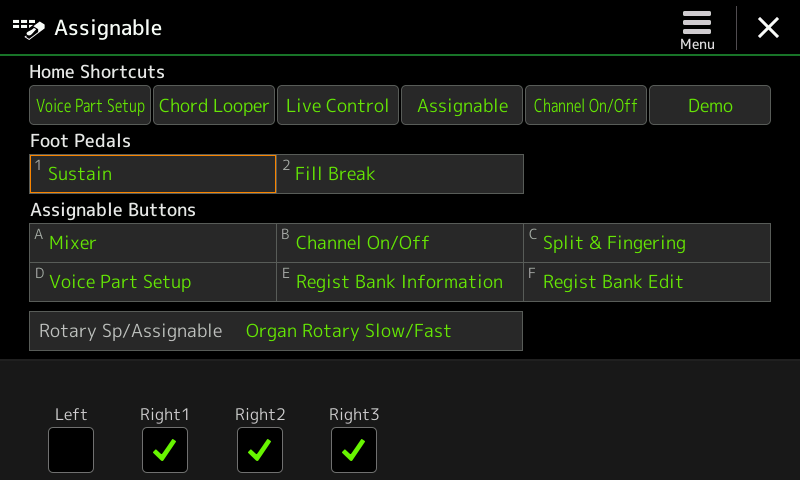
For your Mic Setting, press the Menu button and then touch Mic Setting to bring up the Mic Setting screen. If you want to set the split point at a specific point, you can bring up the Split & Fingering screen. You can also get to Vocal Harmony from this screen. Some users may also want to set the initial touch on your keyboard and that is done in the Keyboard/Joystick screen. The foot pedals can be set in the Assignable screen. Here are some of those screens where you set your preferences.
Once you have everything set up the way you want, press the [Memory] button and then the first Registration bank memory button. With all your settings now registered in RM1, it is time to save this registration file.
Go to the Regist Bank screen (by pressing the "+" and "-" buttons under Regist Bank Select). Touch File to open up File Edit and then touch Save to save your registration file. Change the "_BLANK" name, or whatever you used, to something like "STARTUP" and save it in the User area. Now when you turn your keyboard on, load "STARTUP" registration, press the first button, and your keyboard will be set up as you want it.
Create A Registration Bank For Eight Songs
There are two time-tested methods of creating registrations banks, both of which are used by professional entertainers throughout the world. Each has its own merits, and each are very effective at eliminating dead time between songs. The first, creating a single registration for each song, saves a total of eight custom song setups per registration bank.
The second method is to create an entire bank for each song. There are a huge number of options available for each method, and it would be impossible to cover all of them without writing an entire book on registration creation. Therefore, the following is merely a starting point, guidelines that will, hopefully, make creating registrations and registration banks easier.
- Press the [J] button, and when the REGISTRATION BANK page opens select the "NEW" registration file.
- Using the steps outlined above for renaming the registration bank, rename it to a specific music genre. For starters lets rename it to "COUNTRY1", press OK and exit to the MAIN screen.
- Now, select a country style from the style section of the keyboard. CountryPop would be a good one for a song I have in mind, City Of New Orleans by Willie Nelson. After the style has been selected, the keyboard should revert to the MAIN screen.
- Now, select the Intro, tempo, and style variation that you want to use.
- Select the various voices you wish to use, Right1, Right2, Right3, Left. You can also tune each of those voices using the Mixing Console.
- If you use the transpose feature, select the half-step you wish to use for that particular song.
- Be sure the accompaniment, Auto Fill In, OTS Link, Variation and Sync Start lights are on, and the Start/Stop light is flashing.
- Press the [MEMORY] button, which opens the Registration Memory Contents Page. Every box other than MIC SETTING and PEDAL should have a check mark (tick).
- Press the #1 Registration [MEMORY] button. The button should turn red.
- Press the [J] button on the lower right corner of the display, which will open the REGISTRATION BANK page.
- Press the EDIT button (bottom of the [#8] on most keyboards), which opens the REGISTRATION EDIT page.
- Press NAME followed by OK.
- When the naming feature box opens, rename the first registration to "City Of New Orleans," then press OK, followed by the UP button, which will take you back to the REGISTRATION BANK page.
- Now, press SAVE, OK and when you see the message that the file exists and do you wish to overwrite, select YES!
After filling each of the eight (8) registrations with songs, you now have instant access to those songs. Of course, after a while you may not remember what songs are in the "Country1" Registration Bank. However, this is not a problem because you can access the bank on the fly and by merely pressing the EDIT button on the lower right corner of the display you can quickly see what songs are contained within that bank. Then, when you are finished with the song you are playing and singing, you can press the button next to the displayed song and all of the information you saved will be instantly recalled. As soon as you press a key, the keyboard will fire up with the correct style, intro, tempo, variation, right hand voice(s) and left hand voice.
Now, if you wish to create another Country registration bank, merely press the [J] button again, select NEW, rename it to "Country2", and you're ready to go.
Create A Registration Bank For One Song
This particular option is not much different than using a single button for each song, but it does have one advantage. Every song will be in alphabetical order, with 10 songs displayed on a page. Again, we'll use the same song, City Of New Orleans by Willie Nelson, for demonstration purposes. The difference is that we will use the entire bank of eight buttons for this one song. Keep in mind that registrations DO NOT take up a huge amount of space, therefore, you do not need a massive amount of storage space to hold a huge number of registrations.
- Follow steps 1 thru 7 above to set up the keyboard for the song.
- Press the [MEMORY] button, followed by the first Registration Memory button [RM1].
- Press the [MEMORY] button, and UNCHECK every box other than VOICE and STYLE, then exit to the MAIN screen.
- Now, select new Right1, Right2 and Left voices that you feel would add variety and enhance the song.
- Press the [MEMORY] button, followed by the [#2] button. This will add those new voices, but, at the same time, will not have any effect on the performance while you are playing. You can add as many registrations as you feel necessary to switch variations and voices during the performance.
- Keeping track of the changes you made is easy. Just name the changes you made using the EDIT button.
- Press the [J] button, then save the entire bank as "City Of New Orleans."
Some folks like to use folders to save their registrations, which is OK if you have lots of time — most performers DO NOT. If you decide to use folders, I suggest naming them alphabetically, such as A thru C, then placing all the registrations (songs) beginning with the letters A thru C in that folder. Keep in mind that it is not necessary to use folders — it's just another option.
I hope this will help Yamaha arranger keyboard users in creating and modifying new and existing registrations.
Gary Diamond
Gary's Registrations -- Gary has provided a number of "Gig Disks" to the PSR Tutorial. You'll find these under Styles on Gary's Gig Disk Page. In addition to gig disk sets that are styles, there are some registrations there for PSR-2000 and PSR-3000 owners. Be sure to check them out
This page updated on September 19, 2024 .