While the Genos and PSR-SX900/700 models perform the same kind of file operatons as on earlier Tyros and PSR models, the touch-screen interface is very different. So I am providing a separate lesson on file operations using the SX900 to illustrate the various screens you encounter. Genos screens should be similar.
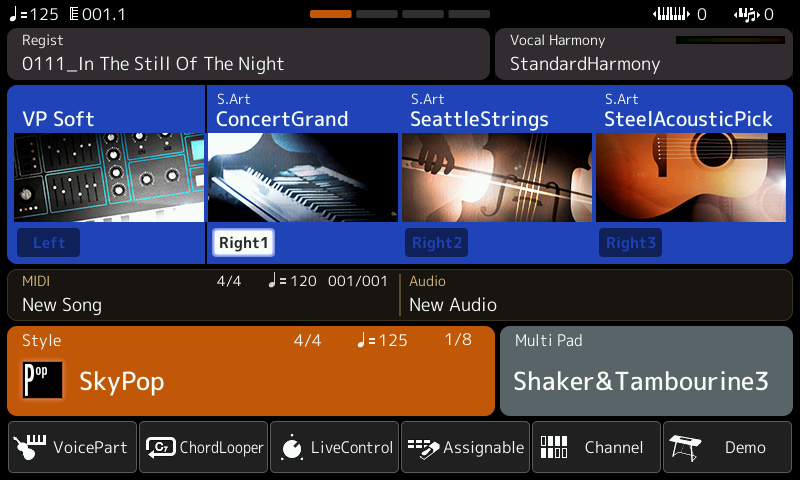 There is nothing on the initial Home screen that allows you to manipulate files. But, by touching various parts of the screen, you open up specific file selection screens.
For example, touching any of the voice boxes (Left, Right1, Right2, Right3) opens up a Voice selection screen. Touching the Style box opens up the Style selection screen, same for the MultiPad box (to the right of the Style box), the Regist box (top left), the MIDI box (above the Style box) and the Audio box (to the right of the MIDI box).
File Operations
![]()
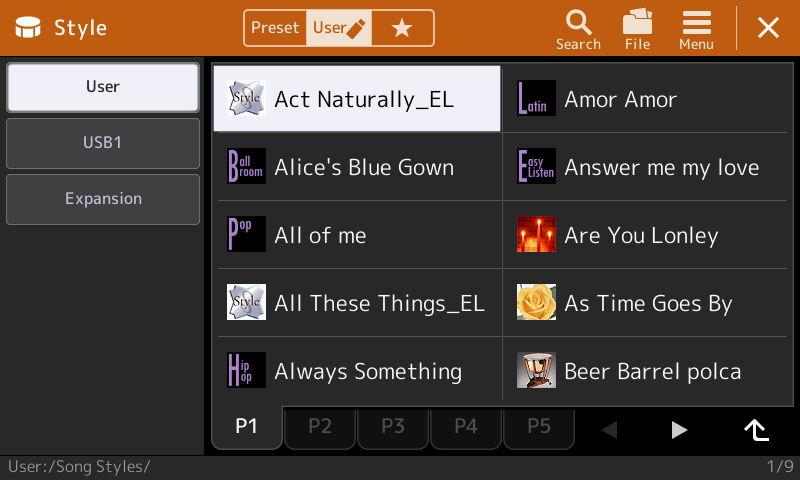
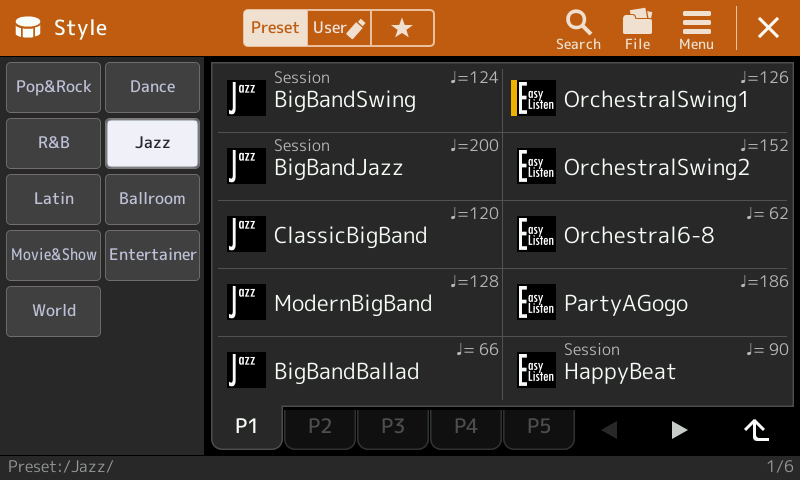 On every one of these file selection screens is a top line indicationg the type of file displayed. In this screen shot we are looking at the "Style" selection screen. Three possible storage areas: Preset (highlighted to show that it is currently selected), User, and a "star icon" for "Favorites" are shown in the center of the top line. Various file option icons are shown on the right side of the top line: (Search, File, and Menu). Finally, the "X" button is used to close the window.
The screen shot shown here is looking at Preset styles. These styles are stored in nine "folders" as indicated by the left-hand panel (Pop&Rock, ... World). The Jazz folder is currently selected. The right panel shows the styles, 10 at a time. This is the first page of 10 Jazz styles indicatee by the highlighted P1 tab at the bottom of the style listings. There are additional pages (P2, P3, P4, P5) that you access by pressing the particular page tab. There are 60 Preset Jazz styles. The right facing arrow takes you to the next, and final, Jazz page (P6).
The upward arrow moves you up one level. Pressing that will take you to a display of the 10 Preset folders. Selecting one of those highlilghts the folder in the left panel and displays the first 10 files in that folder.
You are limited on what you can do with any of the Preset style files. They are stored permanately in the folders in the Preset area. You can not add anything to the preset area or change any of the files stored there. However, you can modify a style by changing voices or tempo or volumes or whatever. That modified style can not be saved and stored in the Preset area, but it can be saved and stored in the User area. Let's look briefly at some of the file editing that is possible.
File Edit Options
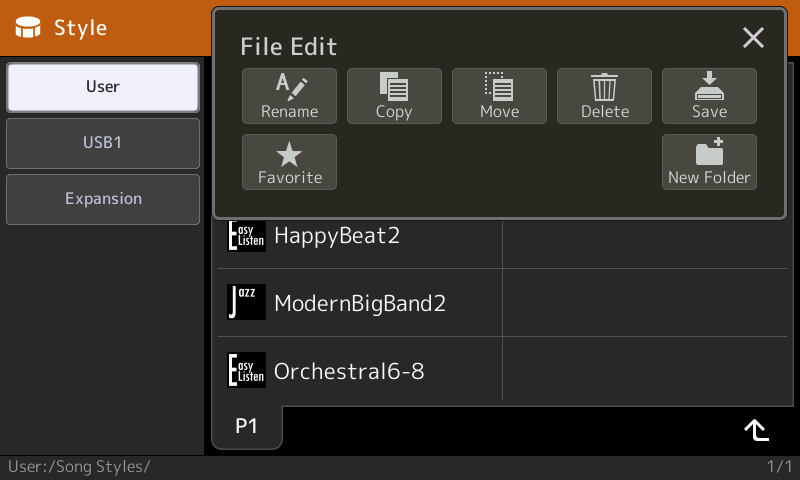
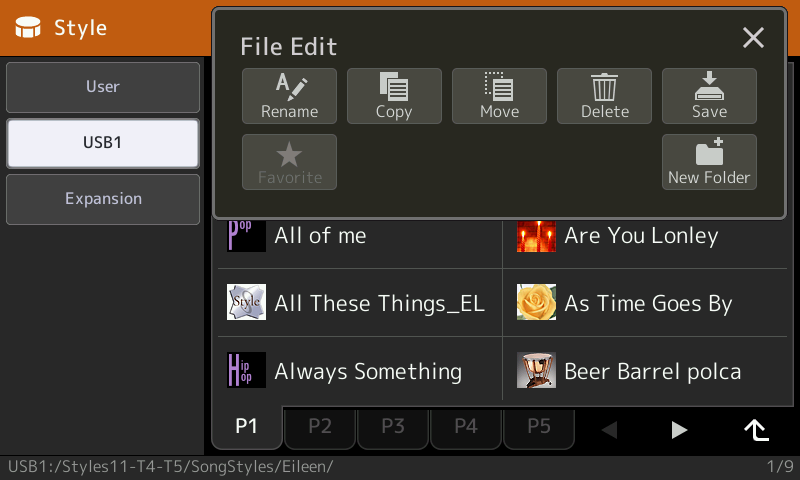
 Press the File icon shown on the top line. A File Edit box opens up on top of the Style selection screen. The file operations shown in this File Edit box are the same whether you are looking at styles, voices, multipads, registrations or songs.
For Preset styles, the only thing you can do is Copy or Save the file or mark it as one of your favorites. This Favorites option is only available for styles and voices. The four remaining file operations (Rename, Move, Delete, and New Folder) are dimmed out indicating that they are not available in this context. Since Preset styles are built into your keyboard, you can not rename them or delete them. And, of course, you can not create a new folder in the Preset area.
Copying Files
To illustrate the various file operations, let's examine some real life file operations and see how they are accomplished on the PSR-SX900. For the first exercise, we copy some Preset files over to a new folder in the User area.
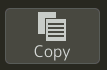
 If you want to modify any of the Preset styles, you would have save them in the USER area to preserve your changes. So, let's start by using the Copy option to put a copy of some styles in the User area. First, touch the Copy option to indicate the operation you want.
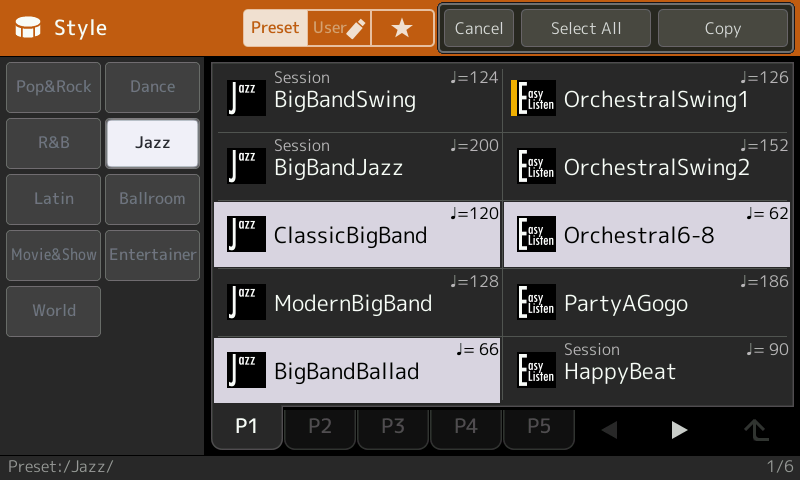
The next step is to select the file (or files) you want to copy. In this screen shot, three files are selected. You select a file by simply touching the file name. Touch the name again to deselect the file.
Note at the top of the page, your options now are to Cancel the operation, Select All the files, or Copy. "Cancel" quits this operation and takes you back to the previous screen. If you wanted to copy everything on every page, you could use the "Select All" option. For this operation we have selected three files and are ready to copy them. So, press that "Copy" option in the upper right corner.
My options at the top of the screen are now Cancel, New Folder, and Copy Here.
 I want to put these styles in the User area, so I touch User (next to Preset) and then touch the User area on the left. There are some folders already but I want to put these styles in a new folder, so I select New Folder.
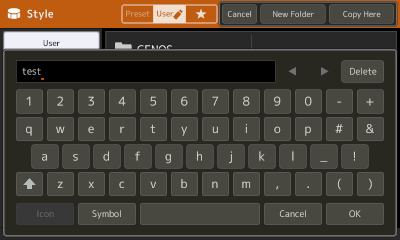
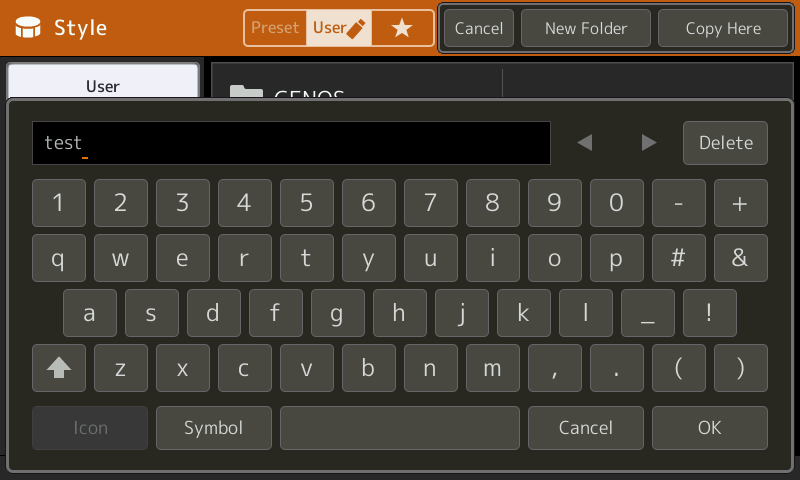
A typewriter keyboard pops up so I can enter a name for the folder. By default, the name "New Folder" is already showing. I use the Delete key to get rid of that name and enter "test" as my folder name by touching the keys on the keyboard.
The upward arrow next to the "z" key shifts up to Capital letters. The "Symbol" key converts the keyboard to display various symbols. The "Cancel" key lets you quit the whole process. When the folder name is completed to your satisfaction, touch the OK key to close the keyboard.
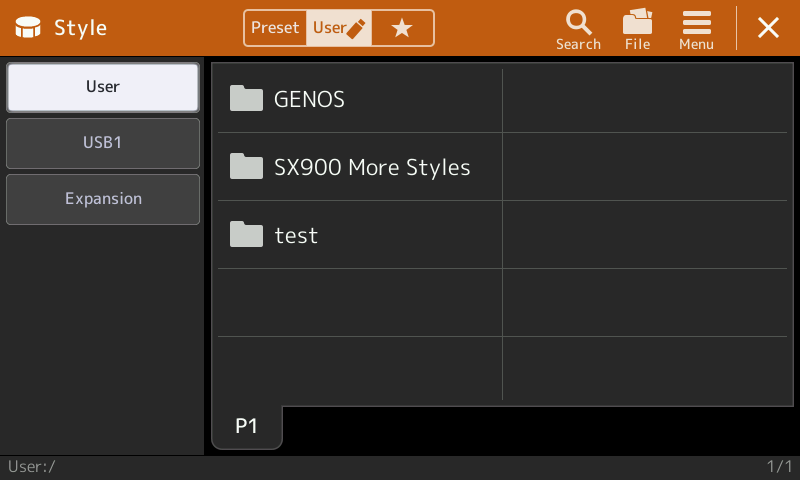
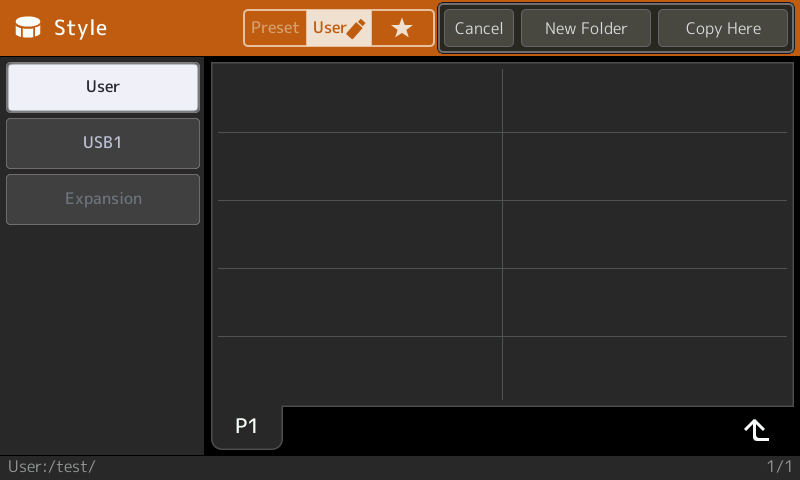 My new "test" folder in shown with the other folders in the user area. I touch that folder to open it up. It is, of course, empty since it is a new folder.
Remember, the path to where you are is shown in the bottom left corner. Unfortunately, that path is difficult to read, but on this screen it is shown as "User:/test/".
I am now positioned where I want the copied files placed. So, I press the Copy Here option to complete the copy operation.
Immediately, my three styles are copied to the "test" folder and I see them clearly in the window.
Let's review the steps needed to copy one or more style files.
- Go to the Style selection screen.
- Press the "File" option to open the File Edit window.
- Press the "Copy" option.
- Navigate to where the files you want to copy are located and select one or more files to be copied.
- When your files are selected, press the "Copy" option.
- Navigate to where you want to save these files.
- If needed, you can use the "New Folder" option to create a new folder for your files.
- When you are positioned where you want the files, touch the "Copy Here" option.
Saving A File
 The above example copied three preset files to the User area. How would the "Save" option have been different? Save applies to the currently loaded file. If you select a Preset style, it will be the currently loaded file on your Home page. Follow these steps to Save a file.
- Select the Save Icon from the File Edit Menu. The currently loaded file is selected. You can not select a second file. If you do, the second file becomes the currently loaded file.
- Navigate to where you want to save that file in the User area or on USB1. If necessary, you can use the New Folder option to create a new folder.
- When you are positioned where you want to save the file, select "Save Here."
- Unlike the Copy operation, when you are saving a file, you are given an opportunity to rename the file. A typewriter keyboard window opens up and shows the name of the file you are saving. You can leave it as it is, modify it, or type in an entirely new name. When you are done, press OK to close the name editing window.
- The file now appears in its new location with whatever name you entered.
Renaming A Folder
Let's consider another real world example. I have a collection files on a USB drive. There is a whole batch of styles there that I want to copy from the USB drive and store them in my User drive. Many Yamaha owners have external files obtained from the internet or other sources. Moving these files over to your User area is a common task for many owners.
For this exercise, I are going to rename my "test" folder to "Song Styles." Then, I delete all the current files in that folder. Finally, I navigate over to the USB drive and find a batch of external song styles (styles named after a song that they are suited for). I then copy those styles to my "Song Styles" folder on my User drive.
 My User area shows three folders as shown in this screen shot. I want to change the name of that "test" folder.
One would think I start out by selecting the "test" folder. Wrong! If I touch the "test" folder, it opens up that folder and shows the files in the folder.
To rename, the first step is to touch the "Files" option at the top of the Style screen to open up the File Edit window. From there, I select the "Rename" option.
 This opens up the current folder so you can select what it is that you want to rename. Until you select something, the only option available is Cancel.
I touch the "test" folder to select it and now the option to "Rename" is available. I touch "Rename" to continue this operation of renaming the "test" folder.
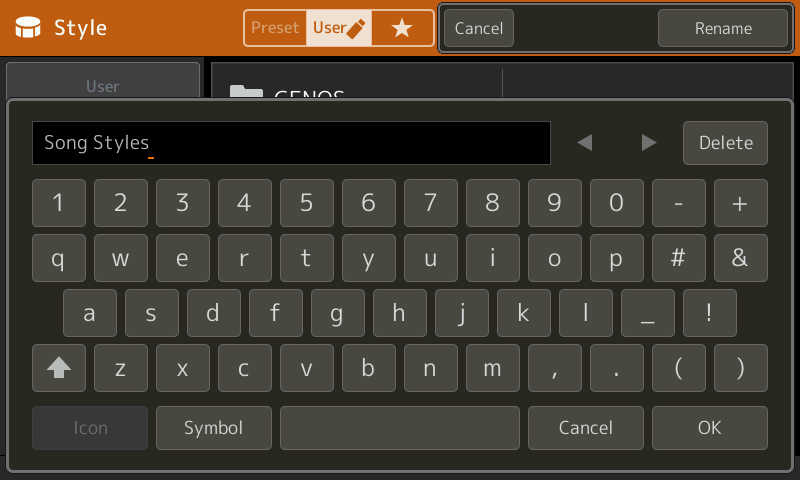 When you touch "Rename," the typewriter keyboard pops up displaying the current folder name ("test"). I use the Delete key to remove the characters in the current name. I then use the keypad to enter my new name. The "Shift" key shifts letters to uppercase. I used that to enter the capital letters in the new folder name, "Song Styles", which is seen in this screen shot.
With my new name in place, I touch OK to close the typewriter keyboard.
Deleting Files
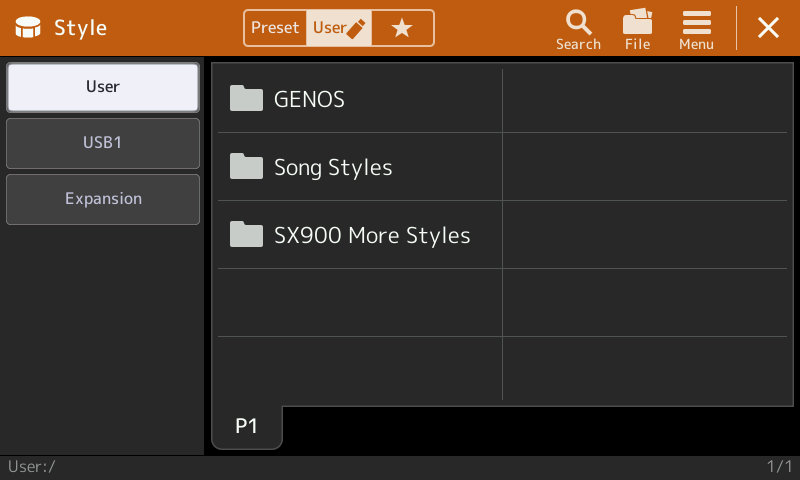 My User area now shows three folders. The "test" folder is now called the "Song Styles" folder.
If I touch the Song Styles folder to open it up, I see that it still holds the style files that were in the "test" folder. I don't want to keep any of the styles in this folder. They were copied from the Preset area so they are all still there.
Time to Delete them.
 The first step is to touch the "Files" option to open the File Edit window. Select the "Delete" option.
The screen now displays the contents of the current folder and gives you three options: Cancel, Select All, or Delete.
You now select the file (or files) that you want to delete by touching file names.
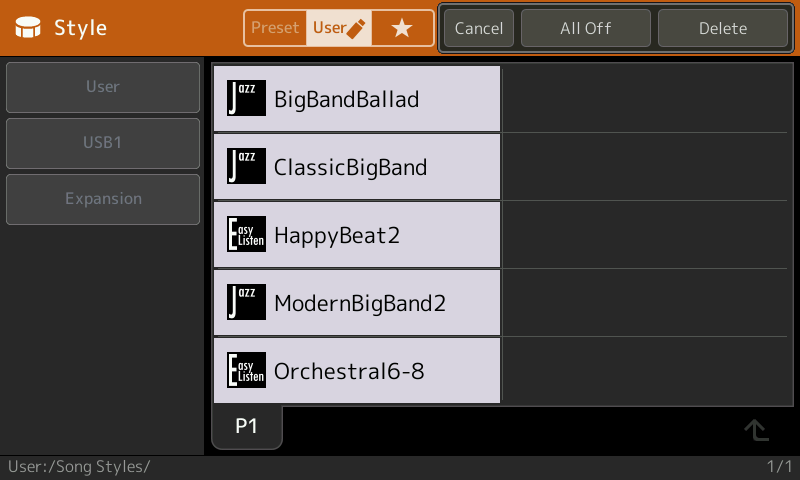 The folder showed only 5 files and I could have easily touched each one to select it. Instead of that, however, I tried the "Select All" option. All 5 files were immediately selected as shown in this screen shot.
Note the options at the top of this screen changed to: Cancel, All Off, and Delete. If you choose the "Select All" option, it switches to "All Off" so you can quickly unselect everything if needed. These are the files I want deleted, so I touch the "Delete" option.
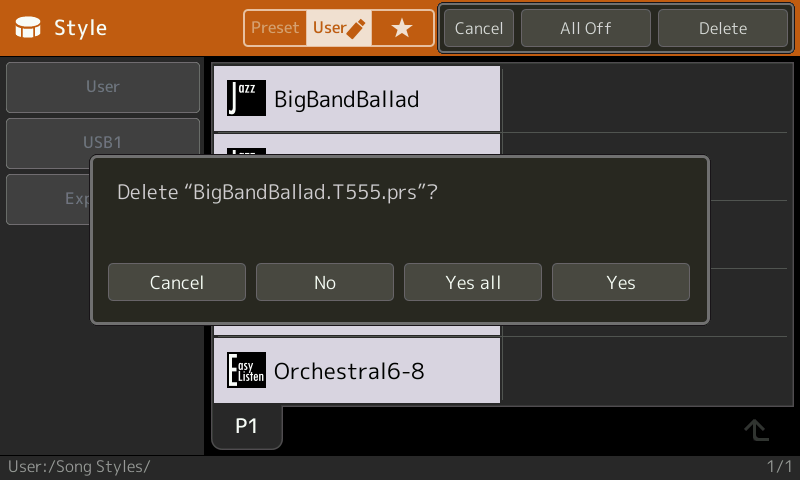 Deleting everything is an extreme measure. Once deleted the files are GONE forever! As a result, your keyboard gives you a chance to change your mind.
A dialog box opens up asking you to confirm that you want to delete each of these files. You can selectively answer "No" or "Yes" to each file or, if you are confident these all should go, you can respond "Yes all." If it really is a mistake, select that "Cancel" option.
 With the style files gone, the "Song Styles" folder is now empty and ready for you to fill it up with a bunch of song-styles.
Copying Files from USB1 to User
A crucial skill for many Yamaha owners is the ability to acquire and use styles from external sources, such as the internet or commercial providers. These styles often start on your computer and then are copied to a USB drive. That drive is plugged into your keyboard where you can easily access these files.
In this exercise, I illustrate how you can navigate through an external style collection, find styles you want and then copy them over to the User area in your keyboard. They are, of course, accessible in the USB drive, but only if that drive is plugged in. If they are moved to the User area, they are always available.
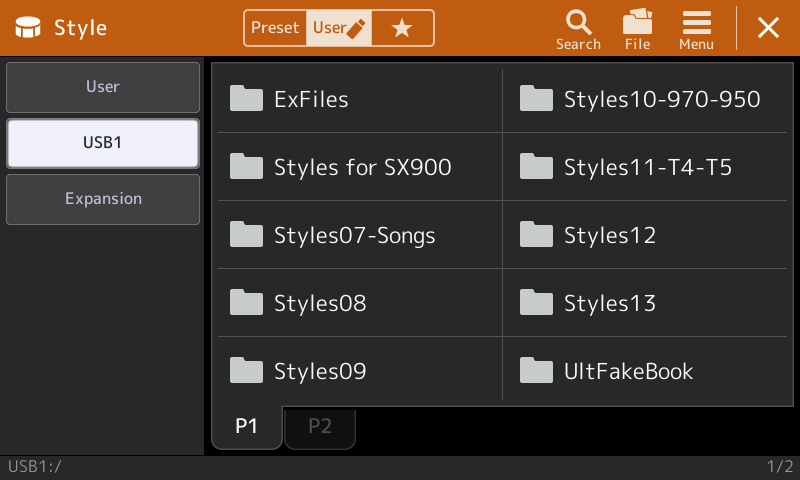 I have a 32GB USB drive with many of the Style Collections from the PSR Tutorial. With this drive plugged in, when I go to USB1, I see all the collections in individual folders.
These collections are very large with thousands of files contained in many folders and subfolders . To find individual style files often requires drilling down through several folders to find the files that will work on your keyboard.
 For this exercise, I extract some song-styles from the Styles11 Collection. Although this collection was developed for new Tyros4 and Tyros5 users, most of the files will also work on the PSR-SX900.
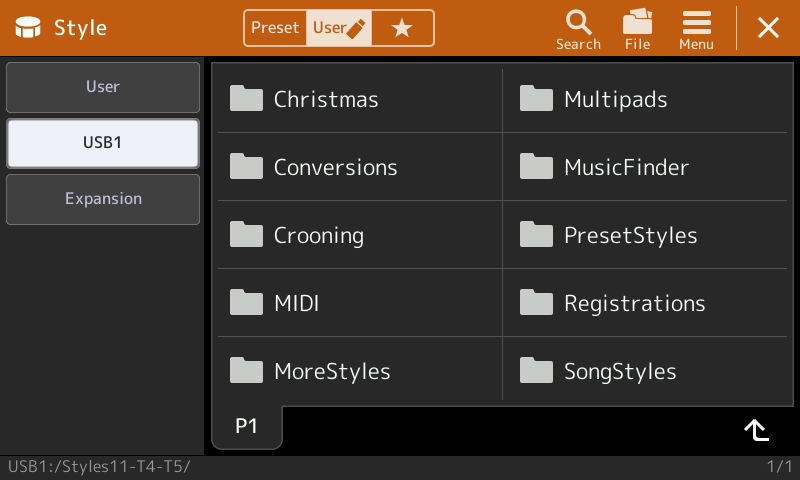
Touching the Styles11 folder opens it up to show 10 subfolders. This collection has a wide variety of files. Sometimes the folder name identifies the type of files included in that folder. For example, the "MIDI" folder holds midi files; the "Multipads" folder has multi pad files; "Registrations" holds, of course, registration files.
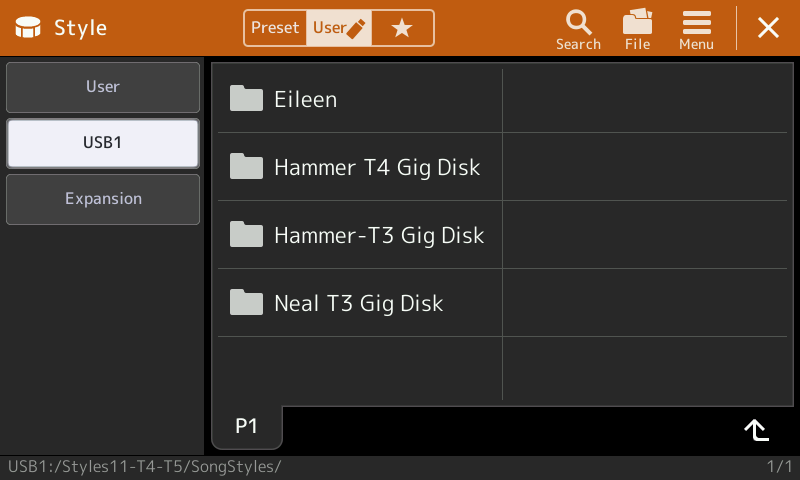 I'm looking for some song styles, so the logical folder to open is "SongStyles." That folder contains four subfolders indicating the source of these song-styles. One is from Eileen Lowry; Hammer's T3 and T4 Gig Disk styles are here, and the late Neal Saunders T3 Gig Disk styles are here. These collections can be found on the PSR Tutorial site under the Styles section where hundreds of additional styles are available from Eileen Lowry, Hammer (Deane Peters), and Neal Saunders.
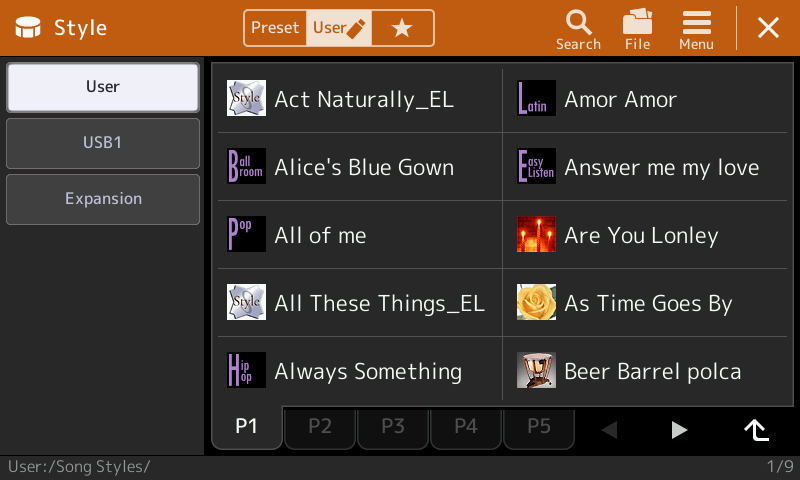
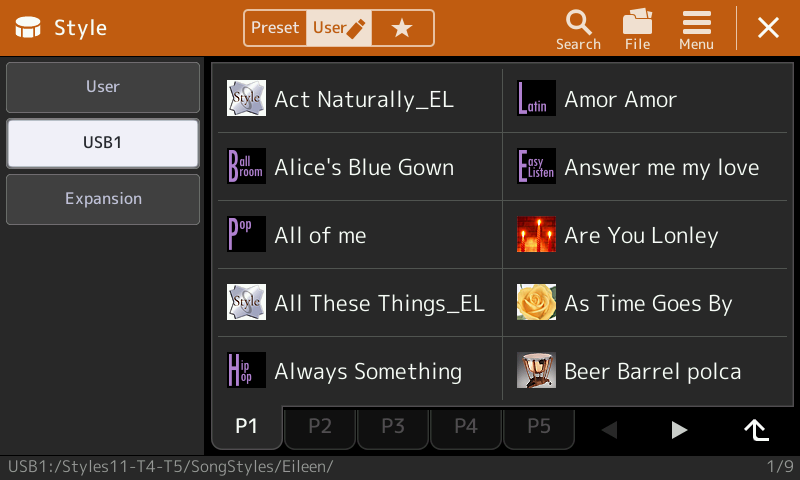 Opening Eileen's folder, I find the style files. These files are named after songs, but they are not songs. They are style files tuned to work well for the indicated song. How do you know they are style files? They are shown in the Style selection screen, which ONLY shows folders and style files. This is the first page P1 of styles. There are 9 pages of styles in Eileen's collection.
 You can try out any of these styles by simply touching the style. It will be loaded into your keyboard and appear on the Home page. When you touch that style from the Home page, it will open the Style selection with that style highlighted. After trying out several styles, I decide I want to move all of Eileen's song styles to my User area and put them in the Song Styles folder.
So, I touch the Files Icon to open up the File Edit box and then touch Copy to start the operation.
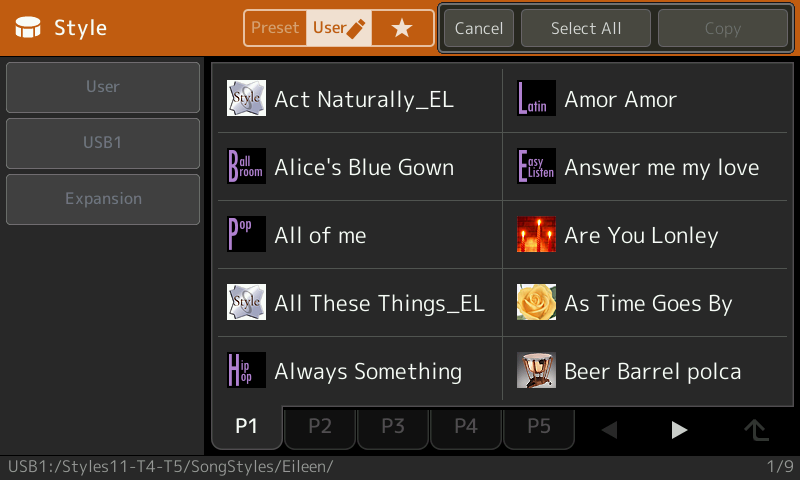 With 9 pages of files, this is a case where I definitely want to use the "Select All" option. When I do, ALL of the files are immediately highlighted. This screen shot shows P5. You can check any of the pages and see that, in fact, every file on every page is selected.
I now touch the "Copy" option to contine with this operation.
 I next navigate to the User area and touch the Song Styles folder to open it. It is currently empty.
I now touch the "Copy Here" option.
All 9 pages of the selected files are now copied to my Song Styles folder.
Moving Files
 Since I used the Copy option, these files are still on my USB drive. If I wanted to move the files from my USB drive to my User drive, I would have used the Move option. We have not discussed the Move Option. It is exactly the same as the Copy option except that in a "move", the selected files are moved to the new location and deleted from the original location. The advantage in using Copy rather than Move when transferring files from the USB1 to the User area is that the files remain on the USB drive where they can serve as a backup of what you put in the User area.
Assigning Icons to Files
 As a final example of file operations, let's see how to assign a specific icon to a file. In the list of song styles, each style includes an icon shown to the left of the style name. If you were to examine this list of styles on your computer, the first four style names would be shown as:
Act Naturally_EL.sty
Alice's Blue Gown.T406.STY
All of me.T160.STY
All These Things_EL.sty
The filetype on all of these (.sty or .STY -- case does not matter) indicates they are style files. The codes ".T406" and ".T160" specify the icon that is shown with the file name. Notice that there is no icon code included for "Act Naturlly_EL" or for "All These Things_EL". The screen shot, however, shows a similar icon for both of these styles. This is a default icon the SX900 puts in if there is no icon code included with the filename.
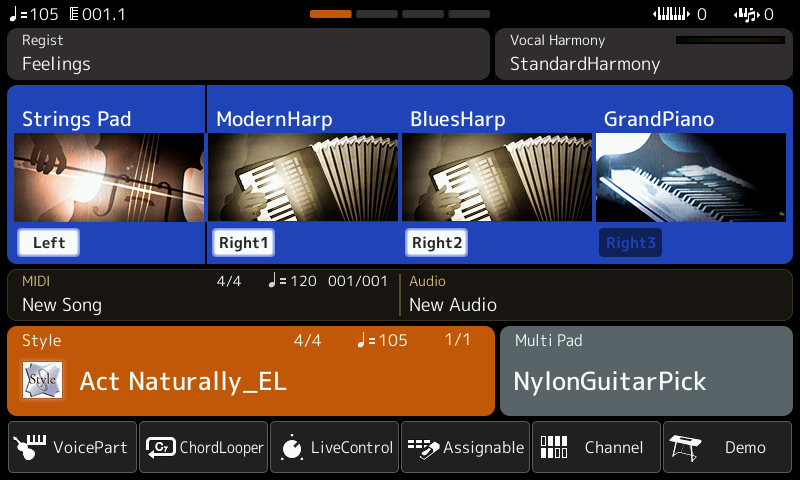 If "Act Naturally_EL" is selected, it appears on the Home page as the currently loaded style. The Icon is also shown on that page along with the style name.
For this song, I notice that the Right1 and Right2 voices are a ModernHarp and a BluesHarp. Suppose I want to change the icon for this file to somethng that matches those initial voices. How is that done?
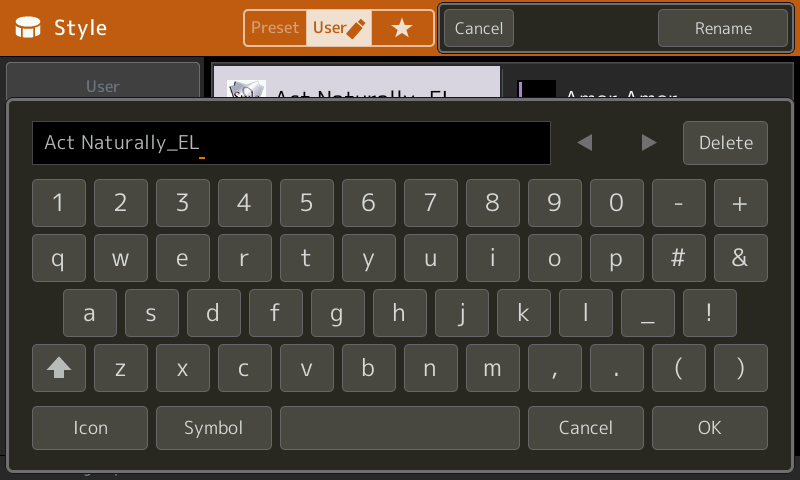 From the Style screen showing the "Act Naturally_EL" style, select the Files option to open the File Edit box and then select the Rename option. Now select the "Act Naturally_EL" style. That opens up the typewriter keyboard. In this case, I am not going to change the style name, but I want to change the Icon. At the bottom left of the keyboard, a new key, Icon, is now visible. This was not available when renaming a folder. It is available when renaming a file.
Press the Icon key to open up the first of four Icon Select pages of icons. 50 icons are shown on this page. To select an icon, touch the icon picture. In the screen shot below, the accordion icon is selected. To view the other pages, press the down arrow to go to pages 2, 3, and 4. For your convenience, you can see larger versions of these pages right here by clicking on these links: Page2, Page3, Page4.

 When you have selected the icon you want, press OK to return to the typewriter keyboard. Since I am not changing the name itself, I press OK once more to return to the list of styles. You can see that the new icon is now shown next to the file name for "Act Naturally_EL".
What's Next?
This lesson has covered manyl of the file operations as they are completed on the PSR-SX900. Executing file operations is very different on the Tyros and PSR-S models. These operations are covered many of the subsequent lessons in this section. You can skip all these if you have a PSR-SX or a Genos and jump down to the lessons on File Downloads and on File Compression.
This page updated on September 19, 2024 .