In the MIXING CONSOLE lesson, you learned how to adjust the sound balance between individual instrumental parts in a particular style by using the MIXING CONSOLE. The adjustments you made then, however, applied to each variation in the style. That is, set the volume of the 3rd track, the BASS track, to 90 and it is set to 90 in all four style variations (A, B, C, and D). Sometimes you do not want the same volume for a particular track to be the same in all the variations. You may have a style that uses a GrandPiano for CHD1 in variations A and B, and then switches to a JazzGuitar for variations C and D. The volume appropriate for the GrandPiano may or may not be what you want for the JazzGuitar. You need to adjust the individual volumes separately in each variation of the style. How do you do this? You'll find out in this lesson.
The MIXING CONSOLE
The good news is that you already know how to adjust sound balances if you have already completed the lesson on the MIXING CONSOLE. Because the MIXING CONSOLE is the same tool that you will use to adjust the individual accompaniment sounds in each of the four style variations. The big difference is that you will go into DIGITAL RECORDING of the STYLE and then start adjusting the sounds. (In the earlier, broad-brush adjustments, you adjusted all the sounds and went into the DIGITAL RECORDING function only to SAVE your adjustments.
The STYLE CREATOR
 Load
the style you want to work on and select the variation you wish to modify.
Press the [DIGITAL RECORDING] button, then press the [B] button to select
the STYLE CREATOR. This will open up the BASIC tab of the STYLE CREATOR.
Load
the style you want to work on and select the variation you wish to modify.
Press the [DIGITAL RECORDING] button, then press the [B] button to select
the STYLE CREATOR. This will open up the BASIC tab of the STYLE CREATOR.
The function of each of these STYLE CREATOR tabs is described in the Tyros3 Reference Manual:
- BASIC - Creates the basic settings of the Style. You can also record your performance in real time to create a new Style (Realtime Recording).
- ASSEMBLY - Mixes the various parts (channels) from preset Styles or already created Style to create a new Style.
- GROOVE - Changes the rhythmic feel of your created Style.
- CHANNEL - Edits data for each channel—quantizing, changing velocity, etc.
- PARAMETER - Changes the settings related for Style File Format
- EDIT - Lets you enter notes one by one to create your Style (Step Recording).
In this lesson we focus on the BASIC tab, although we won't do any recording now. We will adjust the style volumes and, perhaps, instruments to modify the style. You'll also see that it is easy to turn off any tracks for a particular style section. In a future lesson, we'll show you how to use the ASSEMBLY page to combine sections from different styles into your own new style.
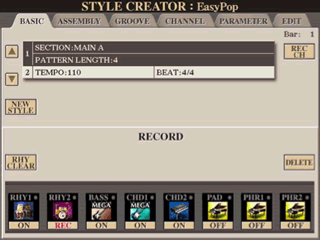
Returning to the BASIC page screens hot above, note on the bottom half of the screen you see the RECORD box, which shows the 8 accompaniment channels. The second channel, RHY2, is set to REC (for record). You do not want to record more rhythm instruments, so press the [2-B] button to turn REC off. The track will now show ON which means the RHY2 track is playing in this variation. You can also see that the first 5 tracks (RH!, RH2, BASS, CHD1, and CHD2) are all playing in MAIN A, while PAD, PHR1, and PHR2 are not playing now.
To hear those five tracks playing, simply press the [START/STOP] button on your keyboard. No need to finger a chord, what you are hearing is the style notes in their original format - styles are created using the Cmaj7 chord. This information is used to alter the style sound when you finger different chords as you play. Here, everything is in Cmaj7. Yamaha provides the following "rules" for anyone who wants to record their own style parts in non-rhythm channels:
- Use only the CM7 scale tones when recording the BASS and PHRASE channels (i.e., C, D, E, G, A, and B).
- Use only the chord tones when recording the CHORD and PAD channels (i.e., C, E, G, and B).
If you want to listen to individual tracks, turn off all the tracks except the one you want to hear.
If you want to take a shot at adding a track yourself, try this. In the EasyPop style shown above, the PAD is OFF in MAIN A. It is currently set at the default GrandPiano voice. Press the [6-A] button to choose another voice. Try one of the PAD voices. To turn REC on for that channel, hold down the REC CH button and simultaneously press the [6-B] button. The PAD track should now show REC. Start the style playing to hear the other tracks. The pattern will repeat every 4 measures. You can add to this pattern now by playing whatever you want with that PAD voice although you may want to restrict your notes to C, E, G, and B. As the pattern repeats, you can add additional notes if you want and they will be added to the 4 measure pattern. Stop anytime and listen to the result. Below, you'll see how to save your modified style so you can try it out on the keyboard where you control the style with your left-hand chords.
 Press
the [EXIT] button to close the RECORD box. This returns you to the BASIC
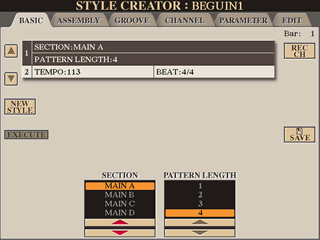
tab options. Use the [A] and [B] buttons to move between the SECTION and
TEMPO selections shown at the top of the BASIC tab. The screen shot here
shows the SECTION option selected. On the bottom of the screen, you use the
[3] or [4] buttons to select the section you want to work on and the [5]
or [6] buttons to set the pattern length. You normally would not change the
pattern length, but you could choose to work on a different section. There
are 17 sections available in a style: the four MAIN sections (A, B, C, or
D), four Intros, four Endings, four Fill-ins and the Break. (Your keyboard
panel buttons only provide you with three intro and ending buttons.)
Press
the [EXIT] button to close the RECORD box. This returns you to the BASIC
tab options. Use the [A] and [B] buttons to move between the SECTION and
TEMPO selections shown at the top of the BASIC tab. The screen shot here
shows the SECTION option selected. On the bottom of the screen, you use the
[3] or [4] buttons to select the section you want to work on and the [5]
or [6] buttons to set the pattern length. You normally would not change the
pattern length, but you could choose to work on a different section. There
are 17 sections available in a style: the four MAIN sections (A, B, C, or
D), four Intros, four Endings, four Fill-ins and the Break. (Your keyboard
panel buttons only provide you with three intro and ending buttons.)
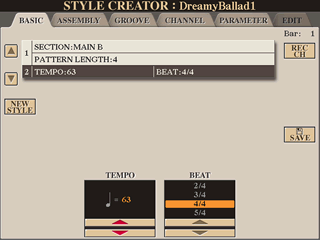 If
you press [B] to move to TEMPO, the bottom of the screen will change and
show two boxes from which you can select the TEMPO in terms of BPM (Beats
Per Minute) and the BEAT (2/4, 3/4, 4/4, or 5/4). You usually would not be
adjusting the BEAT.
If
you press [B] to move to TEMPO, the bottom of the screen will change and
show two boxes from which you can select the TEMPO in terms of BPM (Beats
Per Minute) and the BEAT (2/4, 3/4, 4/4, or 5/4). You usually would not be
adjusting the BEAT.
To bring back the RECORD screen, press the [F] button to select the REC CH, Again, notice that RHY2 is set to REC; turn that OFF. You can listen to the style by pressing [START/STOP]. What's that? It doesn't sound like you expected? Take a look at the SECTION. Make sure you are looking at the section you intend to work on. (If you reviewed the various sections available and went all the way down to ENDING1, you may still be pointing to that section. Change your SECTION back to MAIN A.)
Listen to Each Track
While you are getting used to this, let's listen to each track of the style. Press the [START/STOP] button and the style will start playing. In the illustration above, the pattern length is 4 so this style variation repeats every 4 measures and, when you are listening to it in the STYLE CREATOR, it will continuously repeat until you press [START/STOP] again to turn it off.
All the parts that are ON should be playing. Press the button below each number for the tracks that are playing and this will turn that track OFF. Turn off all the tracks. (If you press the button above the number, you will be presented with the VOICE screen where you can select the instrument used for that track.) With all the tracks off, you will hear nothing. Turn RHY1 and RHY2 ON and you'll here the rhythm section. Now you might try turning on the instruments one by one to see what they add to the style. Keep the drums going and listen to each instrument separately with nothing else playing. If you can barely hear that instrument, you may want to make the volume a little louder. You can, of course, turn on two instruments to see how they blend together. If you turn them all on, you are back to listening to the whole style playing in this variation.
Adjusting Volumes
Ready to adjust the volumes? Just press the [MIXING CONSOLE] button and there is your mixing console. As you adjust the volume up or down on any particular instrument, you will be able to hear the difference the adjustment makes so you can set it to where you want it. In fact, you may want to try adjusting the instruments one by one. Set the rhythm tracks to the volume you want and then adjust the other instruments relative to the rhythm volume. With the other instruments off, turn the BASS on and then adjust that. When the BASS is adjusted, add the CHD1 track (chord1) and adjust that. Continue in this manner until you have everything adjusted to suit your taste.
In doing this kind of adjustment you need to alternate between the BASIC screen where you can see the channels and what is ON or OFF and the MIXING CONSOLE screen where you adjust the volumes. When you were doing the adjusting outside of the STYLE CREATOR, you could alternate between screens by pressing the Channel On/Off button and the [E]/[J] buttons to jump between looking at tracks and volumes. In the STYLE CREATOR, that won't work. You must press [EXIT] to exit the MIXING CONSOLE and get back to the BASIC page. On the BASIC page you can turn tracks ON and OFF. You must press the [MIXING CONSOLE] button to get back to the mixing console to adjust the volumes.
Moving to Another Variation
There are several ways you can move on to adjust another variation in the style. While the style is playing, you can simply press one of the four variation buttons on your keyboard panel. You will see a pop-up window appear on the BASIC screen where you have the REC CHANNEL window at the bottom showing the individual tracks. You would use buttons [6] or [7] to select the section you want to modify, and button [8] to say OK (and switch to that section) or CANCEL (to forget the whole thing and stay with the section you are working on).
Another method would be to press the [EXIT] button when you are in the BASIC page and the RECORD box is shown on the bottom. This does not exit the BASIC page, but it does exit the RECORD box. You now will see a SECTION box at the bottom of the screen above the [3] and [4] buttons. Pressing either one of these will scroll the section choices up or down so you can select another section to work on. When you have moved to the new section you want, press Channel ON/OFF to show the REC Channel box again.
WARNING: Every time you move to another section the RHY2 track will be set to REC. If you leave this on, and you start the music, any key you happen to press will be adding an instrument to the RHY2 pattern in your style. You may actually want to do that, but you probably don't want to do it by accident. So turn REC off. You won't be recording any new notes to the style, but you can still change the volumes.
Lots of Sections
You can use the method described above to adjust any of the four Main sections. You can also use it to adjust any of the four Fill In's (for Variations A-D), up to four Intros (A-D), and up to four Endings (A-D). I say "up to" because few styles actually have four intros or four endings. To balance your style completely, you have to check the intros and the endings. You might have the variation A just right, but when you press the Ending button you don't want to be startled by a bunch of horns jumping in and blazing away. Adjust the intro and ending volumes to blend in with the volume levels you have set for the main sections.
All this flexibility comes, however, at a bit of a price. If you adjust the piano accompaniment volume just the way you want it in variation A, it won't have that volume anywhere else. You have to go in and adjust the volume in each of the variations. You might try getting things reasonably close using the methods described in the lesson on the MIXING CONSOLE, and then go in to the STYLE CREATOR to make finer adjustments to the volume levels. This may be necessary because the instrument used changed in different variations and you want to keep that instrumental change, but you need to adjust the volumes separately for each instrument/variation combination. In this method, of course, if you change the instrument for CHD1 in Main A, it doesn't impact the instruments used in the CHD1 track anywhere else. If you want that change in all the tracks, you have to visit each track and make the change each time.
Saving Your Work
The process for saving your changes is the same as indicated in the SAVING lesson. You can go there to review the steps in detail. I'll repeat the major steps here. When you are happy with all the tuning you have done and are ready to save your work, tab over to go to the ASSEMBLY page. From that page, press the [J] button to SAVE your style. You will be saving it to the USER styles area, or you can tab to one of the other areas you have available for saving files (FLOPPY, CARD, HD, USB). Press the [6-B] button to indicate you want to save the style. Save it under the current name or rename if you want, then press the [8-A] button to indicate it is [OK] to save or the [8-B] button to CANCEL your save operation.
Actually, that SAVE option is available in other pages of the STYLE CREATOR as well. When you first come to the BASIC page, it is hidden by the RECORD box. Press [EXIT] to close the RECORD box and you see the SAVE option next to button [I]. You can save using the option on this page or on the ASSEMBLY page.
That's all there is to it. After you have a done a number of styles, the steps will become automatic and it will not be as complicated as it may seem. Try adjusting some of those styles that came from other, non-Yamaha, instruments to see if you can tune them to your satisfaction. You may find that you enjoying making your "own" style. Of course, with both the PSR and Tyros models, you can also create and save your own One-Touch Settings to go along with any style. We explain how to do that in the next lesson.
This page updated on September 19, 2024 .