You've got the style sounding just the way you want it. However, if you turn your arranger off, all your work is GONE forever. You have to SAVE your settings so that you can access this setup again whenever you want. You can save your adjustments in a REGISTRATION file or in a new version of the STYLE itself.
If you were adjusting an internal preset style and you wanted to save your settings, you could save them in a registration button and then save the registration file. When you load that registration file and press the appropriate registration memory button, you would LOAD the style and all the settings would be adjusted automatically by the registration file to be just the way they were when you saved them to the registration button.
However, for a style on your USB drive (or FLOPPY), you will have to save the new settings in the style itself. Here is a simple six-step process to do that.
 Step
1. When you have the style volumes set just the way you want,
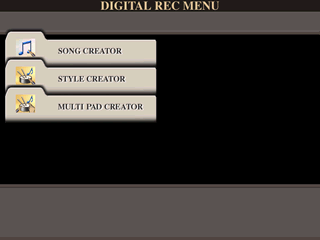
press the [DIGITAL RECORD] button. This opens up the DIGITAL REC MENU.
The second folder here, called STYLE CREATOR, is where you would go to
create a new style. Press the [B] button to select the STYLE CREATOR. This
opens up the STYLE CREATOR display screen at the first tab, marked BASIC.
Step
1. When you have the style volumes set just the way you want,
press the [DIGITAL RECORD] button. This opens up the DIGITAL REC MENU.
The second folder here, called STYLE CREATOR, is where you would go to
create a new style. Press the [B] button to select the STYLE CREATOR. This
opens up the STYLE CREATOR display screen at the first tab, marked BASIC.
 Step
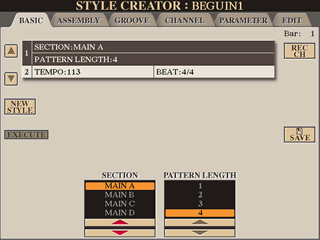
2. The STYLE CREATOR screen has six tabs. At the top you see the
currently loaded style. I was working on updating the BEGUINE style from
the previous chapter and "my version" named BEGUINE1 is loaded
into the STYLE CREATOR. The STYLE CREATOR is a very powerful system, but
we are not going to make any changes to our tuned style here. We are only
going to use the STYLE CREATOR to save our version of the currently tuned
style.
Step
2. The STYLE CREATOR screen has six tabs. At the top you see the
currently loaded style. I was working on updating the BEGUINE style from
the previous chapter and "my version" named BEGUINE1 is loaded
into the STYLE CREATOR. The STYLE CREATOR is a very powerful system, but
we are not going to make any changes to our tuned style here. We are only
going to use the STYLE CREATOR to save our version of the currently tuned
style.
 You
are looking at the BASIC tab when you first open it STYLE CREATOR. Ignore
this page and just tab over to the ASSEMBLY tab. This page shows you what
is currently in each of the 8 accompaniment tracks. In a future lesson,
you will learn how to use this page to assemble parts from different styles
to create your own new style. But we are not going to make any changes here.
The only thing we are going to use on this page is the SAVE option.
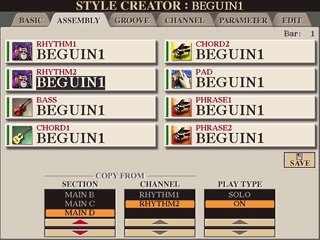
You
are looking at the BASIC tab when you first open it STYLE CREATOR. Ignore
this page and just tab over to the ASSEMBLY tab. This page shows you what
is currently in each of the 8 accompaniment tracks. In a future lesson,
you will learn how to use this page to assemble parts from different styles
to create your own new style. But we are not going to make any changes here.
The only thing we are going to use on this page is the SAVE option.
Step 3. The SAVE option on this ASSEMBLY page is positioned next to the [J] button. Press the [J] button to SAVE your "tuned" style. Note that you have not really used anything in the STYLE CREATOR to create or modify the basic components of the style. You are accepting the instruments and everything they are playing in each variation. But you HAVE changed the volume settings. You may also have changed some of the instruments. When you SAVE the style now, you will be saving those volume (and instrument) changes in the style itself. In later lessons, we'll talk about how to use some of the other features found in this style creator function. For now, all you are doing is going into the STYLE CREATOR, switching to the ASSEMBLY page, and choosing the SAVE option.
Step 4. After you press the style SAVE button, you are shown the standard STYLE file screen, which shows the available style storage areas for your keyboard (PRESET, USER, CARD, HD, USB, FLOPPY). You can not, of course, save your adjusted style in the PRESET area. But you can save your new style in one of the areas where you can create files. Tab over to where you want to store your new style and push the [7-B] button to select the SAVE file option visible on the bottom row of the screen.
Step 5. You're not done yet. The STYLE screen, just as it does whenever you want to save a style, opens up a little SAVE screen at the bottom of the display. The current name of the style loaded is shown in the name input box. You can accept this name or change it. You might want to change it a bit, say by adding a number at the end, to distinguish it from the original style. If you are tuning a preset style, you can't hurt the original style since that is in the PRESET area of your keyboard. However, you may be tuning an external file that you downloaded from the internet and you may want to keep the original version in tact. By saving under a new name, if you made any big blunder, you haven't impacted the original style at all; it will still exist as it was before you started adjusting. Of course, if you are happy with your new style, you can always go to the STYLE file screen and delete the old style anytime you want.
Step 6. When you have completed the SAVE operation, you will find yourself back in the STYLE CREATOR ASSEMBLY page. Press [EXIT] to exit the STYLE CREATOR. Now you are back in the DIGITAL REC MENU. Press [EXIT] again to leave Digital Recording. Finally, you are back at the MAIN screen.
Well, there you have it. You now know how to adjust the volumes of any style you have and save your adjustments in a style tuned to your own liking. By the way, here is a tuned version of the Beguine for the PSR-2000, which will play on most keyboards. . I also took an opportunity to tune this style on the Tyros3 and, if you have a T3 or S910, you may want to check out the Tyros3 version. You don't necessarily have to download either of these styles, if you've tried the exercises from the previous lesson, you already have your own tuned version.
In the Fine-Tuning Styles lesson, we'll show you how you can adjust the accompaniment volumes (instruments) for each individual section (A, B, C, or D) of the style. Then, the next lesson discusses how to add your own One-Touch Settings to this style so you will have a final, finished style, that includes the soloists you want to use when playing that style.
This page updated on September 19, 2024 .