Please download this midi for demonstration of Midi Transpose and transfer it to your USER area in the keyboard: Midnight_FB.MID
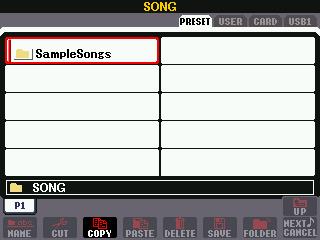 1.
Pressing [Song Select] Button on central left side of the PSR-3000 will display
this screen.
1.
Pressing [Song Select] Button on central left side of the PSR-3000 will display
this screen.

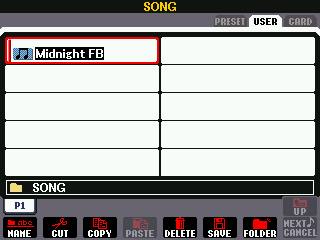 2.
You must now tab to location of the song that needs to be transposed - USER,
CARD, USB, or HD. For our demonstration, please select Midnight_FB located
in USER area.
2.
You must now tab to location of the song that needs to be transposed - USER,
CARD, USB, or HD. For our demonstration, please select Midnight_FB located
in USER area.
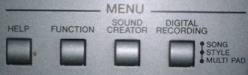 3.
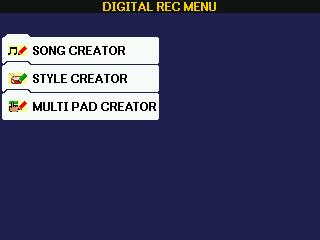
By pressing [DIGITAL RECORDING] button, the DIGITAL REC MENU screen appears.
3.
By pressing [DIGITAL RECORDING] button, the DIGITAL REC MENU screen appears.
 Please
press screen left button [A] to select SONG CREATOR.
Please
press screen left button [A] to select SONG CREATOR.
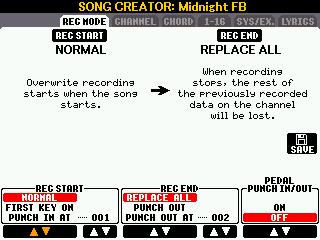 4.
Selecting SONG CREATOR will open up the SONG CREATOR display screen on the
REC MODE tab.
4.
Selecting SONG CREATOR will open up the SONG CREATOR display screen on the
REC MODE tab.
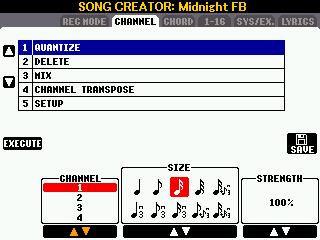 5.
Pressing <TAB> right one time, brings up the CHANNEL screen.
5.
Pressing <TAB> right one time, brings up the CHANNEL screen.
 6.
Pressing buttons [A] or [B] allows you to select 4 - CHANNEL TRANSPOSE.
6.
Pressing buttons [A] or [B] allows you to select 4 - CHANNEL TRANSPOSE.
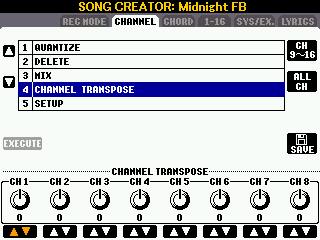
 7.
Using the [1] button below the screen, you can increase or decrease the transpose
amount. For our demo, please set to "-4".
7.
Using the [1] button below the screen, you can increase or decrease the transpose
amount. For our demo, please set to "-4".
8. Use buttons [2] through [8] to set channels 2 through 8 for "-4".
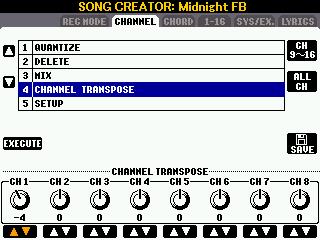
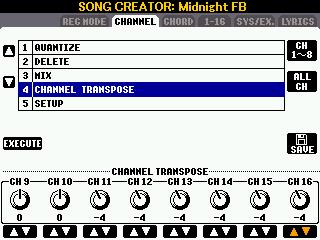 9.
Please press button [F] to select channels 9-16 to modify.
9.
Please press button [F] to select channels 9-16 to modify.
10. Channels 9 through 16 are now displayed. DO NOT change channels 9 and
10 for Yamaha midi's. They are PERCUSSION channels. Please complete setting
channels 11 through 16 to "-4".
 11.
Press button [D] to select EXECUTE.
11.
Press button [D] to select EXECUTE.
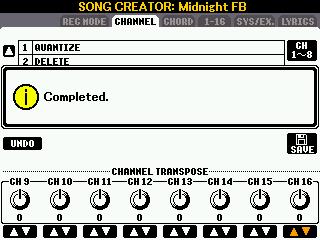
12. You will see this screen when the transpose process is completed.
13. After the EXECUTE is completed, press the [I] button to select the SAVE
option.
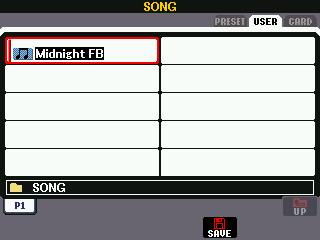 14.
After pressing SAVE button, the SONG display screen appears.
14.
After pressing SAVE button, the SONG display screen appears.
15. <TAB> to and select the same location as the original song. Note,
it's already hi-lighted. Press button [6-B] to select SAVE option.
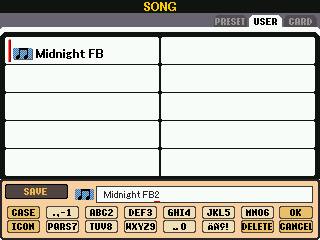 16.
The previous step displays this screen. Notice the name in EDIT window is
same as original. Go to next step.
16.
The previous step displays this screen. Notice the name in EDIT window is
same as original. Go to next step.
17. In EDIT window, add "2" to end of file song name. Just in case you made a mistake. System now won't erase the original.
18. Press button [8-A] to select OK. This actually saves your changes.
 19.
The CHANNEL screen appears once more. You have now transposed and saved the
changes to the original midi song. Press [EXIT] keys several times to get
to the MAIN screen.
19.
The CHANNEL screen appears once more. You have now transposed and saved the
changes to the original midi song. Press [EXIT] keys several times to get
to the MAIN screen.
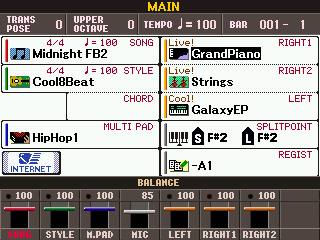
20. You could have skipped part of last instruction. But, it's always good to go HOME to the MAIN screen.
You have now completed and saved the original midi with a new name. It does need to be tested (played). Go to steps 1 and 2, then Play the transposed midi.
This page updated on September 19, 2024 .