If you have followed along through the lesson on the Yamaha Expansion Manager, you saw how I created an installation file for the PSR-SX900 with 6 Latin expansion packs included. Now, it is time to install that Latin cpi file into the SX900.
Here's what the PSR-SX Reference Manual tells us about the Pack Installation file:
The file which contains the bundled Expansion Packs (“***.ppi” or “***.cpi”) to be installed to the instrument is referred to as a “Pack Installation file.” Only one Pack Installation file can be installed to the instrument at a time. If you want to install multiple Expansion Packs, bundle the packs together on your computer by using the “Yamaha Expansion Manager” software.
I have on my USB drive a file called "LATIN_PackInstallData.cpi". Now I need to install that "Pack Installation file" on the SX900.
 The first step is to go to the Expansion Menu screen. We saw how to do that in earlier lessons.
Press the [Menu] button on the keyboard bringing up the Menu1 screen.
Tab over to the Menu2 screen.
The "Expansion" button shown here brings up the Expansion Menu screen.
 There are only three options, You've seen how to export the Instrument Info in the YEM lesson. Now we are going to use that second option.
See below for a little more on that third button.
Press the "Pack Installation" button to start the process.
 The Pack screen comes up showing the contents on my USB1 drive under User. There is a folder where I have stored my downloaded expansion packs and two installation files.
One, "Latin_PackInstallData", is the one created at the end of the YEM lesson. I will select that pack to install my new "Latin" collection.
But first, let me offer a few words about that other installation pack shown on my USB drive.
Restoring Pre-Installed
 I created the installation file, "SX900_JWPack01", earlier before I started working on these expansion pack lessons. It included 7 expansion packs (Church&Christmas, Europe, Brazilian, ChurchOrgan, Italy, WesternEurope, and BestOfEurope).
When I started working on the lessons, I thought the "Exploring" lessons should cover what was in the pre-installed packs. That meant I had to replace that JW pack with the 4 pre-installed packs.
 Well, that gave me a chance to try out the 3rd option in the Expansion Menu: "Restore Pre-Installed Expansion Contents." When I selected that option, a warning screen alerted me to the fact that everything in Expansion memory would be restored to the factory condition. I selected "OK" and the four pre-installed packs were placed back in my Expansion memory.
Of course, those 4 pre-installed packs are also available as expansion pack project files (cpf) that can be downloaded. Using the Yamaha Expansion Manager, I could include one or more of them in any special pack I wanted to create. In that initial pack, I did include the Europe pack, which was one of the pre-installed packs.
Installing Latin Installation File
 But right now, I am going to install that new "Latin" installation file. So, I selected the "Latin_PackInstallData" file.
I am next presented with a warning message that current expansion data will be lost. I could cancel at this point but I respond by choosing the "OK" option.
If there were some styles or multi pads I wanted to save, I could select "Cancel" and then go back and copy them from the Expansion memory to my regular User memory or to the USB drive.
Expansion voice files can not be copied to USER or USB1. If a style uses one of those voices in OTS, that voice would not be available in the copied version of that style.
 Once you click on "OK" the install process starts. The first step is to clear out the Expansion Memory and you get a message to that effect.
The next step is to copy expansion files into your Expansion memory. It can take some time. For the "Latin" group of 6 expansion packs, the installation on my PSR-SX900 took about 7 minutes.
You won't be able to do anything on your keyboard while the installation is underway.
 Eventually, you get a message that the installation has completed and that the instrument will be restarted.
Press the "OK" button to restart your keyboard.
When your keyboard reboots, you are on the Main screen and the 6 "Latin" expansion packs are now in your Expansion Memory.
"Latin" Expansion Files
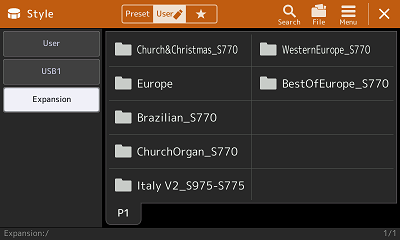
 To check out the installation, let's take a look at the Expansion styles. I go to my Style category buttons on the PSR-SX900 and press the [EXPANSION/USER] button. This brings up the Style screen showing the subfolders under the Expansion folder. Each subfolder represents one of the Expansion packs now installed. The original pre-installed packs are gone. Note, however, that I did include the Latin America pack in this group. That was one of the original pre-installed packs.
Each expansion pack I downloaded was for the SX900. I see some of the packs may have been created for an earlier keyboard but, apparently, can still be used on the SX900.
 If I press the [EXPANSION/USER] under the Voice category buttons, I see the same six expansion pack folders in the Right 1 Voice screen. That would also be true in the Multi Pad screen, the Regist Bank screen, and the MIDI screen.
In the case of the pre-installed expansion packs, none of them actually included any midi files or registration files. Only Latin America and Europe included some multi pad files.
Multi-Pad Files
 Looking through the 25 CumbiaLatina styles, I select the BoleroTrio style. Back on the Main screen, I see that this Style uses a "BoleroTrio" Multi Pad. It looks like that is a Multi Pad designed specifically for this new style.
 Pressing the Multi Pad box brings up the Multi Pad screen (shown here), which highlights the currently loaded BoleroTrio Multi Pad on P1.
The CumbiaLatina pack actually has 3 pages offering 30 new Multi Pads.
Registration Files
 I press the small Regst window at the top of the Main screen to bring up the Regist Bank screen. Opening up the Expansion files and then the Salsa folder, I discover that the Salsa Expansion Pack includes 12 registration files.
I load the registration file "10 Guajira&Mozam" to try it out.
Pressing the first registration button (R1) brings up the "01 SalsaNYC" style. This is one of the 20 styles from the Salsa Expansion Pack. It is shown in the Main screen below.
 The other registration buttons (R2, R3, and R4) bring up this same style but different voices. The OTS voices in the registration are different from the original OTS voices.
The last four registration (R5, R6, R7, R8) buttons bring up the "02 Timba" style with different OTS settings.
| Style | Voice | Multi Pad | Regist | Midi | |
|---|---|---|---|---|---|
| Brazilian | 50 | 8 | 0 | 0 | 0 |
| CumbiaLatina | 28 | 25 | 30 | 14 | 1 |
| LatinAmerica | 16 | 13 | 6 | 0 | 0 |
| MexicanBanda | 20 | 37 | 97 | 0 | 0 |
| Norteno&Mariachi | 20 | 30 | 113 | 0 | 0 |
| Salsa | 20 | 5 | 82 | 2 | 2 |
| Total | 154 | 118 | 238 | 16 | 3 |
I went through the various resource screens to see all that was provided in this "Latin" expansion pack. There is a lot of material here to go through.
All of this could fit in the Tyros5 or the Genos if the packs are available for those keyboards.
The PSR-SX900 has the most storage space of any of the PSR-SX or PSR-S models.
Other models may be far more limited in how many packs could fit in their keyboards.
MIDI Files
 As the table shows, few expansion packs offer any songs to show off the features of the pack. The two expansion packs in the table that do provide midi files are an advertisement highlighting what is available from that pack.
Still, you might want to know how to access an Expansion pack midi file (or any midi file).
On your keyboard, above the Style category buttons is a section with Song buttons. Press the [Player] button there and that brings up the Song screen.
 The MIDI box where you see "New Song" or the midi file that is currently loaded is the trigger to open the MIDI screen.
Press the song in the MIDI box and that brings up the MIDI screen.
Here is that MIDI screen showing the five songs in the SX900 Preset area.
 Press User to bring up the user area and then press Expansion to bring up all the installed expansion pack folders.
Opening up most of the packs will show no midi files available.
However, opening the Salsa pack shows two files. They appear to be the same with the first narration in English and the second in Spanish.
Select the midi file you want and then play it on your keyboard.
Quick Installation File
I have read about the "quick" installation file. But I have not tried it yet. If you worry about having to delete everything in the Expansion Memory whenever you install a new (cpi) file, then you may want to look into the quick installation file (cqi). Fortunately, thanks to Casper synthTutor, there is a video explaining cqi and how to use it.
Casper includes a narration, but it is not in English. Fortunately, there are English text prompts providing a translation of what is going on step-by-step. I am going to repeat Casper's explanation in the bullets below. They not only tell you a lot about quick installation files, but they also show what you will see happening in the video. If you have been reading through these Expansion Pack lessons, you will recognize many of the steps outlined below. And now you have a chance to watch them implemented in this video. Click on the link below to launch Casper's the 9 minute video.
Quick Installation File pqi/cqi, by Casper tutorSynth
Contents from the video:
- This video is a continuation of the topic of installing Free Packs and I will now explain how to use a PQI/CQI file.
- We call it the Quick Installation File, and in the middle of the extension there is the letter Q.
- The purpose of this file is to upgrade the content contained in the keyboard, which is already installed in the Expansion Memory.
- It should be noted that this format cannot be used on Tyros5 and PSR S models.
- We can create it for Genos V2.00, and with SX keyboards it has appeared since YEM version 2.7.
- In practice it works like this.
- To use Quick installation you need to have a basic installation file (ppi / cpi).
- We make it in YEM in the usual way...
- The ppi/cpi format should be selected when exporting.
- I create the Installation Pack, put it on a USB stick via the menu and start the installation.
- As you can see, 5 packs are written to Expansion Memory.
- After trying and testing, we can change, upgrade or delete this content again.
- So, I again go to YEM where I can fix what I want in a very simple and easy way.
- I am adding a new Pack to join the whole compilation.
- It is necessary to activate the tick on it, it turns green and the content is added.
- In the same way, I can select data within each Pack.
- There are three different colors of ticks and they show the status of a content.
- When I am satisfied with the job, I create the first Quick Installation file.
- Of course, I now choose the PQI/CQI format.
- I put the file on a USB stick and start the installation.
- Quick file in the keyboard can be recognized by a different icon.
- This installation will be faster because existing content is not deleted.
- So, there is no formatting of the memory and writing of the basic content.
- This approach is practical for testing new material, especially if the Basic Package is large, iIf it has more than one gigabyte.
- We see that the Alen Pack has been added and that some sounds from the Italian Pack are missing.
- If necessary, they can return to YEM multiple times and change the Basic Package.
- I can insert content entry by just dragging it into the YEM box.
- I can delete entire Packs or change their position using Bank Select LSB.
- Manipulating content in Yamaha Expansion Manager is clear and very simple.
- I mark new Pckages and thus add them to my own compilation.
- All the changes I make will eventually be saved in a new Quick Installation file.
- So we can have multiple Quick Installation files and that number is practically unlimited.
- However, it is important to note that when using the Quick Installation file, there is a rule that we must follow.
- The installation of the files must be done in the same order as we created them.
- In my example this means I can't install QuickCasper02 or 03 directly on CasperBasic00.
- Also, after QuickCasper01, I can't run QuickCasper03.
- If we make a mistake in the order, the message you just see on the screen will appear.
- Therefore, it is practical to add numbers to the file name to avoid confusion and problems.
- Of course, when we finish testing, when we are happy with what is on the keyboard, we need to make the final installation file.
- Now it will be a cpi or ppi file, so we will have the entire contents in one file.
- It can serve as a backup for charging the keyboard.
- However, this file should only be understood as an installation package, we cannot re-enter it in YEM.
- So we shouldn't just stay on that kind of backup.
- A real backup of all content is created on a computer and it is very important that we make it regularly.
- If you aven't thought about it so far, if you don't know how to do Backup, the video is coming soon.
This page updated on September 19, 2024 .