For the most part, installing more memory in the Tyros-2 is well covered in the Owners Manual. The simple step-by-step instructions are straightforward and well illustrated. Be sure to read all the warnings and notes before beginning, as they are important. The main purpose of this article is to bring together pertinent information relative to installing optional memory.
First consideration is, "Do you need to install additional memory?" The optional memory is only important if you plan to create your own voices from wave samples. The Tyros-2 comes with 4 MB of installed memory for creating these wave voices and that may be enough if you only intend to use only one or two Custom Voices in any given song or performance. As with the Tyros-1, you can still make and use many custom voices by modifying the preset voices using the voice edit routine already part of the Tyros-2 or the Voice Edit software on the PC without the need for optional memory.
You can create a Custom Voice from a wave file and then store it in a library on your hard drive or USB Drive instead of leaving it in a Custom Memory location. This will free up the memory for creating more custom voices. You just load the voice you want to use back into a memory location when you want to use it for playing or recording. You may find, however, that you will run out of memory if you create a very complex voice with many elements.
Optional memory modules must be installed in pairs and they both should be from the same manufacturer and of the same type. Memory chips are not as expensive as they once were and the difference in price between two small (128 MB) modules and two medium (256 MB) size modules leads me to the conclusion the medium size module may be the better option. You can install two large 512 MB modules and that may be the better way to go if you plan to do a large amount of work with custom voice creation. Table 1 at the end of this article, courtesy of Yamaha, lists the memory modules known to be compatible with the Tyros-2.
Before following the steps below, make sure you have the appropriate memory modules and a #2 Phillips screwdriver. Please use the Owner's Manual opened to Pages 223 and 224 to supplement this article.
- Turn the T-2's power off, and disconnect the AC power cord and all other external devices.
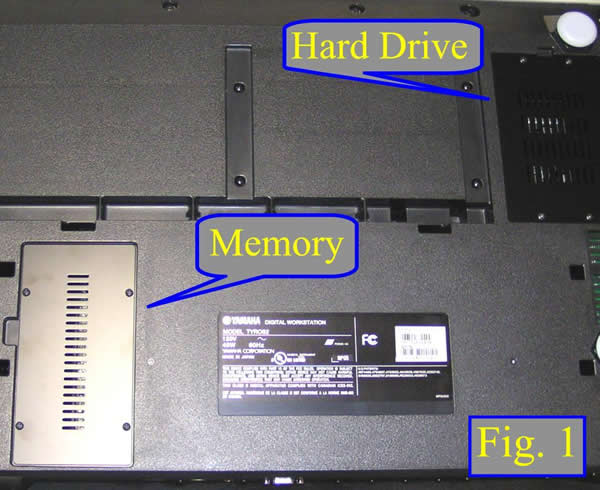
- Turn the Tyros-2 face down on a blanket or some soft surface, giving you direct access to the bottom of the keyboard. You could place it on a couch, bed or on the carpet. Just be careful to NOT lift the keyboard by the keys. Please place the hands on each end of the keyboard while handling it. Both the memory and hard drive covers are shown in Fig.1.
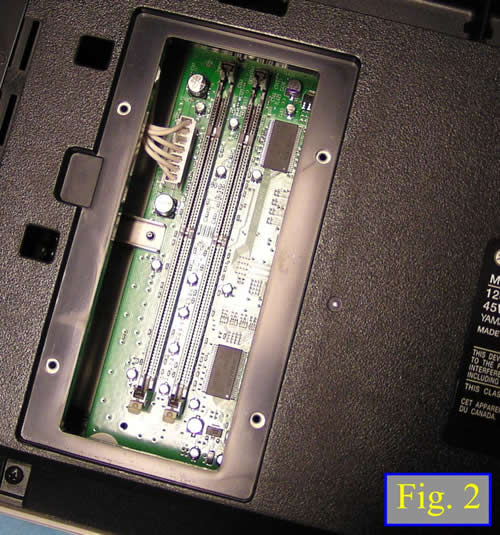
- Remove the four screws from the cover. The memory bay and empty DIMM module sockets can be seen in Fig. 2.
- Insert the two DIMMs into the DIMM sockets being careful to handle the modules as indicated in Fig. 3.
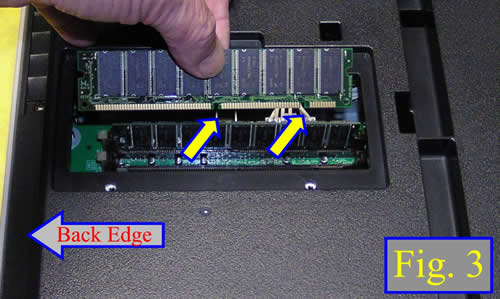
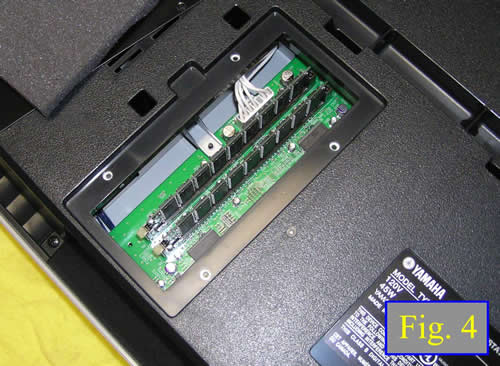
Note the position of the two cutouts (Yellow Arrows) in the memory module for proper alignment with the DIMM sockets. The installed memory modules are shown in Fig. 4.
- Re-install the cover you removed in step #3, in reverse order.
 To check that the installed DIMMs are functioning properly, set the Tyros2
right-side up, and connect the power cord to the rear-panel AC INLET jack
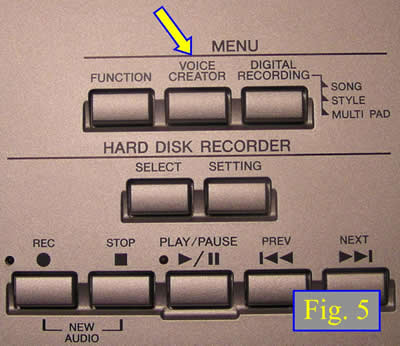
and an AC outlet and turn on the power. Press the [VOICE CREATOR] button
to call up the Voice Creator.
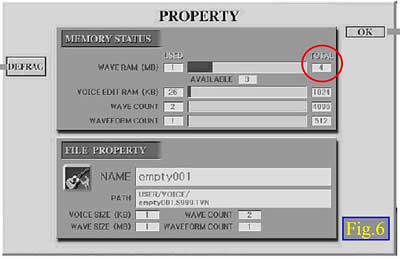
- Call up the CUSTOM VOICE BANK EDIT menu by pressing the [B] button. Select the NORMAL tab, and select a Voice within the Custom voice bank. Press Button [8] Down to bring up the Property pop-up screen (Fig. 6) and the Wave RAM in MB's will show in the box circled in RED. It should read 256 for two 128 MB modules, 512 for two 256 modules and so on. If the number is still 4, then the installed modules are not properly installed or not recognized by Tyros-2.
Compatible DIMM Memory Modules
Below is a list of the DIMM memory modules that are compatible with the Tyros2.
| Manufacturer | Serial Number | Size (MB) | Compatibility |
| Mushkin | 16x64-PC100 Corsair VS | 128 | yes |
| Premium | 32x64-100 LT | 256 | yes |
| Premium | 32x64-100 VS Corsair | 256 | yes |
| Premium | 64x64-133 LT | 512 | yes |
| PNY | 6416VHSEM8G05 | 128 | yes |
| PNY | 6432VHSEM8G09 | 256 | yes |
| PNY | 6464WHSEM8G17 | 512 | yes |
| Crucial | CT16M72S4D75 | 128 | yes |
| Kingston | KVR133X72C3/256 | 256 | yes |
| 3S Plus | TS32MLS64V6D | 256 | yes |
| 3S Plus | TS32MLS64V6F | 256 | yes |
| 3S Plus | TS64MLS64V6F | 512 | yes |
For those of you who may want to download this article in a pdf format, CLICK HERE.
This page updated on August 24, 2024 .