XGworks Tutorial - Part 1:
Background and Setup
Well, here we go again with another tutorial, this time for those of us who want to modify our MIDI files to a standard higher than General MIDI (GM) or than GM2. I am talking here about the greatly enhanced capability of the Yamaha XG standard. By the way, XG stands for eXtended General MIDI.
It is, of course, only worth while doing this if you have a piece of hardware (or software, the S-YXG50 or 100) that is capable of implementing / responding to the XG commands. In this case we are talking about the earliest daughter board for the Creative Labs SoundBlaster card, a board called the DB50-XG or its external box counterpart the MU10, (MU by the way means Music Unit as far as I can ascertain) or any of the later XG internal sound cards, like the great SW1000-XG, or MU tone generators (as Yamaha calls them), e.g. MU50, MU80, MU90, MU100, MU128, MU1000 or MU2000.
Many of Yamaha's keyboards also support the extended XG sound set, as well as many of the effects. Keyboards like the PSR540, and many others, can usefully have MIDI files, which you want to use with them, "tweaked" so that they can access the advanced features of the keyboard to their full capability.
 Way
back in the mid 90s Yamaha brought out a piece of sequencing software called XGworks for
Windows 95, which allowed you to get at the more complicated features contained
within the XG standard. It reached, in the West, version 3, which was pretty
useful for editing the parameters of most of Yamaha's sound cards and sound
modules up until about the very early noughties.
Way
back in the mid 90s Yamaha brought out a piece of sequencing software called XGworks for
Windows 95, which allowed you to get at the more complicated features contained
within the XG standard. It reached, in the West, version 3, which was pretty
useful for editing the parameters of most of Yamaha's sound cards and sound
modules up until about the very early noughties.
It is upon the facilities, and ways of editing MIDI files, using XGworks version 3 that this tutorial is going to focus. So you need to get hold of a copy of the program to follow this, and that's not an easy task because Yamaha have discontinued the product. If you're struggling to find a copy please send me a PM or put a request for where to find a copy on the Yahoo Group XGworks Users.
What is an XG MIDI file?
"Just exactly how is an XG file different from a GM file?" I'm often asked. Well, I think I can answer the question by saying "It's different in three main ways."
- It will contain a special command, known as a System Exclusive message (SysEx for short) that tells the sound card (or sound module, or soft synth) to enter XG mode. This command must be placed after the General MIDI System On SysEx message, in the file, if it (the GM System On) is included.
- An XG MIDI file will almost certainly contain further SysEx messages
that set up the effects processors contained within all XG devices. They
will define, as likely as not, things like the system reverb, and possibly
insertion effects like the type of amplifier that may be used by a guitar
sound as well, possibly, as other effects like distortion. As the XG specification
advanced over the years, the effects available grew in number as well as
variety.
The exact quantity and variety of effects available will depend upon the sound card/module you have. All MU modules had some effects available. Early devices such as the MU10, MU15 and MU50 were moderately limited, but later ones like the MU80, 90, 100 and 128 as well as the excellent SW1000-XG had many.
And this is really the key to XG. We can take a fairly mundane sounding Standard MIDI File (SMF), change some voices, add some effects, then use a control wheel or foot pedal to modify the effects over time (or draw in lines or curves that change MIDI controllers) and the voices really come alive compared to GM. And the XG voices really need those effects as, in the main, they are recorded "dry", and sound a bit lifeless without them. - XG provides a much wider variety of what are known as melody voices and a number of different types of drums kits. GM provides just 128 voices and one drum kit, GM2 expanding this to 256 voices and 9 drum kts. The XG voices and drum kits are generally arranged into banks of similar type and are normally selected by issuing three MIDI messages. First a pair of Bank Select messages, followed by the normal Program Change message, as used by GM. In general these messages follow the pattern of different types of instrument as used by the GM standard for voice selection.
I'll try to explain how these work as I go along, and exactly how they can be inserted in several relatively straightforward ways, using XGworks, into a MIDI file.
Connecting to XGworks
Before we can use XGworks successfully it is necessary, of course, to have the hardware - e.g. an MU128, or a soft synth, e.g. S-YXG50 - setup within the computer we are going to use. In this tutorial I am not going to try to instruct you how to set up or connect these things. There are far too many variables. This tutorial focuses upon XGworks the program. However this tutorial will tell you how to set up XGworks to work with various different bits of Yamaha hardware/software as far as I am able.
It is also a good idea to have a copy of the manual for reference. This should be included in your copy of the program, as it is called up when you hit the "Help" button, but there is also a copy available here.
CBX, USB and other drivers
Having said that, here is a link that will point you to the latest USB or CBX drivers from Yamaha. (Correct at the time of writing.) If you need a user or MIDI implementation manual for your device then try here.
So just a quick word about CBX and the driver. CBX is a way of connecting your PC or laptop to a Yamaha Tone Generator via a serial connector, or from an older Apple Mac via the peripheral connector. If your PC has one of those (old-fashioned now) 9-pin or 25-pin connectors on the back (called a serial or RS-232 connector or port) it is possible, via a special cable, to hook the PC directly to the MU-whatever.
The connector on the back of the Tone Generator looks a little bit like the socket we used (maybe still do) to connect a mouse or keyboard to on PC. We called it PS2. The one used here is actually known as an 8-pin mini DIN plug or socket.
You could think of it like a very early version of a USB cable, but just for Yamaha Tone Generators. Actually Roland devices of the same vintage have the same port, my Roland SC-8850 has one too. The maximum cable length is 1.8 metres from a PC or 2 metres from a MAC. (Don't ask me why the difference!)
The CBX drivers, see above link, drive the MIDI data across that link and appear in Windows as MIDI devices. They need to be loaded before you try to run XGworks. When loaded they can be accessed and configured via
One of the major differences between this "To Host" or "To TG" link, as Yamaha calls it, and a conventional MIDI port, is that it is capable theoretically of connecting up to 5 simultaneous MIDI ports outwards from the PC, and a single MIDI port back to the PC! So when you load the MIDI CBX driver and set it to "multiport" it appears as "Yamaha CBX A Driver", "B Driver" up to "E Driver" as MIDI Out ports, and a single "Yamaha CBX Driver" as XGworksvery shortly.
The last of the Tone Generators produced by Yamaha, the MU1000 and MU2000, had USB links and "To Host" sockets, as well as an SPD/IF digital audio output port too. Yummy!
If you have a more modern keyboard, such as a PSR or Tyros or similar, then it's almost certainly going to have a USB interface and, I'm guessing, it'll come with USB driver software. On the same download page as the CBX driver link, provided above, you will find a link to the latest USB drivers. Make sure you download the right version for your version of Windows or OS.
And, of course, last but by no means least, we have the internal sound and audio card, the SW1000-XG. This is inserted into a PCI slot on the motherboard of your computer, if it has one. They're becoming increasingly rare.
There are some useful documents
and specifications to be found here courtesy of Jørgen Sørensen on
his "Unofficial YAMAHA Keyboard Resource Site." Definitely worth
a visit.
"XG specifications (2.00 2001)" and "Recommendations for Producing
XG Song Data (2.00 1999)" are worth downloading. You may find them hard
going at the beginning, but they will gradually begin to make sense as we
progress.
XGworks Program Setup
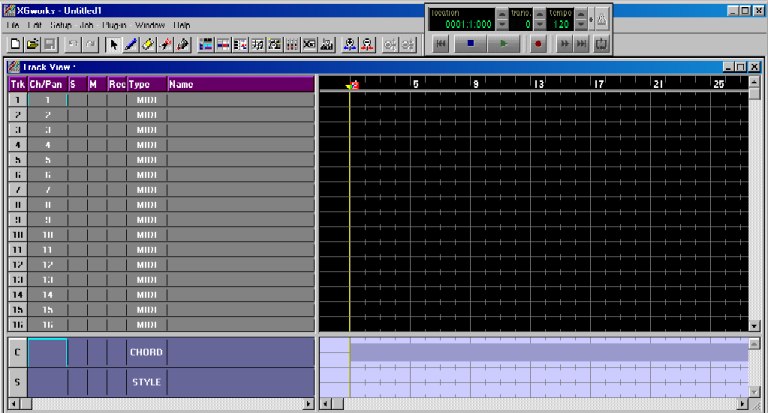 When you have set up XGworks correctly and
applied any patches that may be needed depending upon the version of the
program you are usng and the operating system you are running under, Windows
98SE , 2000, XP etc. (check out the "files" section in the XGworks
Users forum on Yahoo and fire up the program, you should get a window
that looks something like this.
When you have set up XGworks correctly and
applied any patches that may be needed depending upon the version of the
program you are usng and the operating system you are running under, Windows
98SE , 2000, XP etc. (check out the "files" section in the XGworks
Users forum on Yahoo and fire up the program, you should get a window
that looks something like this.
Note: click on any of the screen shots to see a larger version of the screen.
The order of the columns will be different (I've moved them around to suit
myself), the size of the "Track View" window (that's what we're
looking at here) may not be the same, and the the vertical bar, (the "Split
Bar") could be in an alternate position in what you're looking at. Additionally
there may or may not not be a horizontal "Split Bar" with "Chord" and "Style" sections
showing below it.  And,
lastly, the "Play Controls" (the little box with what looks like
CD player controls at the bottom) is unlikely to be in the same position
as it is in my picture. (It can be slid around using "Click and Hold" in
one of the blank spaces within its window.)
And,
lastly, the "Play Controls" (the little box with what looks like
CD player controls at the bottom) is unlikely to be in the same position
as it is in my picture. (It can be slid around using "Click and Hold" in
one of the blank spaces within its window.)
No matter. We will learn during these tutorials, if we don't already know how to do it, how to resize windows, change their positions, slide the split bar left or right to expose or conceal various MIDI / audio setup parameters, and how to conceal or view the Style / Chord track display.
System Setup for MIDI and audio
Before we can start using XGworks properly, like most pieces of sequencing software or DAWS, we need to make it aware of what is connected to the PC in the way of Yamaha tone generators, keyboards and audio devices. If you are using any USB devices, close down XGworks, connect the devices, and then start up XGworks again. Like most pieces of software it can only be made aware of what's connected and known by Windows at the time.
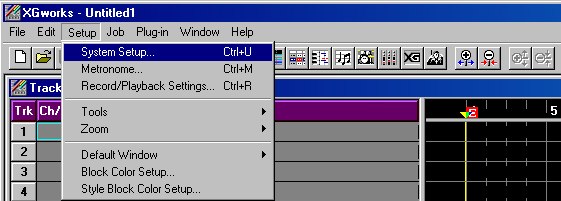 Now
click on "Setup" item in the Menu bar as shown in this screen
shot.
Now
click on "Setup" item in the Menu bar as shown in this screen
shot.
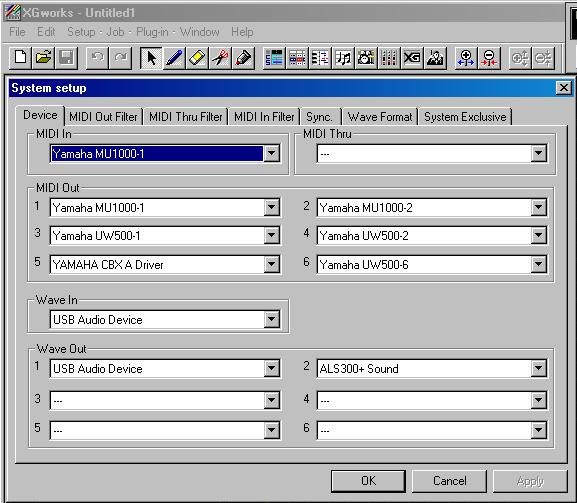 Then
select the System Setup... option and
the result should look something like the screen shown on the right. Here
you must go through setting up the MIDI input (and thru if necessary) and
the MIDI outputs, up to six ports (84 channels in total) and then the audio
(wave) ins and outs. Use the drop down lists at the right of each box to
select from those available.
Then
select the System Setup... option and
the result should look something like the screen shown on the right. Here
you must go through setting up the MIDI input (and thru if necessary) and
the MIDI outputs, up to six ports (84 channels in total) and then the audio
(wave) ins and outs. Use the drop down lists at the right of each box to
select from those available.
It's worth noting that none of the settings can be duplicated in another
place. If you don't have e.g. 6 separate MIDI outs then the empty places
should have the value "---" in them, which is the last value in
each drop down list.
Note to PSR keyboard (Portatone) or Electone users etc.
If you are intending to input to XGworks from
your keyboard, and would like the sounds of the keyboard to be played back
via XGworks, then select the keyboard as both "MIDI
in" and "MIDI thru" then, on the keyboard, set "local
= off". This disconnects the keyboard from the on-board sound creation
and allows XGworks to forward the MIDI
"local = on".
Setting up XG Editor
The next thing we need to do before using XGworks is to set up the XG Editor. It's this process that lets XGworks know what device, e.g. MU50 or SW1000, we are going to be using. Why is it necessary? Because it selects the sets of voices and effects that the device has available to it. And that means we can program those options in a relatively straightforward way when we want to create or modify a MIDI file to the XG standard.
We need to click on the XG logo in the main tool bar in the block of eight icons.
![]()
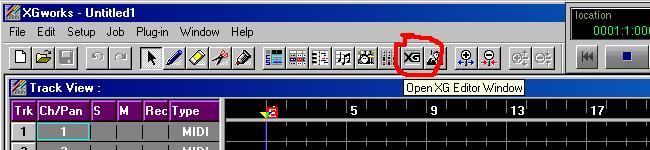 It's
the one I've tried to circle in red in this screen shot.
It's
the one I've tried to circle in red in this screen shot.
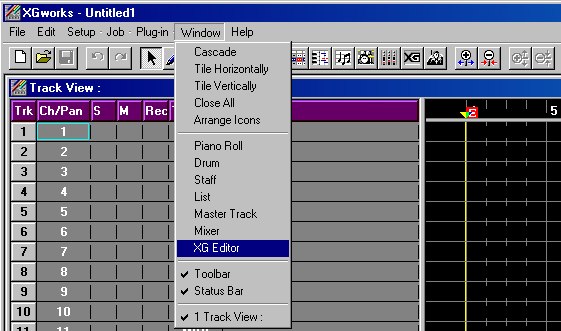 It
can also be opened from the main menu bar.
It
can also be opened from the main menu bar.
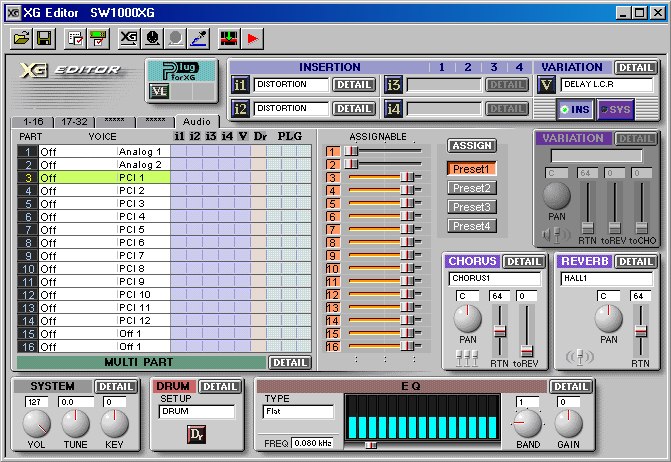
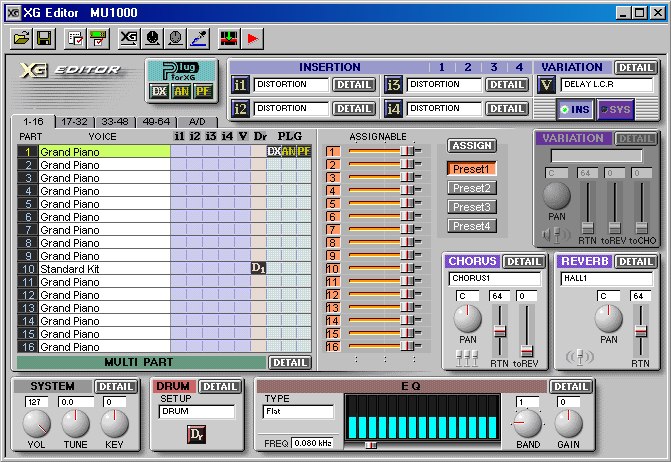 When
we've opened it, we'll get a window that will look somewhat similar to this
one. Only this one has four "Insertion Blocks" (upper
center and right I1, I2 etc.), yours may only have two. And some of the
sections may be grayed out, like the "Variation Block" over on
the middle, right. You may only have 16 channels to play with and possibly
no A/D parts. The MU1000, that I use, has four 16 channel sound producers
(64 channels) and two A/D inputs on its front panel.
When
we've opened it, we'll get a window that will look somewhat similar to this
one. Only this one has four "Insertion Blocks" (upper
center and right I1, I2 etc.), yours may only have two. And some of the
sections may be grayed out, like the "Variation Block" over on
the middle, right. You may only have 16 channels to play with and possibly
no A/D parts. The MU1000, that I use, has four 16 channel sound producers
(64 channels) and two A/D inputs on its front panel.
The Model Setup Window
![]() We
need to set up two windows here. The first, the "Model Setup" window,
can be opened by clicking on the fourth icon from the left in the XG editor
tool bar (shown above) or by pressing the "F5" key.
We
need to set up two windows here. The first, the "Model Setup" window,
can be opened by clicking on the fourth icon from the left in the XG editor
tool bar (shown above) or by pressing the "F5" key.
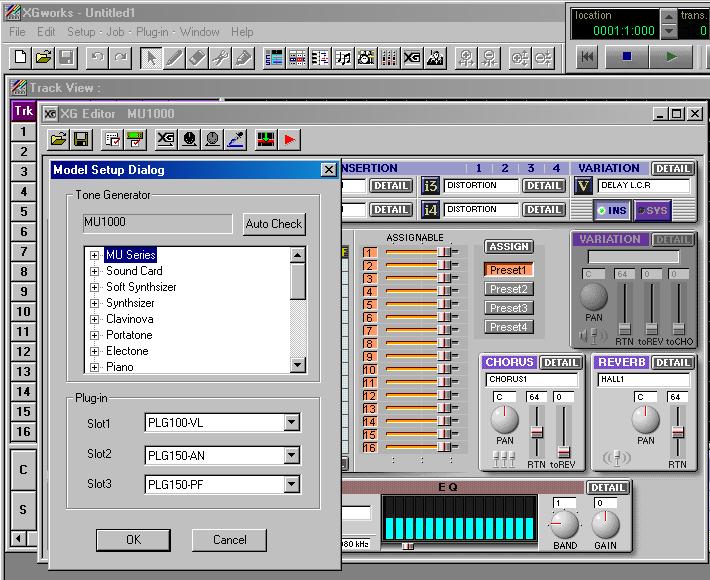 The result
should be a sub-window, the "Model Setup Dialog" that looks
like the screen shot at right. In it we need to select the model of XG Tone
Generator that we are using. By opening the appropriate list (click on the "+" sign
on the left of the model type) and selecting the model from that list. In
addition, if the device we are using has the ability to support additional "synth" cards
(up to three), we can add them to the "plug-in slots". You'll see
three set up in mine, above.
The result
should be a sub-window, the "Model Setup Dialog" that looks
like the screen shot at right. In it we need to select the model of XG Tone
Generator that we are using. By opening the appropriate list (click on the "+" sign
on the left of the model type) and selecting the model from that list. In
addition, if the device we are using has the ability to support additional "synth" cards
(up to three), we can add them to the "plug-in slots". You'll see
three set up in mine, above.
 This
screenshot shows the
setup for the SW1000-XG card. It supports up to 32 MIDI channels, but is unique
(in Yamaha Tone Generator terms) in that it can also process up to 12 channels
of audio as well as having two A/D inputs. Shown below is the A/D and audio setup.
This
screenshot shows the
setup for the SW1000-XG card. It supports up to 32 MIDI channels, but is unique
(in Yamaha Tone Generator terms) in that it can also process up to 12 channels
of audio as well as having two A/D inputs. Shown below is the A/D and audio setup.
XG Editor Setup Dialog
In XG Editor setup, we need to setup some parameters within the Editor itself. We open this dialog by using the third icon in the XG Editor tool bar (see above), the "XG Editor Setup Dialog" or by using the "F4" key.
The Editor is capable of setting up four of the possible six MIDI output ports that we selected earlier, and it's here that we select those ports, where it says "MIDI Output Port".
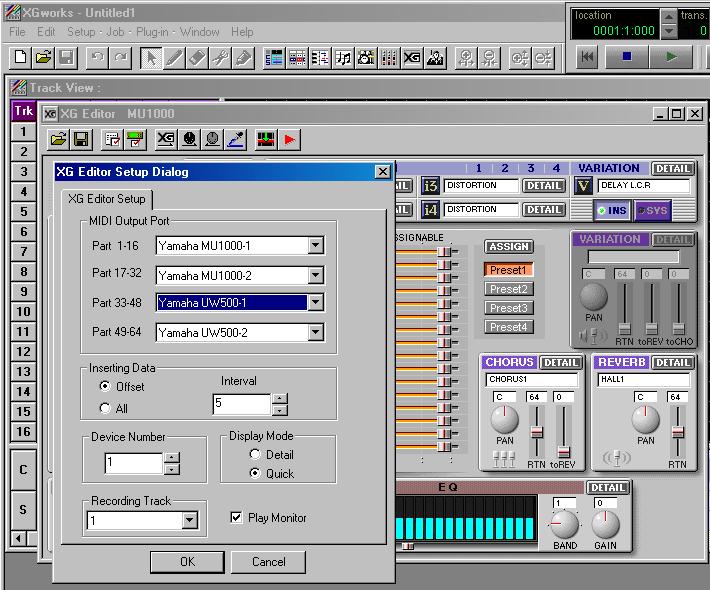 We can also define whether, when we ask the Editor to save what we've changed
(selected voices, reverb etc.), whether it inserts all the parameters it
can or just the changes. I strongly suggest you DO NOT select "all",
but "offset". The result of saving all can be a file of 155 KiloBytes
before any music is entered into it! You have been warned.
We can also define whether, when we ask the Editor to save what we've changed
(selected voices, reverb etc.), whether it inserts all the parameters it
can or just the changes. I strongly suggest you DO NOT select "all",
but "offset". The result of saving all can be a file of 155 KiloBytes
before any music is entered into it! You have been warned.
So in the "Inserting Data" area tick "Offset" and I suggest "Interval" is set to "5". This is how many "ticks" will be left between each inserted MIDI parameter or SysEx event. (See my previous MIDI tutorials about "ticks" as a sub-division of Beat within a Measure.)
Device Number is usually "1".
Display Mode "Quick" or "Detail" will give you one of the following two windows when you try to adjust Reverb for example.
This is the "Quick Window".
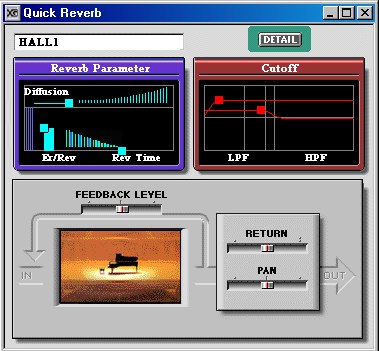 |
And this is the "Detail Window".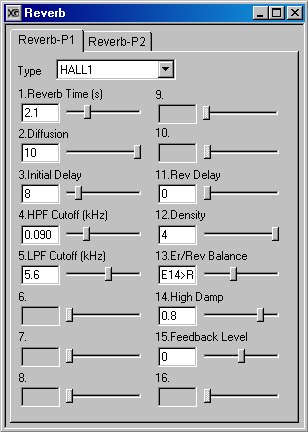 |
However, you can always get to the "Detail Window" from the "Quick Window" later.
Lastly "Recording Track" and "Play Monitor". Recording Track defines where the XG Editor will save all the parameters that you set up in it and Play Monitor will play the sound of the instrument that you select in the instrument definition section - to be defined in the next tutorial.
And that's it. Phew!
"OK" the various windows we've opened and XGworks will remember the setup. And we're set.
What's Next?
In the next tutorial, I intend to look at various ways of setting up "Voices", or, if you like, inserting "Program Change" MIDI messages.
I hope this all makes sense. Any questions, fire away as usual. And please let me know if you spot any mistakes or typos.
And please, please give me some feedback, do! Authors of all kinds thrive on feedback, even if it's not always positive.
Copyright © John Garside, 2011
