The Tyros2/3/4/5 models provide users with the ability to record a performance as an audio file in WAV format. This file can then be moved to a computer where the WAV file can be used to create a CD or reformatted into an MP3 file, which is much smaller than the WAV file. This lesson will expand on the Yamaha Owners Manual instructions and provide an example of converting the WAV to an MP3 format file. The procedure is somewhat different on the Tyros4 and Tyros5 models as will be noted below.
Recording Your Performance
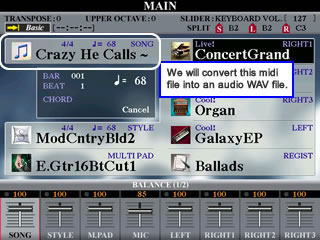
You can make an audio recording of your performance as you play. You can also capture your performance as a midi file and then record that midi file as an audio file. In this lesson, I will use this second alternative. I'll take a midi file, it can be something you recorded or a midi file you downloaded from the internet, and then show the steps to convert that midi file into an audio file.
Why would you want to do this? You can share your music in the form of a midi file, but it will only sound as good as it does to you if the person receiving the midi file also has the same model keyboard you have with the same voices available. If you create an audio file, then you can share your music with others who do not have your keyboard or, in fact, any keyboard. They will be able to play the song through their computer or through an MP3 player or a CD player.
 For
this example, I'll take a midi file of Crazy
He Calls Me, which I had
recorded on the Tyros3. You can see that I have loaded that file into the
SONG cell on the main page. When we are ready to record, instead of playing
the keyboard, I will simply play this midi file.
For
this example, I'll take a midi file of Crazy
He Calls Me, which I had
recorded on the Tyros3. You can see that I have loaded that file into the
SONG cell on the main page. When we are ready to record, instead of playing
the keyboard, I will simply play this midi file.
If you are trying this by recording yourself, you will need to get your keyboard set up with the right style and voices selected so that you are all ready to play your song.
Hard Disk Recorder
 On
the right side of your keyboard panel are a series of buttons under the heading
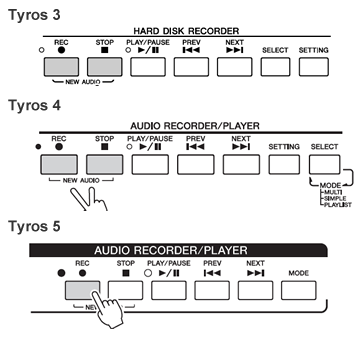
HARD DISK RECORDER on the Tyros3. On the Tyros4 and the Tyros5, this section is labeled AUDIO RECORDER/PLAYER, but it is on the left side of the keyboard for the Tyros5. The Tyros3 and Tyros4 include buttons labeled SELECT and SETTING, although their position is reversed. These buttons are gone on the Tyros5 and replaced with a single button labeled MODE. You will use these buttons to create and work with your
audio files.
On
the right side of your keyboard panel are a series of buttons under the heading
HARD DISK RECORDER on the Tyros3. On the Tyros4 and the Tyros5, this section is labeled AUDIO RECORDER/PLAYER, but it is on the left side of the keyboard for the Tyros5. The Tyros3 and Tyros4 include buttons labeled SELECT and SETTING, although their position is reversed. These buttons are gone on the Tyros5 and replaced with a single button labeled MODE. You will use these buttons to create and work with your
audio files.
Adjust Record Volume
 The
first step is to check the volume setting on the record monitor.
The
first step is to check the volume setting on the record monitor.
- On the Tyros3, press the HARD DISK RECORDER - [SETTING] button to call up the AUDIO SETTING display.
- On the Tyros4, you need to select the SIMPLE type of recording. Pressing the [SETTING] button will bring up the SIMPLE Recording screen, which has the REC MONITOR.
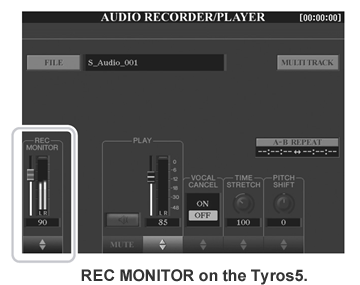
- On the Tyros5, press the [REC] button to bring up the AUDIO RECORDER/PLAYER screen where you will find the REC MONITOR control.
When you play a few keys, you will see the keyboard volume reflected in the REC MONITOR as you play. The music sound bars should NOT extend beyond the top 0 mark. If it does, the light under REC monitor goes on. Adjust the volume down until even the loudest part does not extend beyond this boundary. Yamaha's advise is to "adjust the control so that the volume doesn't constantly go into the 'red' and light up the indicator." For testing with the midi file, just press the PLAY button for the MIDI and watch the REC MONITOR adjusting the setting as needed. I assume you understand that you would use the buttons below the screen to adjust this setting.
Create A New Audio File
The next step is to create a NEW AUDIO file. Note that
the [REC] and [STOP] buttons under the HARD DISK RECORDER group have the
label "NEW AUDIO" below the buttons. On the Tyros3, simultaneously press both of these buttons
to create a new audio file. 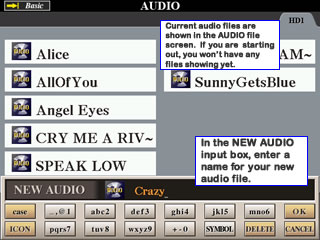 This
will open up the AUDIO display screen showing your current audio files. If you are just starting out, there won't be any audio files yet.
At the bottom of the screen is the NEW AUDIO name input box. The default
name is "NEW AUDIO", which you should change to something closer to the song
you are about to record. In the screen shot, I entered "Crazy" as the file
name. There is no need to be too explicit if you intend to move this file
over to your PC where it will be much easier to rename the file as needed. When
you've entered your new name, press the [8A] button for OK.
This
will open up the AUDIO display screen showing your current audio files. If you are just starting out, there won't be any audio files yet.
At the bottom of the screen is the NEW AUDIO name input box. The default
name is "NEW AUDIO", which you should change to something closer to the song
you are about to record. In the screen shot, I entered "Crazy" as the file
name. There is no need to be too explicit if you intend to move this file
over to your PC where it will be much easier to rename the file as needed. When
you've entered your new name, press the [8A] button for OK.
On the Tyros4, pressing the [REC] and [STOP] buttons simultaneously opens up a choice box that lets you select MULTI, SINGLE, or CANCEL. MULTI means a multi track recording with various recording methods and full flexibility. SINGLE means a single track recording, which lets you record quickly and directly and creates a WAV file named "S_Audio_***.WAV.". For this example, you would select the SINGLE option.
 On the Tyros5, pressing the [REC] button brings up the AUDIO RECORDER/PLAYER display, as mentioned above, and also creates a new file named "S_Audio_***.WAV." The filename is shown in the window to the right of the FILE button. If this is the first time you are trying this, the file would be called "S_Audio_001." If that file already exists, the new file would be named "S_Audio_002." The [REC] button will be flashing, which indicates that the keyboard is ready for you to record.
Record Your Song
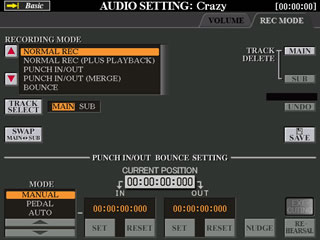
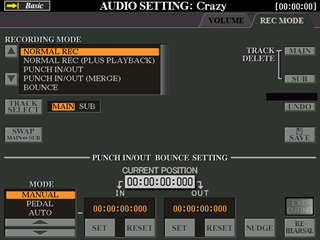 On the Tyros3, press
the [REC] button to enable recording. The REC MODE page is automatically called
up. Now you are ready to record. Nothing is actually being recorded yet, however. You
could <TAB> over to the VOLUME tab and check the volume once more if you like. <TAB>
back to the REC MODE tab. Your current position in the song is shown on this screen. Since
you haven't started, the current position is shown as zero.
On the Tyros3, press
the [REC] button to enable recording. The REC MODE page is automatically called
up. Now you are ready to record. Nothing is actually being recorded yet, however. You
could <TAB> over to the VOLUME tab and check the volume once more if you like. <TAB>
back to the REC MODE tab. Your current position in the song is shown on this screen. Since
you haven't started, the current position is shown as zero.
On the Tyros3 and the Tyros4 and the Tyros5, press the [PLAY/PAUSE] button to start recording. Start the Style and play the keyboard if you are recording live. If recording from a MIDI file, be sure the MIDI position is set at the beginning of the song. Press [PLAY/PAUSE] on the HARD DISK RECORDER (AUDIO RECORDER on T4 and T5), which starts the recording, and then immediately press the [PLAY/PAUSE] on the midi song, which will start the song playing. The midi file will play and the audio recorder will record it.
When the song is finished playing, press the [STOP] button on the HARD DISK RECORDER (on the AUDIO RECORDER for the Tyros4 and Tyros5). If you are recording a midi file, press the [STOP] button for the midi as well. You can listen to the result now by pressing the [PLAY/PAUSE] button in the RECORDER section.
Saving your Recording
 If
you are happy with your recording you now need to save it. Press the [I] SAVE button
to save your new recording. You are presented with a prompt asking you to confirm
that you want to save this audio file. Press the [G] OK button
to complete the save operation. Your completed audio file is saved and can be viewed
with the other audio files you may have created and saved on your hard drive.
If
you are happy with your recording you now need to save it. Press the [I] SAVE button
to save your new recording. You are presented with a prompt asking you to confirm
that you want to save this audio file. Press the [G] OK button
to complete the save operation. Your completed audio file is saved and can be viewed
with the other audio files you may have created and saved on your hard drive.
On the Tyros5, your file is saved with your other audio files, which you can view by pressing the FILE button on the AUDIO RECORDER/PLAYER screen. This opens up the AUDIO display screen showing your audio files. There is a NAME option there if you want to rename the file to something other than S_Audio_001.
Audio Data Playback
 To
listen to any of the audio files saved on your hard drive, press the HARD
DISK RECORDER [SELECT] button on the Tyros3, which will open up the AUDIO file display
screen. On the Tyros5, press the MODE button to open up the AUDIO file display screen. Then use the [A]-[J] buttons to select the desired audio file and
press the HARD DISK RECORDER [PLAY/PAUSE] bottom to start playback. To
stop the playback, press the [STOP] button.
To
listen to any of the audio files saved on your hard drive, press the HARD
DISK RECORDER [SELECT] button on the Tyros3, which will open up the AUDIO file display
screen. On the Tyros5, press the MODE button to open up the AUDIO file display screen. Then use the [A]-[J] buttons to select the desired audio file and
press the HARD DISK RECORDER [PLAY/PAUSE] bottom to start playback. To
stop the playback, press the [STOP] button.
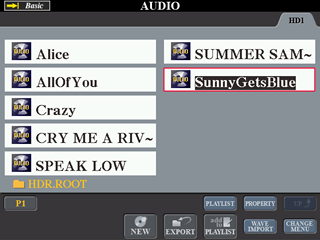
The HARD DISK RECORDER [PREV] and [NEXT] buttons can be used to move to the previous or next song in your list of audio files. For any selected song, the PROPERTY option will provide you with properties for that particular audio file.
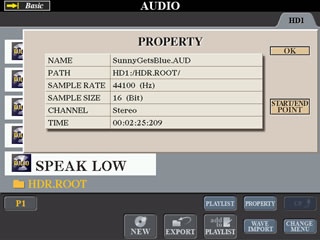 In
the screen shot above, SunnyGetsBlue is selected
and the properties for that file are displayed in this screen shot. All of
the audio files will have a sample rate of 44100 (HZ) and a sample size of
16 (bits). This song plays for 2 minutes and 25 seconds. The START/END
POINT option allows you to alter the start and end point of the recording.
In
the screen shot above, SunnyGetsBlue is selected
and the properties for that file are displayed in this screen shot. All of
the audio files will have a sample rate of 44100 (HZ) and a sample size of
16 (bits). This song plays for 2 minutes and 25 seconds. The START/END
POINT option allows you to alter the start and end point of the recording.
In the AUDIO screen shots shown here, note the CHANGE MENU option [8B] button. The menu shown allows you to create a NEW audio file or EXPORT an audio file. I'll discuss the export option in the next section.
![]() If
you press the CHANGE
MENU option, a second set of menu options appear. These provide the
standard file operations that allow you to create folders, NAME files, CUT or DELETE files,
and COPY or SAVE files.
If
you press the CHANGE
MENU option, a second set of menu options appear. These provide the
standard file operations that allow you to create folders, NAME files, CUT or DELETE files,
and COPY or SAVE files.
Exporting Audio File To USB Drive (T3)
The EXPORT function in the AUDIO display screen allows you to transfer your recorded audio file to a computer via a USB storage device, for further editing and/or recording. The audio files that can be exported are in stereo WAV format (44.1 kHz sample rate and 16-bit resolution). Follow these steps to export your file.
- Insert a USB storage device to the USB TO DEVICE terminal.
- Press the HARD DISK RECORDER [SELECT] button to call up the AUDIO display.
- Press the [8B] CHANGE MENU button if necessary, then press the [5B] EXPORT button to call up the Export function.
- Select the desired audio file by using the [A]-[J] buttons. The selected file name is highlighted. You can continue to select additional files here, as many as desired. If you want to select all files in the current folder, press the [6B] ALL button.
- After you finish the selection, press the [7B] OK button.
- Select the desired destination for exporting by using the [TAB] buttons. Generally, a USB storage device will show up as “USB1” in the display. When the device is selected, all folders and audio files on the device are automatically shown. If necessary, you can specify the desired folder by using the [A]–[J] buttons. For this example, I created a new folder on my USB drive and labeled "WAV". I selected this folder as the destination for my audio file.
-
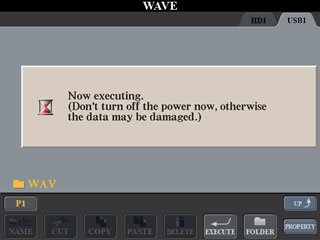 Press
the [6B] EXECUTE button to export
the file(s). Exporting may take as little as a couple of seconds or as
long as a several minutes, depending on the file size, as well
as the number of files you are exporting. This screen shot shows the, initially
empty, WAV folder on the USB1 drive and the warning message that you have
to wait until the export is completed before turning of your keyboard.
Press
the [6B] EXECUTE button to export
the file(s). Exporting may take as little as a couple of seconds or as
long as a several minutes, depending on the file size, as well
as the number of files you are exporting. This screen shot shows the, initially
empty, WAV folder on the USB1 drive and the warning message that you have
to wait until the export is completed before turning of your keyboard.
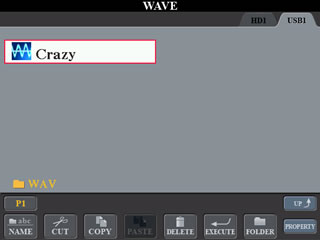 After
the export is completed, you see the converted audio file, now in WAV format,
on your USB drive. The next step is to remove the USB drive from your keyboard
and take it to your computer where you can then copy it to your PC hard drive,
or work on it in the USB drive if you prefer. Be aware, however, that each
of these WAV files will be very large, 20-30 MB or larger. So be sure you
have enough space on your USB drive to accommodate them.
After
the export is completed, you see the converted audio file, now in WAV format,
on your USB drive. The next step is to remove the USB drive from your keyboard
and take it to your computer where you can then copy it to your PC hard drive,
or work on it in the USB drive if you prefer. Be aware, however, that each
of these WAV files will be very large, 20-30 MB or larger. So be sure you
have enough space on your USB drive to accommodate them.
Exporting WAV file on the Tyros5
The Tyros3 created an "audio" file that had to be converted to a WAV file when you were exporting it to your USB drive. On the Tyros5, the audio files are created as WAV files already. So, to move one of your created songs to a USB drive, follow these steps:
- Press the MODE button to open up the AUDIO RECORDER/PLAYER screen.
- Press the FILE button to open up the AUDIO screen. It will show files on the hard drive (HD). There will be no PRESET or USER tabs available. However, if your USB drive is plugged into your keyboard, the USB drive will be available.
- Use the COPY option to select one or more of your audio files. Select your files and then press OK.
- Tab over to the USB tab and then use the PASTE option to paste the copied files onto your USB drive. The files will be WAV files.
- You can now remove your USB drive and take the WAV files to your PC.
Converting WAV File to MP3 File
The next step can be done in a variety of different ways depending on your computer system and the software you have available. I will use Apple's iTunes to do the conversion. This program is free and can be installed on your Windows PC or on Apple's computers.
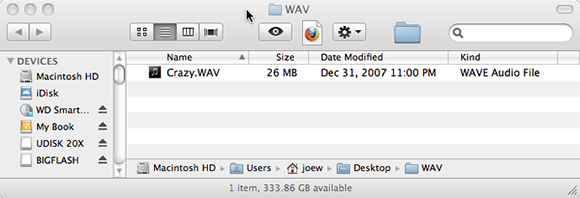
I connected the USB drive to my iMac and copied the WAV folder to my desktop. The contents of that folder, shown below, include only the one audio file which, as you can see is 26MB - a very large file. The filename is "Crazy.WAV". The "Date Modified" comes from the Tyros3 and is the date permanently etched into files created on the Tyros3.
The iTunes program can import files from your PC as well as "rip" songs from a CD. By launching iTunes and using the "Add To Library option", I imported the WAV file into iTunes. The following screen shot shows the "Crazy" file imported into iTunes and playing. Note that the size shown here is 24.9MB. The song plays perfectly and can be used with other WAV files to create a CD if desired.

Just like on a PC program, you can see available options by right-clicking your mouse. In the screen shot below, I have selected the Crazy.WAV file. Among the available choices is "Create MP3 Version". Well, that's simple enough, and I selected that option. iTunes then created a new version of that file in an MP3 format.
When the conversion is completed, the new song shows up in the list of songs (screen shot below). Note the difference in size. The MP3 version is 3.4 MB in contrast to the WAV version, which is 24.9 MB. The MP3 version is playing in iTunes. I can find this MP3 version by navigating to where iTunes stores its files and simply copying the MP3 version to wherever I want.

This page updated on September 19, 2024 .