 Your
Keyboard Deserves Better Supports
Your
Keyboard Deserves Better Supports
Your keyboard sounds great. The supplier gives you a free stand or you buy a metal X frame that looks more like an ironing board and you can’t get your feet comfortable. The music falls off every time you turn the page and anything larger than a couple of pages catches the controls.
There are some stands that might look great on stage but do you really want one in your home. Then there all those wires, which try as you might, are impossible to hide.
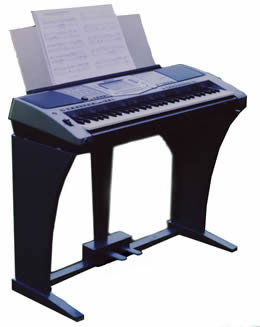
This stand is designed to appeal primarily to the home keyboard player.
Lightweight but stable;
Comfortable playing height;
Large music stand;
Styled to complement keyboard;
Simple to Construct
Construction Details for Keyboard stand
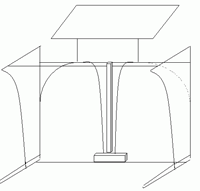
It is basically a one-piece wooden frame with the end panels covered with hardboard, which are attached to the feet. Cross members line up with the keyboard feet and the corners are reinforced with hardboard quadrants. The music stand is removable and is mounted on sockets on the top cross member.
 I
made the stand specifically for my Yamaha PSR-1000 with the top of the end
panels moulded to match the base of the keyboard. An earlier prototype used
pegs, which located with the recessed screw holes underneath the keyboard.
This gave a very positive location but it could be difficult to lift on and
off.
I
made the stand specifically for my Yamaha PSR-1000 with the top of the end
panels moulded to match the base of the keyboard. An earlier prototype used
pegs, which located with the recessed screw holes underneath the keyboard.
This gave a very positive location but it could be difficult to lift on and
off.
I have sketched the basic layout but details have been omitted as I expect constructors to adapt the idea to their own individual keyboard. The stand has also been used successfully with a PSR-340 and a PSR-3000. I imagine the base of most of the Yamaha keyboards use the same unit but cannot guarantee it.
The pedal unit is home-made with the wiring concealed in the central brace. The whole is painted to match the keyboard.
I have chosen a playing height of 730 mm, which gives a stand height of 645 mm. The width is the same as the keyboard 945. The feet are 380 mm made of approx 40 * 40 mm section and tapered at the front. Cross braces are made of suitable timber and are screwed and glued to the end panels.
I think it is best to start with the end panels, which I made 350 mm at the top and 85 mm at the bottom. They could be made from MDF, but I made a frame of 25 * 25 mm timber, using a template for the curved parts. Joints for the cross bracing were incorporated and then they were covered in hardboard, which is very strong but light. I routed the base of each foot to allow for fixing screws into the bottom of the end frames. This also reduced the weight. After adding the cross braces and pedal unit, hardboard quadrants were glued and pinned to the top corners, which had a remarkable effect on the overall stability. The central brace conceals the pedal wiring but otherwise is mostly for decoration. I considered adding the power supply into the pedal unit and might modify it next time.
I suppose the stand could be adapted to be collapsible but care would need to be taken to maintain the rigidity. Heavier section would also then be needed to make it durable. The home version, which I made, is very rigid but not intended to be taken out to gigs.
BobDurham r3d3@onetel.com
August 24, 2024 .