Many visiting this page may not even be aware of what registrations are. So let's first find out what this is all about.
Generally speaking - registrations are simply the saving of your favorite keyboard settings. The settings are things like right-hand voice selections including effects, styles, time signature, foot pedal settings and many more.
Thanks to registrations, you can access your most favorite settings quickly and with very little effort.
For those who have had a keyboard other than a Tyros in the past - there will be a learning curve with respect to saving registrations. This new generation of keyboards opens up many more opportunities than ever existed before, but it also requires a slightly different approach to managing the new features.
New opportunities?
Yes, meaning that you can now structure registrations in folders and sub-folders, similar to folder structures on a computer. And it is a good idea to bring some structure into your registrations!
Structures: Folders and Sub-Folders
Before you begin adding any registrations on the keyboard; grab a pen and paper and draw out a basic outline of your folder structure.
The goal shall be to set-up a hierarchy with (for now) empty folders and sub-folders; or "empty" containers that will later be used to store your registration banks. Don't start adding registrations on your keyboard before giving this some thought first!
The most critical goal of this process is to obtain a structure that will allow you later to access saved registrations as quickly as possible while playing the instrument.
What should be the sort criteria for your favorite settings? Should it be...
- Alphabetical
- By dance style (waltz, foxtrot, discofox, ...)
- By instrument (best instrumentation for piano, strings, brass, ...)
- By theme (musicals, jazz, Christmas, by artist, ...)
- By mood
- By event situation (introduction, dinner, dance, party, goodbye)
- By dance number
- Also, if you play with different bands or groups, name the main registration folders accordingly.
Over the past years, I have developed the following folder hierarchy, which has worked out for me perfectly. Take a look at the folders on my keyboard hard drive below. Each keyboard section has its own main folder:
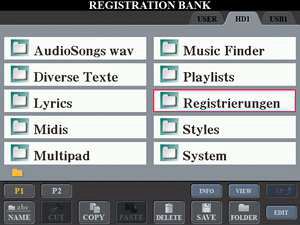 Audio Songs
Misc. Text
Lyrics
MIDI
Multipads
Music Finder
Playlists
Registrations
Styles
System
Voices
With this layout it becomes quite obvious where the later files shall be saved to.
Registrations Backups
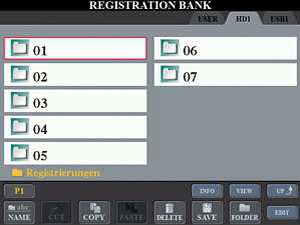 The screen shot here shows the subfolders you find after clicking on the "Registrations" folder on my hard drive. These subfolders are the consecutive backups of my registration files.
Copying existing registrations into a new folder and then building up upon the new folder has the advantage that you still have the earlier registration settings. You can access them quickly in case something goes wrong, which sometimes happens more often than you would like to think! ![]()
The last folder in this case is folder 07. It is the most current folder that I use today. Once I have added many new registrations to this folder, I will make another backup. I also backup my registrations to my computer. Registrations are very valuable and, as such, it is important to back them all up - and not just onto the keyboard.
Registration Folders
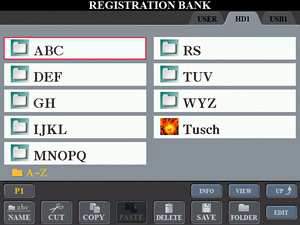
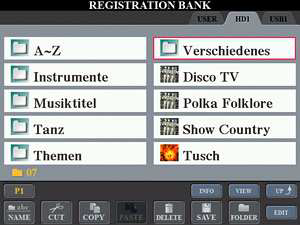
 Let's open folder number 07. We now are on the main page of my registrations, the center of it all. This is where I often operate from during my gigs, for example.
Why that is so will become evident as you keep on reading the description of the individual subfolders below.
A – Z
 In this folder I store registrations sorted by song title. Back when I began creating my first registrations on the Tyros, I simply used the first title letter as you can see in the right column of the picture. Over time however, the registration banks filled-up to the point where I had to split-up some of the individual alphabet letters. So "A" then became "Ab - An" and "Ap - Az". (I can't recall any title that begins with "Aa..." - hence my naming convention begins at "Ab - An" instead of "Aa - An".)
 As I added more and more titles over time, the structure above became cumbersome as, with over 130 registration banks, it was no longer possible to navigate through to a title with just two or three button clicks. So I had to re-design my folder structure where I
used multiple letters for one folder.
As I added more and more titles over time, the structure above became cumbersome as, with over 130 registration banks, it was no longer possible to navigate through to a title with just two or three button clicks. So I had to re-design my folder structure where I
used multiple letters for one folder.
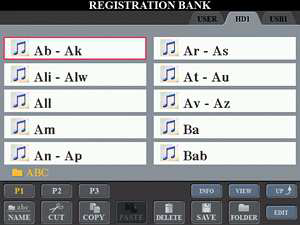 Within that, I have today a maximum of three pages
(P1, P2, P3) with up to 10 registration banks per page, which now is much more efficient. For example, the first page of the ABC folder content today looks like this:
Within that, I have today a maximum of three pages
(P1, P2, P3) with up to 10 registration banks per page, which now is much more efficient. For example, the first page of the ABC folder content today looks like this:
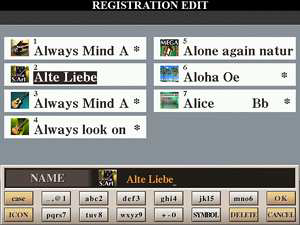
So far, we have just observed the "birds-eye-view" of the registration banks. Yet on one registration bank you can have up to 8 registrations. With the EDIT button in the lower right corner, you can get to the individual registrations - and once there, you can get back up again using the UP button.
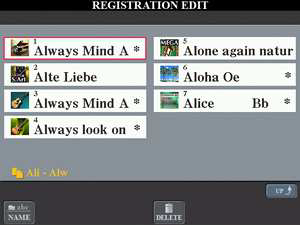 Let's see what that looks like when we click on the EDIT button. First, we can see that each title has a descriptive name. It is also possible for a title to occurs twice. The later is because the same title can be played differently. I, for instance, want to be prepared if another musician joins in where I just want to play the accompaniment.
Within a registration bank, I keep (whenever possible) the same instrument order. That is why you would find with my registrations the piano always in the first position, given that there even is a piano on this bank. A guitar always goes to number 3, regardless of what guitar! - etc.
This way I can dive into a registration quickly and without having to search for a particular instrument. And often it is not even necessary to open the individual registration view just to quickly get to the piano registration!
The asterisk (*) tells me if I already have the lyrics (in .txt format) stored, so I know if there is anything else that needs to be done.
The "A" after "Always Mind" (song title: "Always On My Mind") tells me that I am playing this song in the key of A major.
Instruments (Instrumente)
This is my pool of registrations with the best instrument settings. These registrations do not alter the style or change the keyboard split points.
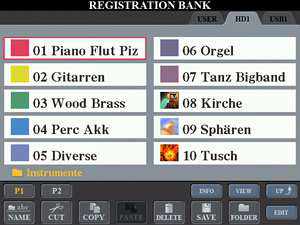 At times, they also consist of the top sounds of the OTS (right-hand voices that are called with the styles). The numbering before the voices is to put the voices in the order I like them rather than the default alphabetical sort.
Since I use two keyboards on my gigs, it can happen that depending on the song, I control the style using one of the two keyboards. With the instrument pool, which is identical on both of my keyboards, I have very fast and effective access to my favorite instrument settings.
I also use these instruments when I "freeze" a style, or when I play a different voice on each keyboard, like the melody on one keyboard and the counter melody on the other.
Music Titles (Musiktitel)
In this folder I store individual song titles that require many registration entries because they are quite extensive. For example Ravels Bolero or Music by John Miles. If you use a full registration bank to store the settings for a single song, you would store those registrations in this folder.
Dance/Ballroom (Tanz)
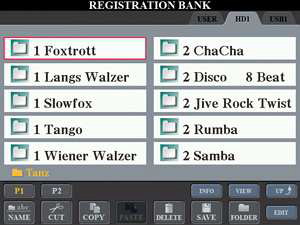 Registration banks in this folder are sorted by dance style. This allows me to quickly access a dance style upon a request from the audience. The screen shot shows the subfolders that I use here.
The numbers leading the dance style title help keep the standard dance styles in the left column and the Latin dance styles in the right column. At the same time, the numbers allow me to have the most important dance styles on the first page (P1).
Under P2 on the second page, I locate all the other dance styles that don't belong to my typical gig program. These include things like polka, schunkelwaltz, slow rock (blues in 6/8 beat), paso doble, rheinländer, etc.
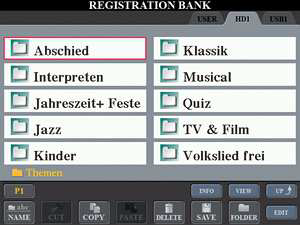 Themes (Themen)
Here I store registration banks that are difficult to assign to a particular category. The registrations in this case are always relevant to the theme title and often there are sub-folders beneath them. Abschied (Farewell), Interpreten (Artists), Jahreszeit+ Feste (Seasonal celebrations), Jazz, Kinder (Children), Klassik (Classical), Musicals, Quiz, TV & Film, Volkslied frei (Folk songs).
Disco TV, Polka Folklore, Show Country, Tusch (fanfare, effects)
 These are my four most frequently used registration banks and as such they deserve their own dedicated folder.
Here I have registrations I use for the opening act or "Tusch".
It is intentional that the same title appears in different folders, meaning it occurs multiple times and may, at first, appear to be redundant. This is because a musician in reality has to respond often very quickly to a song request from the audience, but also address a particular rhythm request within a dance performance.
Now that you have learned about my registration concept and strategy - it is now up to you to build your folder structure and hierarchies for storing your registrations as you go along.
Building Your Folder Structure
Creating your first folder
- Open the REGISTRATION BANK screen by pressing button [J] from the MAIN screen.
- Tab over from the USER to the UD1 tab.
- Select the FOLDER option by pressing the lower [7] button. If you have a Tyros5, you may have to toggle the lower button [8] to see the FOLDER option.
- Enter a name for your folder in the NEW FOLDER entry screen.
- Press the upper button [8] to select OK.
And now, let's create a sub-folder under this new folder:
- Use the appropriate button [A] through [J] to select the folder created in the previous step. This opens the folder and shows you the contents of this folder. Right now the folder is empty so you won't see any contents.
- Use the lower button [7] to once more select the FOLDER option and create a new folder.
- Enter a name for your new folder.
- Press the upper button [8] to select OK.
Use the upper button [8] under the display to select the UP option, which takes you back "up" to the parent folder. You again now see all the folders and can use the button controls [A] - [J] to open the corresponding folder.
You might try creating some of your folders right now...
Registrations
Create an empty registration bank
One thing that will make your life easier when it comes to storing registrations is to start with an "empty" registration bank. One way to so, that is, start with a clean slate, is to just turn your keyboard off and then on again. After startup, you should see 8 unlit registration buttons below the display to the right. And on your display you should see "New Bank". On some models, the registration bank shown may be the last one that was loaded when the keyboard was turned off. See the steps below for converting any registration bank into an empty one.
Here is how to save that empty bank:
- From the MAIN screen, press button [J] (REGIST) to bring up the REGISTRATION BANK screen. You can also get to this screen by simultaneously pressing REGIST BANK "-" and "+" buttons on your keyboard (starting with the Tyros 2).
- Select SAVE by pressing the lower [6] button.
- Give the registration bank a name and optionally an icon (see further down)
- Press the upper [8] button to indicate your new name is OK.
If you already have a registration bank loaded, follow step 1 above to bring up the REGISTRATION BANK screen. Your currently loaded registration bank will be highlighted. Now you can delete all the entries in that registration bank and save it under a name such as "Empty" or "Blank". To do this:
- Press the lower [8] button to EDIT the registration bank. A REGISTRATION EDIT screen appears.
- Press the lower [5] button to select the DELETE option.
- Use the [A] - [J] buttons to select the registration banks that you want to delete. You can use the lower [6] button to select ALL.
- When you are finished selecting registration banks, press the lower [7] button (OK} to delete the contents - or the lower [8] button to CANCEL the operation.
- You will be asked to confirm that you really do want to delete the entries.
- With all the entries deleted, the REGISTRATION EDIT screen will be blank and you will see that the 8 registration buttons on the keyboard will now all be unlighted indicating that there is no data there.
- Press the upper [8] button to go UP to the REGISTRATION SCREEN.
- Press the lower [6] button to SAVE your empty registration file.
- Give it an appropriate name and then select OK.
Now, whenever you want to start with an empty registration bank, just select the "empty" bank you created above. By using "cut" / "paste" of this empty bank - you can move it to any location in your folder structures at any time.
Create a new registration bank
Prerequisite: You have created an empty registration bank as just described above and you see this empty bank on your display.
- First, set up your keyboard with all the settings that you want to save.
- Then, if it isn't loaded already, use the button controls [A] - [J] to select the empty bank.
- Press the [MEMORY] button on the keyboard.
- This brings up the REGISTRATION MEMORY CONTENTS window. The GROUP SELECT box at the bottom of this window lists the various parameters that can be saved. Use the [1]-[7] buttons to move to individual items in the list and the [8] buttons to add or remove a check mark. Items that are checked will be memorized.
- Finally, press one of the eight REGISTRATION MEMORY buttons (1 - 8) where you want to save the setting.
And now what? Where do I go with this new bank?
You have, hopefully, already created some folders. Bring up the REGISTRATION BANK screen and then, using the [A]-[J] buttons, navigate to the folder where you would like to store the registration bank. The name of the folder you selected should be visible right above "P1". You will see the sub-folders, if any, in that folder and the registration files already stored there. If there is nothing in that folder, the screen will be blank. Now, to save the registration bank that you have just stored something to, follow these steps:
- Select the SAVE option (lower button [6]).
- Important: Give this registration bank a name that does not already exist in this folder.
- Select an appropriate icon for this registration bank.
- Complete the process by pressing the upper [8] button indicating OK.
- You should now see your newly named registration in the folder.
Adding a new entry to an existing registration bank
You just found a great setting that should get stored right away. Bring up the REGISTRATION BANK screen and navigate to the registration bank file where you would like to add this setting. You may have to open a folder or subfolder or use the UP option to move up to a parent folder. Then, select the bank using again buttons [A] - [J].
The registration bank will be loaded and the buttons that are not lighted will show you which registration locations are still available. Now, just save your current keyboard settings to one of those available locations:
- Press MEMORY.
- Use the bottom rocker buttons to select what you want to store,
- Press the REGISTRATION MEMORY button where you want to store the current setup.
- Now, be sure to SAVE your updated registration bank using the steps outlined above.
Do not change the name and icon of the bank! If you do, then the content of the original bank with the same name will not be overwritten with the previous and new data!
Luckily if you forget, the keyboard will show a warning "Name already exists. Overwrite?" - "Yes!!"
Had we given previously a different name, then it would have created a new bank that would contain the previous bank plus the new one. And the previous bank would have remained as is.
Granted, this all sounds a bit complicated and it takes a while to get used to it. But once you get the hang of it, you can apply what you have learned here to other areas on your Tyros keyboard(s).
Naming registration banks and folders
 Let's recall again what my main registration window looks like. On the bottom left side you would select the NAME option to name your folders and files.
First select NAME, then go to the file or folder that you want to rename (in this case folder A~Z) using the [A] - [J] navigation buttons.
Then confirm with OK.
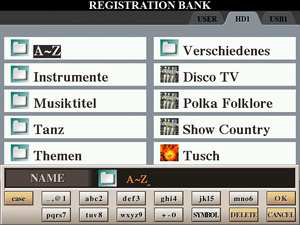 Now you can enter a name using the bottom rocker buttons - almost like you did with one of your first cell phones :-).
DELETE is to delete one character at a time.
If you press and hold DELETE, it will delete the entire line at once.
CASE switches from upper to lower case and back. To the lower left you can select an icon for your registration bank. Then confirm with the OK button.
Naming individual registrations
 Use EDIT to navigate into the individual registration view (REGISTRATION EDIT screen). Here again you will see a NAME option that will allow you to give your registration a suitable name and you can also give it an icon as we had seen earlier.
Important: Everything that you edit/change in your individual registration view must be saved in order for the changes to get applied!
To do so, leave the REGISTRATION EDIT window with the UP control and then SAVE, OK, and YES to store your changes (this overwrites the earlier setting).
With respect to icons: You may hear "they are cute - but it's just a gimmick". Well, that depends on how you use icons!
With my registrations, for example, just by looking at the icon I can quickly spot which instrument voice is used on a registration with the name "Moon River" for instance.
This way, I can begin playing any song, freeze the style with the "freeze" button and then access a registration confidently - already knowing what instrument is awaiting me there! So using visual cues with your icon can bring some spice to the game :-).
And there is more: For example, all my "A" folders have the same icon - which let's me identify the folder at the blink of my eye. Note that you can only save an icon with a registration if the name has at least 4 characters. So, for example, if you have a registration with the name "Sax", make sure to add a space after the name to insure that there are 4 characters!
I hope this workshop will help you being successful and have some great fun! :-)

(The original tutorial, Registrierungs-Workshop für die Tyros-Instrumente, is available on Heidrun's Tyros3/4/5 website.)
This page updated on September 20, 2024 .