What about a Fill from Here, Intro from There, and an Ending from Somewhere Else...
In the previous lesson you found out how to take the parts of styles you like and combine them into one style you really like. In this lesson, Bob Durham shows us how to take it another stage further and copy INTROs, ENDINGs and FILLs from other styles.
Step 1: Preparation
The first step is to load the style and write down the sections that need either replacing or adding. I assume that you have already adjusted the instruments used and the volume levels of the instruments in the four variations of the style but still feel it could be improved by the addition of an extra introduction. By the way, did you know that the PSR-2000/1000 can have four introductions and four endings per style? All the preset panel styles have three of each but they can accept an extra one. I have drawn a table to help you to remember what you are doing; the use of it should unfold later.
| Style Name | Section | Pattern Length | RHY1 | RHY2 | BASS | CHD1 | CHD2 | PAD | PHR1 | PHR2 |
|---|---|---|---|---|---|---|---|---|---|---|
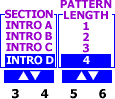
 Suppose you want to add
the 4-bar Intro C from Swing1 to JazzClub and
call it Intro D.
Suppose you want to add
the 4-bar Intro C from Swing1 to JazzClub and
call it Intro D.
- The first thing to do is to LOAD each style and then save it, either into the USER area if you have enough room, or onto a FLOPPY or USB.
- Load the Swing1 style again.
- Go to DIGITAL RECORDING - STYLE CREATOR - BASIC.
- Press the [INTRO] button on the keyboard.
- You will see a pop-up window on the screen; scroll down to the INTRO C entry and press OK.
- In the REC CHANNEL window at the bottom of the main screen, make a note of which parts of the accompaniment are ON and which are OFF. Put the results in your table.
The screen shot here shows the info available under the BASIC tab. Press button [2-B] under the RHY2 part to turn OFF recording for RHY2. If you press [EXIT] the REC CHANNEL window disappears. Press [F] - REC CH - to bring it back. Note that buttons [A] and [B] move the highlight between the first set of parameters (SECTION and PATTERN LENGTH) and the second set of parameters (TEMPO and BEAT).
The table below shows the Swing1 settings for Intro C and for Intro B. Note that Intro C is longer (4 bars instead of just 1) and that it includes CHD1, CHD2, and PAD, which are not in Intro B.
| Style Name | SECTION | PATTERN LENGTH | RHY1 | RHY2 | BASS | CHD1 | CHD2 | PAD | PHR1 | PHR2 |
|---|---|---|---|---|---|---|---|---|---|---|
| Swing1 | INTRO C | 4 | ON | ON | ON | ON | ON | ON | ON | OFF |
| Swing 1 | INTRO B | 1 | ON | ON | ON | OFF | OFF | OFF | ON | OFF |
If you intend adding endings and fills from Swing1 or any other style, it is best to repeat the above exercise for all SECTIONS and FILLS in the table as it will save you a lot of time later.
Step 2: Copying
Now we are nearly ready to start copying the data from Swing1 to JazzClub.
- Load the style we are going to modify, JazzClub, and, once again, go to DIGITAL RECORDING - STYLE CREATOR - BASIC.
- Press the [INTRO] Panel button and scroll to INTRO D (which is where we are going to put our "new" intro) and select this section by pressing button [8] for OK.
- Note that the default pattern length is shown as 1. We know from our table that we need a length of 4 bars to accommodate INTRO C from Swing1. Press [A] to highlight the pattern length option.
-
 In the small windows at the bottom of the screen, use the [3] [4] and
[5] [6] buttons to make sure the SECTION is set to "INTRO D" and
the PATTERN LENGTH is set to "4".
In the small windows at the bottom of the screen, use the [3] [4] and
[5] [6] buttons to make sure the SECTION is set to "INTRO D" and
the PATTERN LENGTH is set to "4". - Now press the [D] button to EXECUTE the change. This will create the space for you to copy the new data.
- Now we really are ready to copy the data. Move to the [ASSEMBLY] tab. We see from our table that we need to copy everything put PHR2. So we will copy all the parts needed in turn, one by one.
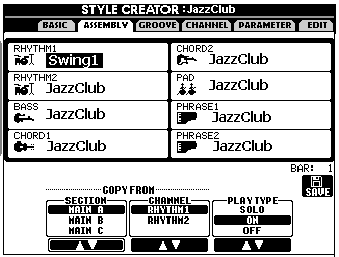 Press
button [A] - RHYTHM1. The ASSEMBLY page assumes you will be copying from
the same part you are currently in. The pop-up window, therefore, shows
that you are copying from SECTION "INTRO D", CHANNEL "RHYTHM1". An INTRO
D section does not exist in Swing1. We will be copying the Swing1 INTRO
C section and putting it into the new INTRO D section we are creating.
So scroll down to "INTRO C",
"RHYTHM1" as per our table and press [A] - RHYTHM1 again
Press
button [A] - RHYTHM1. The ASSEMBLY page assumes you will be copying from
the same part you are currently in. The pop-up window, therefore, shows
that you are copying from SECTION "INTRO D", CHANNEL "RHYTHM1". An INTRO
D section does not exist in Swing1. We will be copying the Swing1 INTRO
C section and putting it into the new INTRO D section we are creating.
So scroll down to "INTRO C",
"RHYTHM1" as per our table and press [A] - RHYTHM1 again- Select the Swing1 rhythm from either the USER tab or the FLOPPY DISK and then press [EXIT]. On the ASSEMBLY screen RHYTHM1 should now show Swing1.
- Repeat the above for the remaining sections.
- When you are done, press button [J] - SAVE to save the finished Style to a floppy with perhaps a new name to show it has been modified.
I think you can see the advantage of using the table, as it is all too easy to forget some of the not too obvious steps.
Good Luck
Bob Durham
This page updated on February 15, 2024 .