The previous lesson discussed how you might change individual voices in a styles One Touch Setting (OTS) buttons. However, you may have noticed that some preset styles have more than just one voice turned on. Particularly on Tyros models, there can be three right-hand voices that are all "On" and the resulting sound can be quite stunning. If you are attempting to modify a style from a different keyboard, you may want to use the preset voice settings that are in your instrument to specify the OTS for the style you are modifying.
For example, I recently completed a project to convert the PSR-8000 (8k) styles (that were already converted for use on the PSR-3000) for use on the Tyros3 (T3). The 8k styles could be used as is on the T3, but they would have only two right-hand voices rather than three and the voices would be those from the PSR-3000 rather than the new voices included with the Tyros3. In making the conversions, I used the RIGHT1, RIGHT2, and RIGHT3 voices that were built into one (or more) of the preset styles in the Tyros3. To accomplish this, I created a large number of registrations files that held the OTS voice setups and used these to change the OTS in the PSR-8000 styles. This made the conversion relatively easy and provided a good many additional styles that sounded just great on the Tyros3.
In this lesson, I'll explain in detail the methodology that I used to create the OTS registration files and convert the OTS in the 8k styles. I'll also provide some useful "tools" that other T3 owners can use to adjust styles on their own. If you don't have a Tyros3, these tools won't be of use to you, but the method will be and you can build your own set of registrations for your keyboard.
Using Preset OTS values
If you only wanted to modify a single style by using the voices from one of the preset styles, you could do that by using the following procedure:
- Load the style that has the voices you want to copy.
- Load an empty registration file. Alternatively, load any registration file and delete the information in the first four registration buttons or simply overwrite them as needed.
- Press the first OTS button [OTS1] to load all the voices.
- Press [MEMORY] to save these settings in the first registration button [R1].
- Before pressing [R1], however, make sure that only the VOICE, MULTIPAD, and HARMONY groups are checked and then press [R1].
- Repeat this process for OTS2, OTS3, and OTS4 saving the results to R2, R3, and R4.
- Load the style that you want to save these OTS in.
- Press [OTS1] to load the current OTS1 setting (or if you have OTS LINK, press MAIN A).
- Press [R1], which loads the voices stored in the first registration memory.
- Press [MEMORY] plus [OTS1] to store these values in the first OTS button.
- Repeat for OTS2, OTS3, and OTS4.
- SAVE the style, perhaps using a new name if you want to keep the previous version as well as your modified version.
The steps listed above will get the job done for that one style. However, it gets more complicated if you want to copy OTS settings from different styles and put them in the style you are working on. For example, using OTS1 and OTS2 from one style and then OTS3 from a second style and, finally, OTS4 from yet a third style. In each case, you would have to load the preset style, transfer the OTS settings to a registration button, then load the candidate style and save the registration values to the appropriate OTS button. A process that would soon become tedious and time consuming.
However, what if you already had all the voice OTS settings stored in registration files? Then, all you would have to do is load the candidate style and the registration file you need to make the OTS changes. This process is much quicker and provides the additional flexibility of letting you audition a number of different possible voice combinations before deciding which one you want to use. Of course, the difficult is you have to first create those registration files. This does take time but, if you are planning to do a lot of style converting, the set of OTS registration files can be used over and over again and can be worth the trouble of building them. I'll show you how I did this on the Tyros3 and, if you have a T3, you can use the files I created. If not, you can follow the procedure to create your own set of OTS registration files.
Tyros3 OTS Registration Files
The Tyros3 has 450 preset styles in 11 style categories as shown in Table 1. Each style has four OTS settings, each of which specifies values for the three right-hand voices with all related voice parameters.
| Category | Total | Category | Total | Category | Total |
|---|---|---|---|---|---|
| Ballad | 44 | Entertainer | 32 | R&B | 45 |
| Ballroom | 24 | Latin | 39 | Swing&Jazz | 48 |
| Country | 28 | Movie&Show | 37 | World | 51 |
| Dance | 47 | Pop&Rock | 55 | TOTAL | 450 |
A registration file has 8 buttons, which means you can store the four OTS settings from two styles in a single registration button. With 450 styles, that means 225 registration files. Wow, that's still quite a lot.
A problem immediately arises as to how to organize these files. I took a simple way out and created a folder for each category and then paired styles within that category into a single registration file and stored in the appropriate category folder. For example, I stored the four OTS from the 16BeatBallad1 style and the four OTS from the 16BeatBallad2 style in a single registration file that I named "16BtBallad 1-2". The first four registration buttons [R1]-[R4] would be for the 16BeatBallad1 and the second four buttons [R5]-[R8] for 16BeatBallad2. As another example, the registration file "80sEP-BoyBand" holds the OTS from 80sEPBallad in [R1]-[R4] and the OTS from 80sBoyBand in [R5]-[R8]. Some times it was easy to pick styles to put in the same registration file, particularly if there were two variants of a particular style, e.g. Chillout1 and Chillout2. Some times I combined two similar styles such as putting Slowfox and Foxtrot in a registration file labeled "Slowfox-Foxtrot". Most folks will be able to determine the styles represented in the registration file from the filename, particularly if you have a printout of the 450 styles by category (see below).
My Tyros3 OTS Registrations are provided in the single zip file shown below. Download this file, unzip it, and you will have the complete set of Tyros3 OTS voice settings that I created. And a special thanks to Patrick Hannequin who created an equivalent OTS file for PSR-S910 owners. (If you create an OTS registration file for your keyboard, please send it to me - jpwaters@gmail.com - and I'll add it to the table below.)
| OTS T3.ZIP | OTS S910.ZIP |
Additional Tools
I have created a number of additional tools that have proved useful in setting OTS values. Note that the registration files store the VOICE, MULTIPAD, and HARMONY values, but not the STYLE. We had to leave the STYLE out because, if it remained in the registration, pressing the registration button would not only load the voices but also the original style, which we certainly did not want. However, the left hand voice is stored in the STYLE itself. So, when you apply the saved OTS values to the style you are working on, you will not be setting the LEFT voice. But the OTS can save the left-hand voice. Therefore, you can set the left-hand voice to be what you want and then turn on the [FREEZE] button to freeze the style you are tuning (and thus the LEFT voice). Now, when you call up, say [R2] for the new [OTS2] voices, the values for RIGHT1, RIGHT2, and RIGHT3 are changed, but the LEFT voice is frozen (to be the voice you want). Store this in [OTS2] and the OTS will have both the right-hand voices and your preferred left-hand voice.
On all the preset styles in the Tyros3, the left-hand voice is OFF. You may or may not be used to playing with your left-hand voice ON. You also may or may not like the typical left-hand voice that Yamaha uses. However, if you want to use the same left-hand voice that Yamaha used in the style, I have created an Excel file that lists all the Tyros3 styles by category as well as the left-hand voice included with that style, the volume setting for that voice and the multipad used with that style.
Left-Hand Voices
While there are 450 styles, as you might expect, each does not have a different left-hand voice. In fact, there are only 83 different voices used by Yamaha in the preset styles and some are much more common than others. In fact, the 10 most frequently used left-hand voices (Table 2) appear in over half of the styles.
| Voice | No. Styles | Voice | No. Styles |
|---|---|---|---|
| Mmh | 82 | VPSoft | 19 |
| OrganAccomp3 | 31 | ButterStrings | 15 |
| GothicVox | 26 | OrganAccomp2 | 13 |
| HahChoir | 23 | SuitcaseEP | 12 |
| Strings | 23 | FrenchHorns | 10 |
Multipads
There are 119 multipads available in the Tyros3. 59 of these are used in the 450 preset styles. For some styles, there may have been a careful matching of the style and the multipad used, but in many cases, in fact, almost half, CrashCymbals was used as the multipad file. The top 10 multipads are shown in Table 3.
| Multipad | No. Styles | Multipad | No. Styles |
|---|---|---|---|
| CrashCymbals | 202 | Harpeggio1 | 13 |
| PowerToms | 46 | Harpeggio2 | 12 |
| Falls | 22 | ScratchBank | 11 |
| BrassChords2 | 13 | BrassChords1 | 8 |
| Gong&Chime | 13 | TranceSeq2 | 7 |
Voices
The Tyros3 has a lot of voices and it can be difficult specifying the exact number because of all the different kinds of voices - T3 preset voices, legacy voices (voices from earlier keyboards that the T3 can reproduce), organ flute voices, mega voices (included in presets but normally not playable as solo instruments), plus drum and SFX kits. In addition, voices can be categorized by several different "Types": Sweet!, Live!, Cool!, S.Articulation1 and S.Articulation2. If a voice has no specific "type", I've labeled it "Regular". Table 4 shows the number of Tyros3 voice by group and type. I've separated the voices that might be used as solo voices from the drum and SFX kits and the mega voices. Note that Table 4 does not include the XG and GM voices that are usually used in styles but can also be used as a right- or left-hand voices.
| Type | Preset | Organ | Legacy | Total |
|---|---|---|---|---|
| S.Articulation! | 49 | 4 | 53 | |
| S.Articulation2! | 11 | 0 | 11 | |
| Sweet! | 26 | 0 | 26 | |
| Live! | 67 | 3 | 70 | |
| Cool! | 56 | 2 | 58 | |
| Regular | 306 | 202 | 508 | |
| OrganFlutes | 20 | 20 | ||
| Total Solo | 515 | 20 | 211 | 746 |
| MegaVoice | 23 | 0 | 23 | |
| Drums | 10 | 1 | 11 | |
| Live!Drums | 7 | 2 | 9 | |
| SFX Kit | 2 | 1 | 3 | |
| Live!SFX | 3 | 0 | 3 | |
| Grand Total | 560 | 20 | 215 | 795 |
The OTS in the preset styles use over half of the available voices, but, again, some voices are used much more than others. Table 5 shows the top 20 voices used as either the RIGHT1, RIGHT2, or RIGHT3 voice in the preset OTS and whether that voice is On or Off. As you can see the S.Articulation2 JazzSax (JazzSax-SA2) is by far the most popular voice in the Tyros3. These top 20 account for almost 40 percent of the preset OTS voices.
| Voice | Off | On | Total | Voice | Off | On | Total |
|---|---|---|---|---|---|---|---|
| JazzSax-SA2 | 68 | 160 | 228 | ClassicJazz | 12 | 88 | 100 |
| Concert Grand | 63 | 86 | 149 | SaxSection | 0 | 82 | 82 |
| JazzTrumpet-SA2 | 76 | 65 | 141 | Violin | 26 | 56 | 82 |
| OrchFlute | 39 | 99 | 138 | GrowlSax | 34 | 39 | 73 |
| Harmonica-SA2 | 76 | 53 | 129 | StudioStrings-SA | 6 | 62 | 68 |
| ConcertStrings-SA | 9 | 117 | 126 | SingleCoilClean--SA | 31 | 37 | 68 |
| ConcertGuitar-SA | 67 | 57 | 124 | WhiterBars-SA | 37 | 25 | 62 |
| SuitcaseEP | 92 | 24 | 116 | JazzVibes | 28 | 32 | 60 |
| Pop Grand | 38 | 71 | 109 | Saxophone-SA | 21 | 37 | 58 |
| JazzClean-SA | 59 | 44 | 103 | Flute | 37 | 19 | 56 |
Voice Groups
When you select an OTS button on the Tyros models, you get three voices. The RIGHT1 voice is always ON, but in many cases, the RIGHT2 and RIGHT3 voice may also be set to ON. Consider the OTS settings for the 12-8Ballad style shown in Table 6. In OTS1, RIGHT1 is the Cocktail Piano voice and it is ON -- a bullet ( • ) after the voice is used to indicate that the voice is ON. RIGHT2 and RIGHT3 are the OrchFlute and the BreathySax-SA2, but these voices are OFF. In OTS3, however, all three voices (AltoFlutes, JazzSax-SA2, and JazzTrumpet-SA2) are ON. Similarly, in OT4 all three voices are ON.
| OTS | RIGHT1 - RIGHT2 - RIGHT3 |
|---|---|
| 1 | Cocktail Piano • - OrchFlute - BreathySax-SA2 |
| 2 | RomanceClarinet-SA2 • - ConcertGrand - JazzTrumpet-SA2 |
| 3 | AltoFlutes • - JazzSax-SA2 • - JazzTrumpet-SA2 • |
| 4 | OrchWoodwind • - FrenchHorns • - Strings • |
| • Indicates that the voice is ON. |
Putting together a table that shows the three voices for each OTS setting for each style is a non-trivial task. However, thanks to the efforts of Michael Bedesem, who provided me with a delimited text file with this basic information, I was able to build an Excel file, T3R123List, showing all the OTS voices. One worksheet shows the information displayed in Table 6 for all the styles, listed alphabetically. Another worksheet shows the same basic information, but sorted alphabetically instead on the R1-R2-R3 voice set.
There is a third sheet in this Excel file that highlights the three-voice combinations that are used most frequently. Many of these are the sets that have all three voices ON and produce terrific sounds on the Tyros3. Table 7 shows the 10 three-voice combinations used most frequently. If you want to combine voices, you may want to try out some of these sets. The alphabetical listing shows you which styles have any particular three-voice set. Again, a bullet ( • ) after the voice name indicates that the voice is ON.
| RIGHT1 - RIGHT2 - RIGHT3 | No. Styles |
|---|---|
| JazzSax-SA2 • - JazzTenor • - JazzSax-SA2 • | 16 |
| JazzSax-SA2 • - SaxSection • - BaritoneSax • | 15 |
| JazzClean-SA • - JazzTrumpet-SA2 - JazzSax-SA2 | 12 |
| BigBandTrumpet-SA • - Brass mf • - SmoothBrass-SA • | 11 |
| GoldenTrumpet • - SilverTrumpet • - JazzSax-SA2 • | 10 |
| JazzSax-SA2 • - SaxSection • - OrchFlute • | 10 |
| Ambient Piano • - JazzClean-SA • - JazzVibes • | 9 |
| Strings f • - Spiccato • - ChamberStrings • | 9 |
| JazzTrumpet-SA2 • - Cornet • - AccentBrass • | 8 |
| ConcertGrand • - JazzClean-SA • - JazzVibes • | 7 |
If you are planning to convert the OTS on a number of styles, having a print out of all the styles by category (with left-hand voices and multipads) is very convenient as is having a print out of all the voice combinations. However, be forewarned that these tables require quite a few pages.
Creating the OTS Registrations
If you have a Tyros3 and plan on using the registration files (and Excel) files provided above, you can skip ahead to the next section where I discuss how to use these tools to redefine a style OTS. However, for those of you who have a different keyboard and want to use this technique, you can follow the steps shown here to create your own set of OTS registration files. You don't have to use the organization method I used. It is provided as just one example. I will use screen shots from the Tyros3. Your keyboard may have slightly different views and options, but the overall procedure will be the same.
OTS Folder
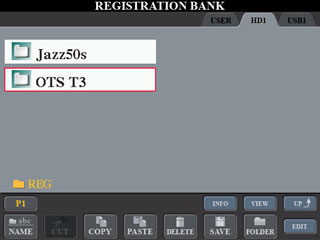 The
first step is to create a folder to hold the OTS registration files. I have a folder
on my hard drive called "REG". I created a new folder within that folder
that I called "OTS T3". If you downloaded the OTS T3.ZIP file and unzipped
it, you can simply copy this folder over to your hard drive and put it wherever
you want to. This screen shot shows the new OTS T3 folder
as well as a Jazz50s folder.
The
first step is to create a folder to hold the OTS registration files. I have a folder
on my hard drive called "REG". I created a new folder within that folder
that I called "OTS T3". If you downloaded the OTS T3.ZIP file and unzipped
it, you can simply copy this folder over to your hard drive and put it wherever
you want to. This screen shot shows the new OTS T3 folder
as well as a Jazz50s folder.
Empty Registration File
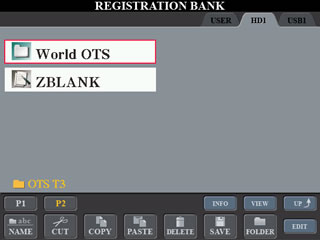 Within
the OTS T3 folder, I created a separate folder for each of the 11 style categories. This
screen shots shows page 2 of this folder with the 11th style category folder, World
OTS,
and a single registration file I called ZBLANK. This
is an "empty" registration file and I used it to create each new OTS
registration file. Starting the name with a "Z" insured that it would
appear at the end of the list of registration files. You can, of course, name the
empty registration file anything you like. When I completed a folder of category
registrations, I deleted the ZBLANK registration file from that folder.
Within
the OTS T3 folder, I created a separate folder for each of the 11 style categories. This
screen shots shows page 2 of this folder with the 11th style category folder, World
OTS,
and a single registration file I called ZBLANK. This
is an "empty" registration file and I used it to create each new OTS
registration file. Starting the name with a "Z" insured that it would
appear at the end of the list of registration files. You can, of course, name the
empty registration file anything you like. When I completed a folder of category
registrations, I deleted the ZBLANK registration file from that folder.
Capturing the First OTS Set
 As
an example, I will show you how to create an OTS registration file holding the
registration sets from the PopBossa1 style and the PopBossa2 style.
As
an example, I will show you how to create an OTS registration file holding the
registration sets from the PopBossa1 style and the PopBossa2 style.
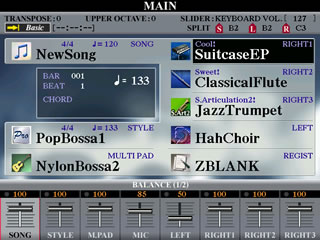
The first step is to load the style you want to copy the OTS settings from, in this case, PopBossa1. Also load the empty registration file. Select the first [OTS] button. This screen shows you the result. The PopBossa1 style is using the NylonBassa2 multipad and the HahChoir LEFT voice. As you move through the different OTS settings, you will see that the multipad file and left-hand voice do not change.
Save OTS1 to R1
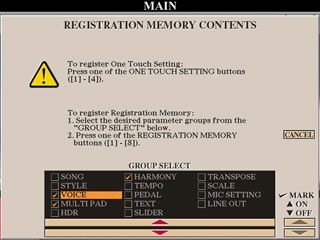 With
the first OTS selected, press the [MEMORY] button. Before you select the first
registration button [R1], look at the screen that shows the REGISTRATION MEMORY
CONTENTS. In the GROUP SELECT box, make sure that you select only the VOICE, MULTIPAD,
and HARMONY options. This setting will save all properties of the right-hand voices,
including harmony settings, and the multipad file.
With
the first OTS selected, press the [MEMORY] button. Before you select the first
registration button [R1], look at the screen that shows the REGISTRATION MEMORY
CONTENTS. In the GROUP SELECT box, make sure that you select only the VOICE, MULTIPAD,
and HARMONY options. This setting will save all properties of the right-hand voices,
including harmony settings, and the multipad file.
The left-hand voice is saved with the style and you can not include that in a registration setting without including the style. We do not want to save the style. If we did, whenever we pressed the registration button, it would replace the currently loaded style with the style indicated in the registration. When you have the correct groups selected, press the [R1] button to save this setting in the first registration button.
Save All the OTS Voices
You can now repeat these steps for the remaining OTS buttons. Select [OTS2] and then press [MEMORY] and [R2]. Once you have selected the right groups as in the step above, they remain selected so you don't have to check that setting each time. Select [OTS3] and save that in [R3]. Select [OTS4] and save that in [R4].
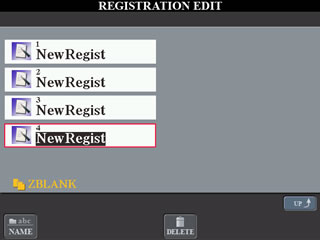 At this
point, the ZBLANK file has the first four buttons lighted
indicating that there is something stored there. If you were to Edit that registration
file, you would see all four buttons are saved with the name "NewRegist".
If you are simply saving the four OTS buttons in the same order in the registration
files, there is no need to provide alternative names. If you have a different
scheme in mind, perhaps saving only your favorite registrations, you
may have to name the registration file button to remind yourself of what you put
there.
At this
point, the ZBLANK file has the first four buttons lighted
indicating that there is something stored there. If you were to Edit that registration
file, you would see all four buttons are saved with the name "NewRegist".
If you are simply saving the four OTS buttons in the same order in the registration
files, there is no need to provide alternative names. If you have a different
scheme in mind, perhaps saving only your favorite registrations, you
may have to name the registration file button to remind yourself of what you put
there.
Load the Second Style
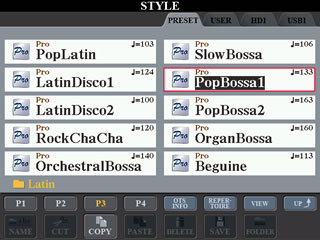 With
the four OTS stored, press button [D] to load another style. The STYLE screen shows
you the current style, PopBossa1. Select PopBossa2 to
load that style. Remember, you can simply double-click the button next to the style
name to select the style and immediately go back to the MAIN screen.
With
the four OTS stored, press button [D] to load another style. The STYLE screen shows
you the current style, PopBossa1. Select PopBossa2 to
load that style. Remember, you can simply double-click the button next to the style
name to select the style and immediately go back to the MAIN screen.
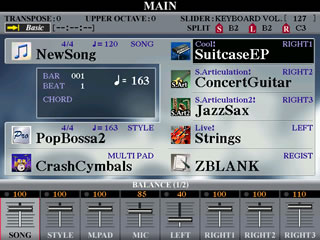 When PopBossa2 is
loaded, note that it uses CrashCymbals as
the multipad and Live!
Strings as
the LEFT voice. This screen shot shows the voices in the first OTS. The
RIGHT1 and RIGHT3 voices are the same as PopBossa1,
but the RIGHT2 voice is different. Repeat the steps to save each of the four OTS
buttons, this time saving them in the last four registration buttons, [R5] to [R8].
When you are done, the ZBLANK file will have all eight
buttons lighted. The first four hold the registrations for the first style and
the second four hold the registrations for the second file.
When PopBossa2 is
loaded, note that it uses CrashCymbals as
the multipad and Live!
Strings as
the LEFT voice. This screen shot shows the voices in the first OTS. The
RIGHT1 and RIGHT3 voices are the same as PopBossa1,
but the RIGHT2 voice is different. Repeat the steps to save each of the four OTS
buttons, this time saving them in the last four registration buttons, [R5] to [R8].
When you are done, the ZBLANK file will have all eight
buttons lighted. The first four hold the registrations for the first style and
the second four hold the registrations for the second file.
Save the Registration File
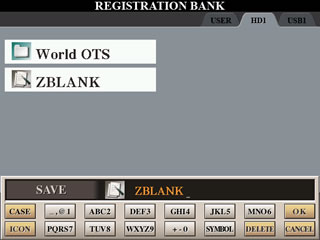 It
is now time to save the registration file. This is a critical step and you have
to be careful to RENAME the file. Press the [J] button to call up the
REGISTRATON BANK screen. To save the file, select the SAVE option,
which will bring up the SAVE file dialog box where you indicate the name you want
to use for saving the current registration file. By
default, the current name
is shown, "ZBLANK". You
do not want to save
the registration file under this name since that is the name of your empty registration
file.
It
is now time to save the registration file. This is a critical step and you have
to be careful to RENAME the file. Press the [J] button to call up the
REGISTRATON BANK screen. To save the file, select the SAVE option,
which will bring up the SAVE file dialog box where you indicate the name you want
to use for saving the current registration file. By
default, the current name
is shown, "ZBLANK". You
do not want to save
the registration file under this name since that is the name of your empty registration
file.
Rename the Registration File
 In
this case, I renamed the registration file to be "PopBossa 1-2". The
name is an indication of the two styles that are saved in this registration file.
The order of the styles is also indicated by the "1-2", PopBossa1 is
first followed by PopBossa2. Once you have the new file
name as you want it, press the OK button
to complete the save operation.
In
this case, I renamed the registration file to be "PopBossa 1-2". The
name is an indication of the two styles that are saved in this registration file.
The order of the styles is also indicated by the "1-2", PopBossa1 is
first followed by PopBossa2. Once you have the new file
name as you want it, press the OK button
to complete the save operation.
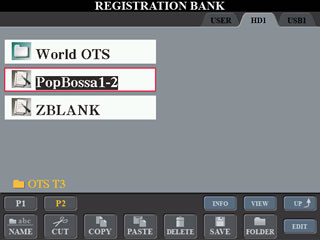 When
you now look at the REGISTRATION BANK screen you will see you new registration
file saved there. The original ZBLANK file is still there and can be used to start
the next registration file.
When
you now look at the REGISTRATION BANK screen you will see you new registration
file saved there. The original ZBLANK file is still there and can be used to start
the next registration file.
In this screen shot, the new style is saved directly in the OTS T3 file. In reality, since I am working on a registration file for two of the Latin styles, I would have saved the registration file in the Latin folder within the OTS T3 folder. To do that, you would navigate to wherever you want to save the registration file and then press the SAVE button. Alternatively, now that the file is created, you can also use the COPY and PASTE options to put a copy of this file somewhere else. Since there is some effort involved in creating these files, it is worth the effort of periodically backing up your OTS folder to another drive, such as the USB drive. You could also create your initial files on the USER drive and then periodically copy them over to the USB drive or the hard drive.
Repeat 225 Times
Storing two style file OTS settings in a single registration file means that you will have to create half as many registration files as you have style files. In the case of the Tyros3, that means 225 files. This does take some effort. But once it is done, this set of registration files can be very handy when you are trying to tune up files from earlier keyboards or from other manufacturers for use on your own keyboard. Of course, if you have a Tyros3, you need merely download the zip file mentioned earlier in this lesson and you are ready to go.
Using The OTS Registrations
To illustrate how you would use these registrations, I'll use one of the styles from the PSR-9000 and adjust the OTS to use some of the Tyros3 presets. Since we just made a file with the T3 PopBossa styles, let's try adjusting the PopBossa 9k style. This is one of the styles provided on the PSR-9000 floppy disk. You can get all the 9k styles from the PSR-9000 Styles page.
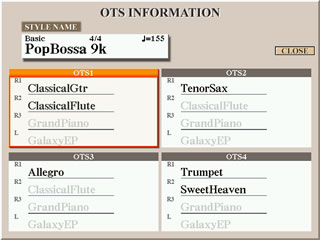 Selecting
the PopBossa 9k style and pressing the OTS
INFO button, we can see the current
settings for that style. Note that the RIGHT3 voice is set to GrandPiano and it
is OFF in all the OTS settings. If a style only specifies a RIGHT1 and a RIGHT2
voice, the RIGHT3 voice will default to the GrandPiano. Note
also that the LEFT voice is set to GalaxyEP and it is
also OFF in all the OTS settings. The current settings may sound fine. I am using
this style only as an example of how you could use the OTS registration files to
reset these voices.
Selecting
the PopBossa 9k style and pressing the OTS
INFO button, we can see the current
settings for that style. Note that the RIGHT3 voice is set to GrandPiano and it
is OFF in all the OTS settings. If a style only specifies a RIGHT1 and a RIGHT2
voice, the RIGHT3 voice will default to the GrandPiano. Note
also that the LEFT voice is set to GalaxyEP and it is
also OFF in all the OTS settings. The current settings may sound fine. I am using
this style only as an example of how you could use the OTS registration files to
reset these voices.
Load Candidate Style and OTS Registration
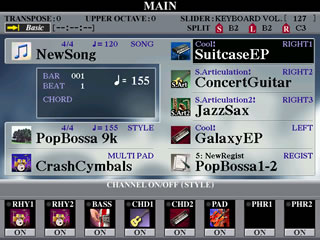 In
this screen shot, I have loaded the PopBossa 9k style and
the PopBossa
1-2 registration
file. Pressing [R5], I call up the OTS1 settings from the PopBossa2 style. You
will see that the right-hand voices are changed, but not the left-hand voice. You
may want to replace the left-hand voice with a voice that you like.
In
this screen shot, I have loaded the PopBossa 9k style and
the PopBossa
1-2 registration
file. Pressing [R5], I call up the OTS1 settings from the PopBossa2 style. You
will see that the right-hand voices are changed, but not the left-hand voice. You
may want to replace the left-hand voice with a voice that you like.
Alternatively, you could set the LEFT voice to be the default voice that was used in the original PopBossa2 style. Looking this up in one of the Excel tables, I see that PopBossa2 used Strings at a volume setting of 40.
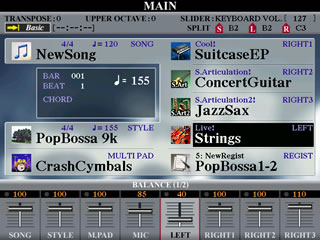 I
set the left-hand voice to match the original left-hand voice as shown in this
screen shot. I
want to use that LEFT voice in each of the four OTS settings, so I press the
[FREEZE] button to freeze the style and the LEFT voice. In this
case, freezing the style is OK because it is the style we are working on. If I
wanted to change the multipad, I could do that also, but I'll leave them set at CrashCymbals.
I
set the left-hand voice to match the original left-hand voice as shown in this
screen shot. I
want to use that LEFT voice in each of the four OTS settings, so I press the
[FREEZE] button to freeze the style and the LEFT voice. In this
case, freezing the style is OK because it is the style we are working on. If I
wanted to change the multipad, I could do that also, but I'll leave them set at CrashCymbals.
Reset the OTS
 OK,
these are the settings I want to use for the first OTS, so I press [MEMORY]
and then the [OTS1] button. A dialog screen pops up warning that the OTS has
been changed. To
keep the change you have to save the style. The OTS settings are saved with the
style. Since we are going to change all four OTS settings, you can answer NO at
this point.
OK,
these are the settings I want to use for the first OTS, so I press [MEMORY]
and then the [OTS1] button. A dialog screen pops up warning that the OTS has
been changed. To
keep the change you have to save the style. The OTS settings are saved with the
style. Since we are going to change all four OTS settings, you can answer NO at
this point.
Move to the second OTS setting. The setting built into the style appears. Press [R6] to load the second setting from PopBossa2. Note that the left-hand voice and the multipad do not change. Now save this setting to [OTS2] by pressing [MEMORY] and [OTS2]. Repeat this process for the third and fourth OTS buttons.
There is no reason you have to replace the OTS1-4 with R5-R8. For example, if you bring up the OTS3 settings and try [R7], you may find that you don't like the voices used in [R7]. OK, try any of the combinations in the [R1]-[R4] buttons. One of these may be more to your liking so just use that to store in the [OTS3] button. It may also be that none of the voice combinations in the PopBossa registration file is what you want. OK, just load a different registration file and try out those voices. There are no rules, pick what you like and save it where you want in the OTS buttons.
Save the "Tuned" Style
 Once
you have the four OTS buttons set to your liking, it is time to save your revised
style. Press the [D] button to bring up the STYLE screen and then the SAVE option
to save the style. If you want to keep the original style, rename your revised
style. In this screen shot, I modified the name to "PopBossa 9ka" to
distinguish it from the original. {You might also note that this screen shot shows
a whole variety of "Bossa" styles from the various Yamaha keyboards.
These can all be downloaded from the Styles
| Yamaha section of this site.)
Once
you have the four OTS buttons set to your liking, it is time to save your revised
style. Press the [D] button to bring up the STYLE screen and then the SAVE option
to save the style. If you want to keep the original style, rename your revised
style. In this screen shot, I modified the name to "PopBossa 9ka" to
distinguish it from the original. {You might also note that this screen shot shows
a whole variety of "Bossa" styles from the various Yamaha keyboards.
These can all be downloaded from the Styles
| Yamaha section of this site.)
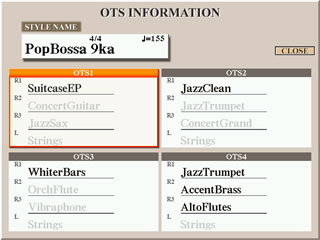 After
the style was saved, I selected it and then choose the OTS
INFO option to bring
up the OTS INFORMATION screen shown here. Note that the revised style now has all
the OTS settings that were used in the preset PopBossa2 style
from the Tyros3 as well as the Strings voice for the
left-hand. The OTS voices are those of the Tyros3, but the style itself is the
one used in the PSR 9000.
After
the style was saved, I selected it and then choose the OTS
INFO option to bring
up the OTS INFORMATION screen shown here. Note that the revised style now has all
the OTS settings that were used in the preset PopBossa2 style
from the Tyros3 as well as the Strings voice for the
left-hand. The OTS voices are those of the Tyros3, but the style itself is the
one used in the PSR 9000.
Some Final Thoughts
In the example used above, the 9k PopBossa style is similar to the T3 PopBossa2 style, although not identical. It may be preferable to use voices from some other style than the PopBossa2 to make a new style that is different from the PopBossa2 preset.
The earlier keyboard style was also on the Tyros3. But there are many styles from earlier keyboards that are not included in the Tyros3. You may want to edit these styles by adding T3 voices and including them in your basic T3 collection.
The voices in these OTS registrations are only a starting point. There is no reason why you can't modify one or more of the voices to meet specific requirements for a style or a song.
Feel free to mix and match the OTS settings from different songs. Remember, these are just the voices, not the styles themselves. You can easily take voices used in a waltz and apply them to a ballad if you want.
Finally, as an example of a conversion set that used these voices, check out the PSR-8000 conversions I did for the Tyros3. These are available on the Tyros3 styles page and repeated here for your convenience.
| Ballad (26 styles) |
Swing&Jazz (18 styles) |
Latin (24 styles) |
Ballroom (24 styles) |
Country (18 styles) |
| Pop&Rock (40 styles) |
R&B (16 styles) |
World (22 styles) |
Piano (7 styles) |
In doing these conversions, particularly some of the earlier ones, I did not pay as much attention to the multipads so some of these may not be the most appropriate. In addition, I often used left-hand voices that I found convenient for my own playing. You may want to change these to what you prefer. Finally, there were a number of songs where some of the style voices, like the drums, were too loud and had to be turned down a bit to balance better on the Tyros3. How to change components of a style is not covered in this lesson.
This page updated on February 15, 2024 .