"Arranger" Workstations
All of the models we are discussing in these PSR Tutorial Lessons are known as "arranger" keyboards. The most distinguishing aspect of these keyboards is that they include internal "styles" that the performer uses when playing a song. These styles let you perform as a "one man band." You are playing your keyboard, but you also have an unseen drummer, a bass player, a guitarist, and even more members in your "band." Not only that, you have a wide variety of "bands" or even "orchestras" available to accompany you as you play. One song can feature a jazz combo, the next a polka band, then a latin group followed by a marching band and then a big swing band.
All of this is accomplished by using the internal styles that are built into your keyboard. These internal styles are referred to as "Preset styles." This lesson explains how you find and select these styles. The next lessons, Style Controls, discusses the component parts of a style, how you direct what the "band" plays, and, finally, what solo instruments you might use with your "band." The musical instruments in a style require that you indicate the chord needed. The Playing Chords lessons explains how to split your keyboard so that you have a left-hand side where you can indicate the chord and also how you actually finger the chords on the keyboard. The individual styles also include suggested voices for each of the style variations and these are covered in the One Touch Setting lesson.
Style Categories
Styles are grouped into eleven categories: Ballad, Ballroom, Country, Dance, Entertainer, Latin, Movie&Show, Pop&Rock, R&B, Swing&Jazz, and World. There is a separate style button, located on your keyboard to the left of the MAIN screen, for each of these categories. There is also a style button labeled "USER" or "USER/ACCESS" or "EXPANSION/USER" and that is where you can save your favorite styles.
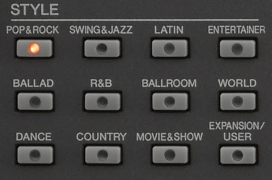 The 12 style categories buttons for the PSR-S970 are shown in the illustration here. These are the same as the more recent PSR-S975 and the newest PSR-SX900. Pushing any of the style category buttons takes you to a screen where you can see and select the styles in that category.
Note that the Genos has style categories but, unlike earlier Tyros models, it does not have any style category buttons on the keyboard. Accessing different style categories is accomplished using the touch-screen interface.
Number of Preset Styles
With each new arranger model, the total number of included "preset" styles increased. The Tyros included 300 styles. The Tyros2 added 100 more and the Tyros3 and Tyros4 models each added another 50. The Tyros5 models hold 539 styles. The latest top-of-the-line keyboard, the Genos, holds 550 styles.
The same is true of the mid-range models. The table below shows the total number of Preset styles provided with the top of the line PSR models from the PSR-2000 up to the PSR-SX900. The junior models have fewer preset styles. For example, PSR-S750 included 325 styles, 83 styles fewer than the S950
| Model | 2000 | 2100 | 3000 | S900 | S910 | S950 | S970 | S975 | SX900 |
|---|---|---|---|---|---|---|---|---|---|
| # Styles | 181 | 203 | 240 | 305 | 322 | 408 | 450 | 523 | 525 |
The Styles | Yamaha section of the PSR Tutorial shows you exactly what styles are included in each category for all of these keyboards.
While newer keyboards do have a larger number of styles, which means new styles are introduced in the new keyboard, some styles from earlier keyboards no longer appear. Fortunately, whatever keyboard you have, you can often load and play styles from earlier keyboards. You are not limited to only the Preset styles available in your keyboard.
The interface in the SX900/SX700 and the Genos for selecting a style is different from all the earlier PSR and Tyros models. The next section describes how to select styles on the SX900. If you have an earlier keyboard, skip down to the following section.
Selecting Styles on PSR-SX900
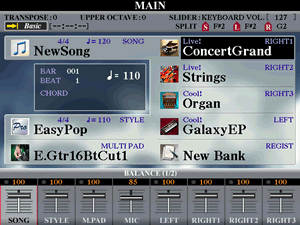
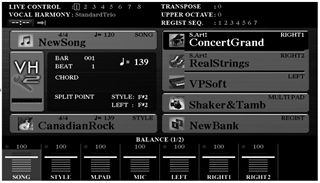
When you turn on the PSR-SX900 the initial HOME screen is loaded. The default style is SkyPop, which is part of the Pop&Rock category. (For the Genos, the default style is Cool8Beat from the R&B category.}
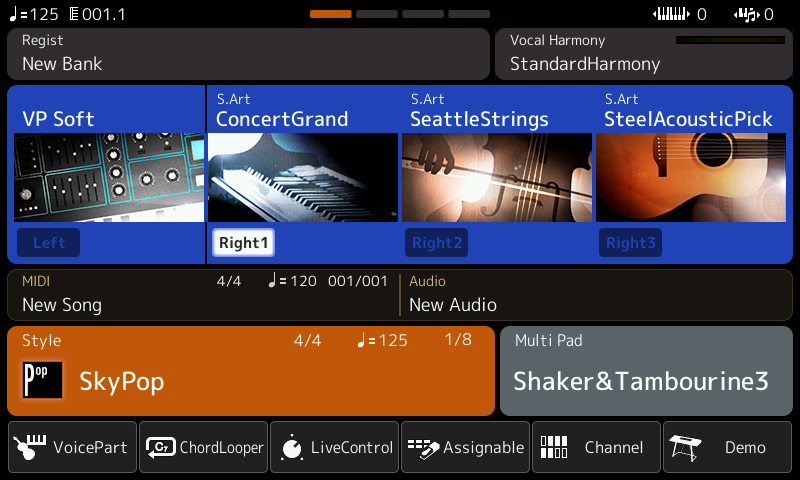
The "Style" box is on the HOME screen below the four Voice parts and the MIDI and Audio boxes. That cell shows the currently loaded style. It also shows the time signature and the default tempo for that style.
If you followed the previous Preset Voices lesson, you know how to select alternative voices. Selecting a different style works the same way. Touch the style name to call up the Style selection display shown in the screen shot below.
Preset Styles
Available style categories are shown on the left side. The current style category is highlighted. Available styles in that category are shown on the right side in "pages" of 10 styles each. In the screen shot above, the SkyPop style is highlighted indicating that it is the currently selected style. It is on the first page (P1) of Pop&Rock styles. There are 4 additional pages of Pop&Rock styles indicated by the dimmed P2, P3, P4, and P5 tabs at the bottom of the page.
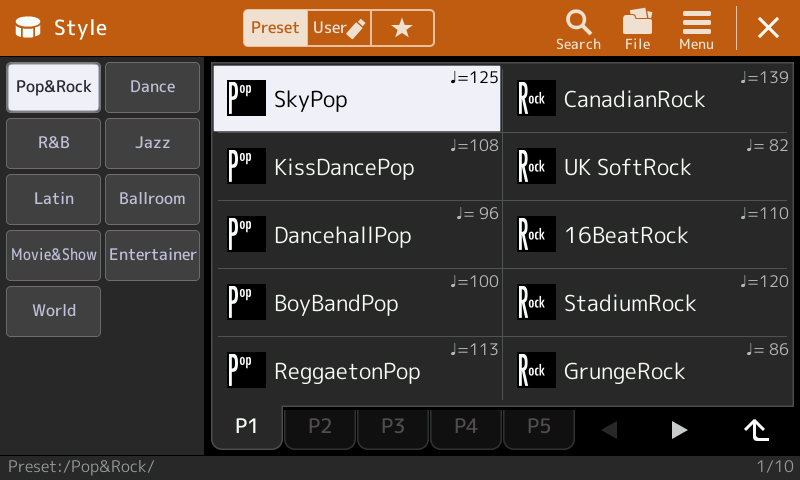
![]() Notice the right-pointing triangle to the right of the P5 tab. This indicates that there are additional Pop&Rock styles. Touch that arrow to move to the next set of pages for Pop&Rock styles. Here is what you get:
Notice the right-pointing triangle to the right of the P5 tab. This indicates that there are additional Pop&Rock styles. Touch that arrow to move to the next set of pages for Pop&Rock styles. Here is what you get:
![]() This is the next set of Pop&Rock style pages. It starts at P6, which is highlighted, and extends to P10. There is no right-facing triangle so there are no additional pages for Pop&Rock styles. The left-facing triangle is used to go back to the previous set of Pop&Rock styles.
This is the next set of Pop&Rock style pages. It starts at P6, which is highlighted, and extends to P10. There is no right-facing triangle so there are no additional pages for Pop&Rock styles. The left-facing triangle is used to go back to the previous set of Pop&Rock styles.
To move to a different style category, touch the style category name on the left side of the screen. Try touching different categories to see how this works. You could also push the style category button on your keyboard. Try pushing different category buttons. To select a style, touch the style name.
![]() The style categories are actually folders used to store the individual styles in that category. If you look carefully on the very bottom line of the screen, the path to the displayed files is shown. For each of the Pop&Rock pages you see "Preset:/Pop&Rock/". These styles are stored in the Preset area in a folder labeled Pop&Rock.
The style categories are actually folders used to store the individual styles in that category. If you look carefully on the very bottom line of the screen, the path to the displayed files is shown. For each of the Pop&Rock pages you see "Preset:/Pop&Rock/". These styles are stored in the Preset area in a folder labeled Pop&Rock.
User Styles
![]() Styles can also be stored in a User area. You access this area by touching the User option right next to the Preset option at the top of the Style selection screen. The User screen shows up to three areas where styles can be found.
Styles can also be stored in a User area. You access this area by touching the User option right next to the Preset option at the top of the Style selection screen. The User screen shows up to three areas where styles can be found.
- User is strorage space in the keyboard where you can save styles that you have modified or obtained from third party sources.
- USB1 is shown if you have a USB drive connected to your keyboard. The folders and style files on the USB drive are found here.
- Expansion is shown if you have any expansion packs added to your keyboard.
User Area
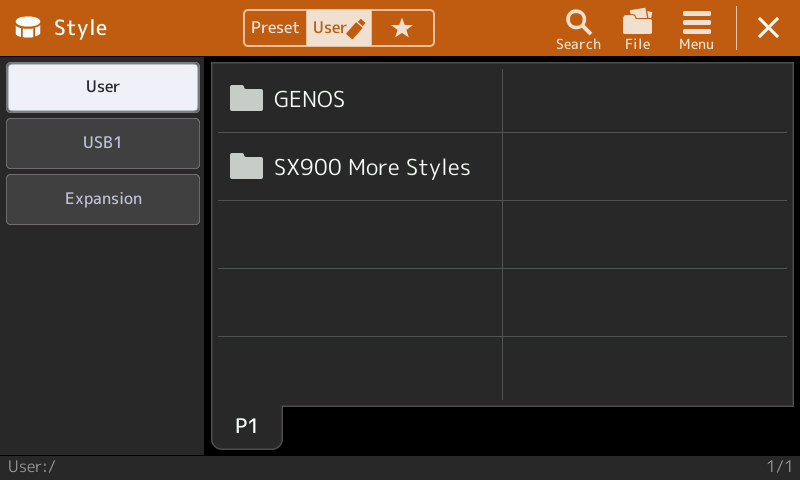 If your keyboard is brand new, you will not have anything in the User area. I have moved two folders from a USB drive to my User area. One has the original Genos styles and another has a collection of styles from earlier keyboards that are not in the SX900 Preset styles. So, when I touch the User icon, I see the screen shown here.
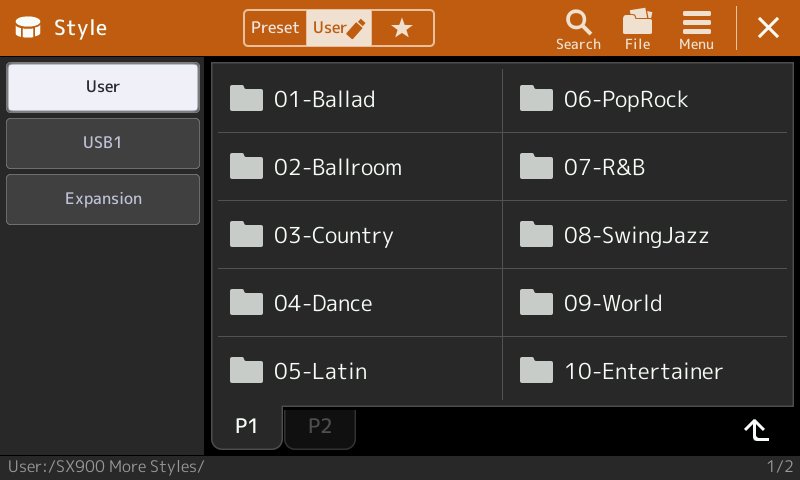 To open a folder touch the folder name. Opening up the folder "SX900 More Styles" shows a set of subfolders. Opening up any of the folders would show the style files stored in that folder. Again, you would select the style by touching the style name.
There is a limit on the amount of space you have to store files in the User area. On the SX900 has approximately 4 GB of space available. The SX700 has only 1GB of space available. This is significantly more than earlier PSR keyboards. The PSR-S970 had 13 MB of internal memory, the PSR-S950 had 6.7 MB, the PSR-S910 had 2.4 MB.
USB1 Styles
 If your keyboard is new, you may not have any styles available on a USB drive and, if no drive is connected to your keyboard, the USB1 area would not even be shown. In this screen shot I do have a large USB drive connected. It holds many of the individual style collections available from the PSR Tutorial. Each collection of styles is shown as a folder that will have many additional folders and subfolders within. You would simply touch the folder name to open the folder or subfolder until you got down to the individual styles. Just like in the Preset area, touching the style name will immediately load that style into your keyboard.
Expansion
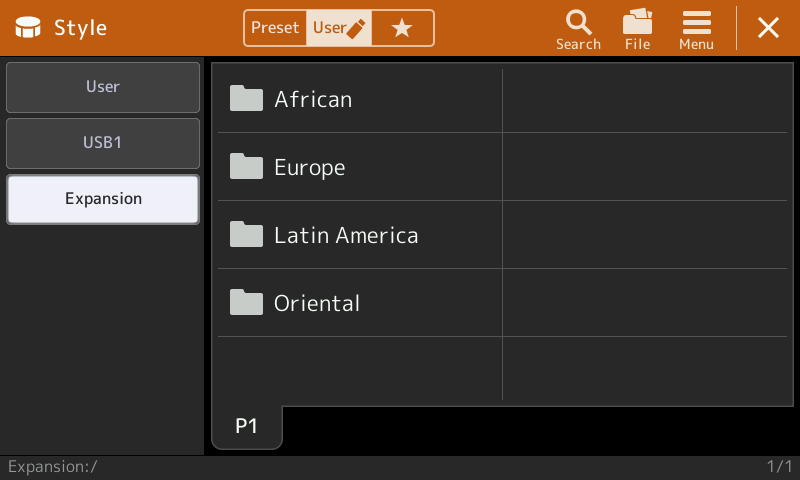 My SX900 keyboard came with 4 expansion packs preinstalled. Touching the User icon I opened the following screen. Touching the Expansion area showed four folders for four expansion packs.
No style files are visible. They are in the folders. To open a folder, simply touch the folder name. Touching the Europe folder revealed the first page of styles in the European expansion pack.
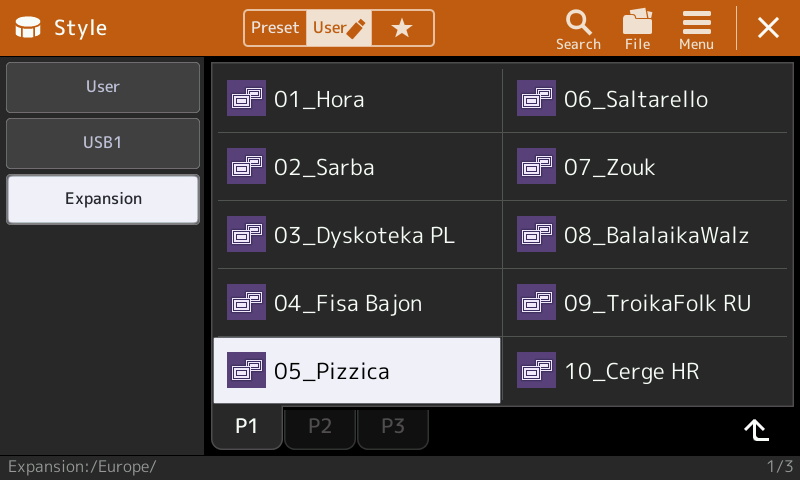 The first page of European styles are shown. In this screen shot the 05_Pizzica style is selected. There are two additional pages, P2 and P3, with additional styles.
Touch the page indicator to display styles in that page. The path to these files is shown in very small print on the bottom line of the screen ( "Expansion:/Europe/" ). To return back to the screen showing the parent folder for these styles (Europe), press the upward-facing arrow in the bottom right-hand corner of the screen. You may encouter cases where folders contain subfolders that hold the individual styles. That upward-facing arrow always moves you up to the level you came from to find the displayed styles.
Favorite Styles
![]() The style selection page also offers you a third option after Preset and User. It is where you can store "Favorite" styles and is denoted by the star you see. If you touch the star, you will see nothing if you have not indicated any favorite styles. Let's see briefly how that works.
The style selection page also offers you a third option after Preset and User. It is where you can store "Favorite" styles and is denoted by the star you see. If you touch the star, you will see nothing if you have not indicated any favorite styles. Let's see briefly how that works.
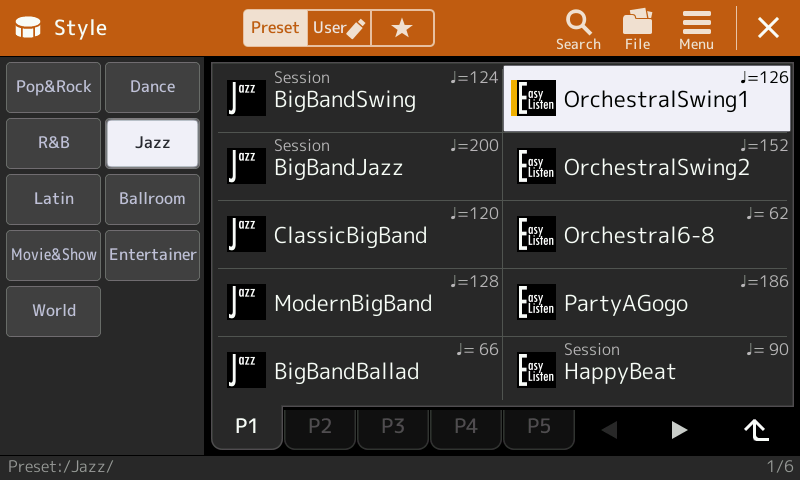 In the screen shot shown here, in the category of Jazz, I selected the OrchestraSwing1 style. As expected, it is highlighted. It is selected by simply touching the name. If I want to make this one of my favorite styles, a quick way to do this is to touch the style name and keep touching it. The style icon will change showing a vertical line indicating this is one of your favorite styles. Try picking out several other styles you may want to designate as favorites.
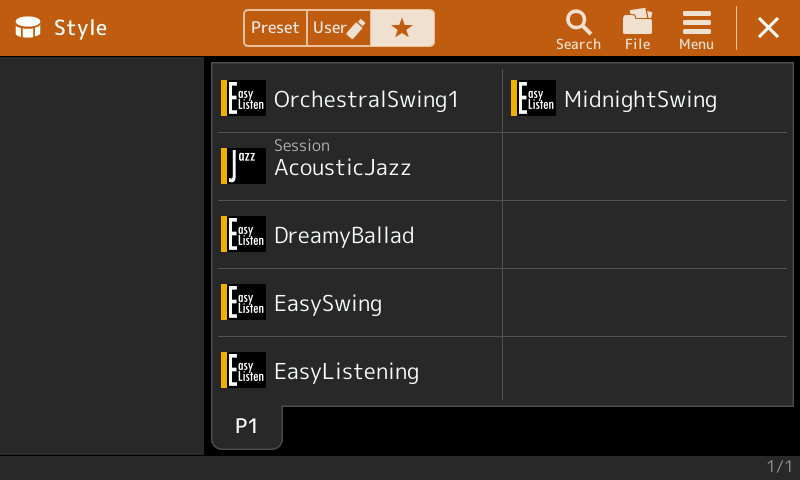 All the files designated as favorites appear under that Star Icon. I added several more "favorites" to see what would happen. The result is shown in this screen shot.
To remove any of the favorite selections, simply touch and hold the style name and that will remove it from the favorites screen. So the touch and hold merely toggles the favorites designation on and off.
You now know how to load a style into your keyboard. In the next lesson, we discuss the various style controls available as you play a song.
Selecting A Style on Tyros/PSR Models
Tyros3 screen
PSR-S970 screen
Here is the initial start-up screen for the Tyros3. Note that the initial style loaded is EasyPop. This initial style has changed with each new keyboard. The Tyros4 defaults to StadiumRock and the Tyros5 starts out with the Cool8Beat style.
The same is true on the mid-range models. The PSR-S970 starts with CanadianRock, PSR-S950 starts with Live8Beat and the S910 starts with Cool8Beat.
The "STYLE" cell is on the MAIN screen right next to the [D] button on the Tyros models and the [E] button on the PSR-S models. That cell tells you what style is currently loaded and ready to play. It also shows you the time signature and the default tempo for the currently loaded style.
If you followed the VOICE lessons, you know how to select an alternative voice for the right or left hand. Selecting a different style works the same way. If you press the button associated with the STYLE cell from the MAIN screen ([D] for the Tyros models and [E] for the PSR-S models), you will open up the STYLE display screen.
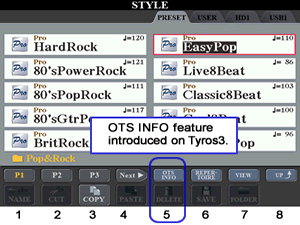 In the Tyros3 illustration shown here, the EasyPop style is highlighted and it is found on page 1 [P1] of the Pop&Rock category of styles. If you want a different Pop&Rock style,
just press the corresponding button ( [A]-[J] ). There are more available
Pop&Rock styles as you can see from the pages at the bottom of the screen
([P1], [P2], [P3], [Next]. To see the next 10 available styles, press the
upper [2] button to go to [P2]. Styles 21 to 30 would be accessed by pressing
the upper [3] button. If you press the [4] button for [Next], you'll see
that there are three more pages of Pop&Rock styles available [P4]. [P5],
and [P6]. Of course, if your keyboard is not the Tyros3 illustrated here, the number of Pop&Rock styles will be different.
In the Tyros3 illustration shown here, the EasyPop style is highlighted and it is found on page 1 [P1] of the Pop&Rock category of styles. If you want a different Pop&Rock style,
just press the corresponding button ( [A]-[J] ). There are more available
Pop&Rock styles as you can see from the pages at the bottom of the screen
([P1], [P2], [P3], [Next]. To see the next 10 available styles, press the
upper [2] button to go to [P2]. Styles 21 to 30 would be accessed by pressing
the upper [3] button. If you press the [4] button for [Next], you'll see
that there are three more pages of Pop&Rock styles available [P4]. [P5],
and [P6]. Of course, if your keyboard is not the Tyros3 illustrated here, the number of Pop&Rock styles will be different.
 Like
the VOICE display screens, notice that there is an [UP] button at the far
right side of those page buttons. Pressing the upper [8] button moves the
display "up" to the parent folder. In this case, you would be going up one
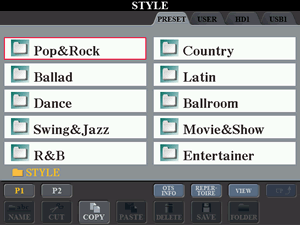
level to see all the available style folders. Pop&Rock is the first folder
listed. There are 11 category folders in the Tyros3 and this first page shows
10 of them. If you went to P2, you would see the 11th category (World).
Like
the VOICE display screens, notice that there is an [UP] button at the far
right side of those page buttons. Pressing the upper [8] button moves the
display "up" to the parent folder. In this case, you would be going up one
level to see all the available style folders. Pop&Rock is the first folder
listed. There are 11 category folders in the Tyros3 and this first page shows
10 of them. If you went to P2, you would see the 11th category (World).
All of the internal preset styles, that is, styles that are built in to the hardware of your keyboard, are found under the PRESET tab. There are other places where you can find styles and they are indicated by the various tabs at the top of the page. You can not change any of the styles in the preset area. However, you could copy a style from the preset area and save it in the "USER" area. Styles in the USER area can be edited and changed. You use the [NEXT] Tab key to move to the USER area. In time, you will see that you can also have styles stored on a hard drive (HD1) or on your USB flash drive. You use the [NEXT] and [PREV] Tab buttons to move back and forth among the four style tabs (PRESET, USER, HD1, USB1). If you have a PSR-3000 , the tab choices would be PRESET, USER, CARD, USB. If you have a PSR-2000 or PSR-2100, the tab choices would be PRESET, USER, FLOPPY.
 Tab
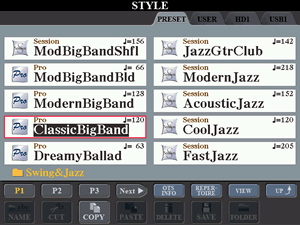
back to the PRESET styles. If you are looking at the Styles folder that shows all the available styles categories, as seen in the illustration above, you could check out the styles in the Swing&Jazz category by pressing the "D" button next
to Swing&Jazz to select that category. As expected, you see the first
10 Swing&Jazz styles. In the screen shot here, the ClassicBigBand style
has been selected for use.
Tab
back to the PRESET styles. If you are looking at the Styles folder that shows all the available styles categories, as seen in the illustration above, you could check out the styles in the Swing&Jazz category by pressing the "D" button next
to Swing&Jazz to select that category. As expected, you see the first
10 Swing&Jazz styles. In the screen shot here, the ClassicBigBand style
has been selected for use.
From the MAIN screen you could have jumped immediately to the Swing&Jazz Style screen by pressing the Swing&Jazz STYLE button. To look at available styles in another category, for example Country styles, just press the COUNTRY style category button. Try it now. You see how you can quickly look at any of the 11 categories. You still need to press the number buttons below the display screen to look at all the different pages within any given style category.
Now that you know how to select and load a style, in the next lesson we'll take a look at the STYLE CONTROL section and the various parts of a style.
This page updated on February 15, 2024 .