One of the chief advantages of an arranger keyboard is that it allows you to arrange your songs. For any particular song you want to play, you select the appropriate style, the right tempo, the voices you want to use. You may also want to adjust the overall sound volume of one or more voice parts. You can decide where you want the split point on your keyboard, whether to put the left-hold option on or not or even whether you want the left hand voice on or off. You can decide to use the harmony/echo features. You can even specify exactly what those harmony/echo features are. You can apply DSP effects and make your keyboard sound like you are performing in a large hall.
Of course, actually making all these settings takes quite a bit of time. Tweaking the setup of your keyboard until it is where you want it to be may require a lot of trial and error. Eventually, however, you get your keyboard "tuned" just the way you want for a particular song. But, since you obviously won't want to repeat the whole process every time you play this song, you need a way to save your keyboard setup so that all the options you set for this song are readily available the next time you play the song.
Here is where the Registration Memory feature of your keyboard comes in. By using one of the eight available registration memory buttons ([1] to [8]), you can "memorize" the current set up of your keyboard (or certain parts of your keyboard) and save it to that button. The next time you want to play that particular song, pressing the registration memory button where you saved the setup instantly configures your keyboard to the settings you selected for that song.
Registration Memory Function
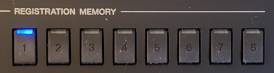 All of the PSR and Tyros keyboards, including the new Genos and PSR-SX, models include a number of panel buttons that provide access
to the REGISTRATION MEMORY feature of your keyboard. The 8 registration buttons (labeled "1" to "8") are located on the right-hand
side of the keyboard below the screen and right above the keys. The photos here are from the PSR-SX900. Registration buttons on your keyboard will match the color of your keyboard and may be placed in slightly different positions.
All of the PSR and Tyros keyboards, including the new Genos and PSR-SX, models include a number of panel buttons that provide access
to the REGISTRATION MEMORY feature of your keyboard. The 8 registration buttons (labeled "1" to "8") are located on the right-hand
side of the keyboard below the screen and right above the keys. The photos here are from the PSR-SX900. Registration buttons on your keyboard will match the color of your keyboard and may be placed in slightly different positions.
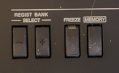 In addition to the 8 registration buttons
you see a [FREEZE] button and a [MEMORY] button
and, on most models, two [REGIST BANK] buttons (labeled "+" and "-"). How these buttons work will be explained shortly.
In addition to the 8 registration buttons
you see a [FREEZE] button and a [MEMORY] button
and, on most models, two [REGIST BANK] buttons (labeled "+" and "-"). How these buttons work will be explained shortly.
When you understand how this feature works, you will see that creating and using registrations is relatively simple. However, getting to the point where you understand how registrations work has proved to be a difficult task for many new owners. This feature has remained relatively constant through all the various Yamaha models. So explanations that described the procedure for the PSR-2000 applied more or less equally to all the subsequent keyboards. However, because registrations have proved to be relatively confusing, I have included several lessons on this topic, composed by different authors over the years. The more material you have to read, the more the basic concepts will sink in and, particularly if you try building your own registrations, the quicker you will become proficient in using this important feature of your keyboard.
In this introduction, I will provide some high-level concepts to help explain the Registration Memory feature. I'll also point to other relevant lessons in this section you may want to pursue.
Registration Buttons, Banks, and Files
There are a number of terms used in discussing registrations that people find confusing. A single registration "bank" can hold up to 8 custom keyboard configurations. The individual registrations are stored in each of the 8 available registration buttons. The entire "bank" or registration buttons are saved in a single registration "file". Thus, a registration "bank" and a registration "file" are two different names for the very same thing. I used the term "up to 8" in the description above because all of the available registration slots need not be filled.
You build any registration files that you want and you can fill, or not fill, any of the 8 available memory slots. In some cases, you may find registration files available on the internet that you can download. However, registration files are keyboard specific -- a registration created for a PSR-2000 will not work on a PSR-3000 or any later keyboard. For recent keyboards, Yamaha has provided some utilities that help convert files, including registrations, from an older to a newer model. Normally, however, users find that moving up to a newer model keyboard generally requires recreating their registration files. Murray Best's Registration File Manager program can be used to assist you in converting registrations from one keyboard for use on another.
Most users are familiar with style files. A style file has many parts - 3 intros and 3 endings, 4 main variations, fill-ins, and a variety of different instruments used in the accompaniment. A style file also can include four OTS settings that specify the right-hand voices. When you "load" a style, all of this information is loaded with it. You may already know that you can modify many aspects of a style and save the modified style as a NEW style. The original preset style remains unchanged but your "new" modified copy of that style can be stored where you can save files -- in USER memory, on the USB drive, or, if you have one, a FLOPPY DISK or a HARD DRIVE.
Similarly, a registration file contains a number of parts, the most obvious of which are the 8 memory slots represented by the 8 registration memory buttons. Like styles, you save your registration files under names that you specify and you can have as many registration files as you like. Only one registration file, however, can be loaded into your keyboard memory at any one time. When you load that file, you have access to the 8 registration memories in that file. If you load a different registration file, you have access to the 8 registration memories in that file.
When you turn your keyboard on, it is ready to play. All the Yamaha models load a default style when your keyboard is turned on and you can immediately start playing with that style. The registration memories are also loaded. If you have a new keyboard, however, there is NO DEFAULT registration bank. A registration bank may be loaded, and called "NEW BANK", but none of the buttons will be lit, that is, all of the available registration memories are empty.
If you experiment and save some information in some of those memory slots and then turn your keyboard off, you find that the next time you turn your keyboard on, those memory slots are still filled with whatever you put there. You can fill all 8 slots with custom keyboard setups, but then you are done. How do you get more? Well, here is where you have to understand that you need to permanently save those 8 registration memories in a file and you want to give that registration file a name more descriptive than "NEW BANK".
So, some of the skills you need to learn are:
- How to actually save something in a registration memory slot,
- How to save the whole registration bank to a separate registration file, and
- How to load one of your saved registration files into your keyboard so you can use it again.
Hopefully, a number of the lessons in this section will help you gain these skills.
Knowing how to save registrations and save registration banks is, of course, critical. But something else you'll need to know is why you are creating a registration file in the first place. When you know what you are creating a registration file for, then that helps to explain what you need to include in that registration file.
Not every registration button will "memorize" every aspect of your current keyboard setup. When you save a registration setup, you decide what parts of your current keyboard setup you want to "save" in that button. This aspect of the registration feature provides a great deal of flexibility but also adds to the initial user confusion. So, let's look at what is, or isn't, saved in some more detail.
Registration Memory
You might think that when you save your "custom" keyboard setup to a registration memory button, everything is saved so that the next time you push that memory button, your keyboard will be exactly like it was when you saved it. Well, not exactly.
You save a keyboard setup to a registration memory by pressing the [Memory] button and then one of the 8 available registration memory buttons. But, in between, a REGISTRATION MEMORY CONTENTS screen allows you to select exactly what part of your keyboard setup you want to save. Your choices are remembered so that you need not specify them every time. But this also makes it easy to ignore that screen. But you need to examine it carefully to make sure what is getting saved is what you want to save.
PSR-SX900 Registration Memory Contents
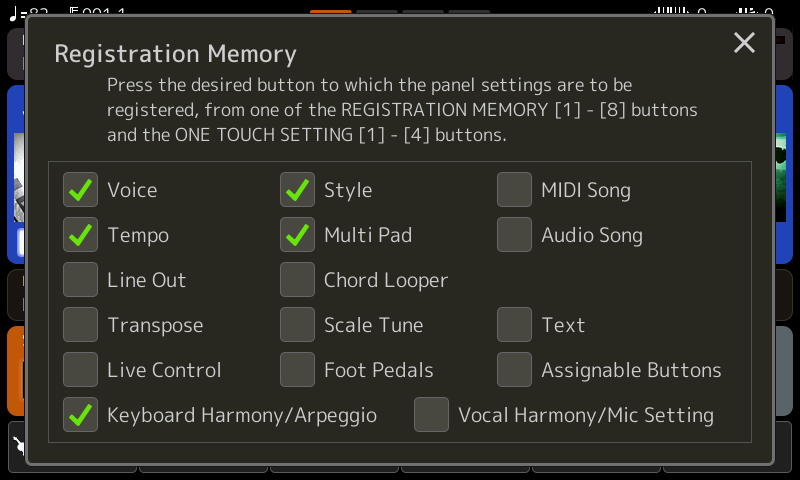 When you press the [Memory] button, the Registration Memory dialog pops up. Here is where you select what part of your keyboard setup you wanted to save in the registration memory button. Select or deselect items by touching the box next to each category. In this example, I want to save my current setup for a particular song. So, I select Voice, Tempo, Style, MultiPad, and Keyboard Harmony/Arpeggio. When I've made the choices I want, I then push one of the 8 Registration Bank buttons.
I can repeat this process filling up additional registration bank buttons. For example, I might change the voices and/or the style variation. Then I would push the[ Memory] button followed by the next Registration Bank button. I do not have to again select which items to save since my original selections remain in place.
Tyros3 Registration Memory Contents
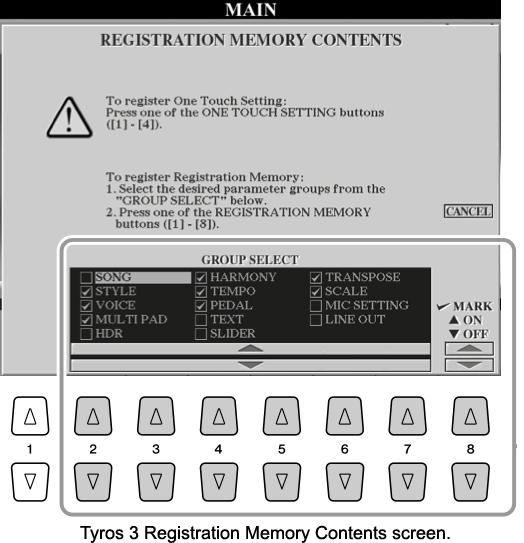 The illustration here shows the Registration Memory Contents screen for the Tyros3. It is similar for
the other Tyros and PSR-S models, although Tyros models have some additional groups not available
on PSR keyboards.
The illustration here shows the Registration Memory Contents screen for the Tyros3. It is similar for
the other Tyros and PSR-S models, although Tyros models have some additional groups not available
on PSR keyboards.
There are 14 available parameter groups that can be saved -- SONG, STYLE, VOICE, MULTI PAD, HDR, HARMONY, TEMPO, PEDAL, TEXT, SLIDER, TRANSPOSE, SCALE, MIC SETTING, LINE OUT. But, any particular group will only be saved if there is a check mark next to that group name. Use the numbered buttons [2] - [7] to move between the 14 parameter groups. Use the [8] buttons to mark (that is, to save) or unmark any group.
Types of Registration Files
Start Up Registration
Why wouldn't you save everything? Well, you may want to make a special purpose registration file that initially sets the keyboard up for the microphone settings you want to use and perhaps the pedal settings. As you play different songs, you would not want these settings to change. So, you would make one "Start-Up" registration file that saves your mic and pedal parameters (and nothing else). You would then load that registration file and use it when you start your keyboard. In other registrations you create, you would be sure not to check the parameter group for MIC SETTING or PEDAL since you don't want those settings to change.
Favorite Voices
As another example, suppose you want a registration file with all your favorite right-hand voices. Suppose you save a Grand Piano as the R1 voice and a Strings as the R2 voice and save that setting in the first registration memory slot [RM1]. No matter what style you load, you would know that you have a Grand Piano with Strings available in [RM1]. In this case, you definitely would not want the style or the tempo to change when you pressed [RM1] to get this voice combination. In making a registration file with your favorite voices, all you would need to save is the VOICE group and, perhaps, the HARMONY group. So, you would check only those two boxes. You could make a favorite voice registration set for jazz songs and another one for country songs. No matter what style you loaded, you would have available your favorite voices plus the voices in the OTS settings that are included with the particular style that is loaded.
What if you wanted to include a left-hand voice in your "favorite" voices registration file. That is possible, but not so easy. The "VOICE" group includes just about any parameter you want to set that affects the Right1, Right2, (and Right3 on the Tyros, Genos, and PSR-SX models) voices. But the left-hand voice is included in the "STYLE" group. If you checked both the VOICE group and the STYLE group, you could save the right-hand voices and the left-hand voice, but you would also be saving the style itself. Fortunately, there is a way around this and I explain the trick you can use to do this in a separate article on Saving Favorite Voices.
Category Registrations
If you want to play a ballad, you can find relevant ballad styles in the BALLAD category on most keyboards. But there my also be good ballad styles located in other categories. And, while there may be quite a few ballad styles, you may have just a few that you like and can use with a wide variety of songs. In this case, you may want to create a series of "category" registration files. For example, a registration file for "ballads" could contain 8 of your favorite ballad styles, each of which you've adjusted to have your own custom OTS. My article on "Category Registrations" will give you some ideas on how to set up your own category registration files.
Song Registrations
Many users want to create a registration to save custom settings for a particular song. In this case, you would want to check the STYLE, VOICE, MULTIPAD, HARMONY, and TEMPO groups. All of these are likely to be altered when you are creating a custom registration for a specific song.
When creating song registrations, some users use each of the eight available memory slots to save a custom setup for a single song and thus save 8 songs in a single registration file. Others may prefer to use the entire registration bank for a single song. The registration memory slots would then be used as the player goes from one section of the song to the next. The first method requires you to keep separate track of where you save particular songs. You could do this with a separate list showing song title, registration file, and registration memory number. With the one-song per registration file method, you could simply name the registration file after the song that it represents.
Richard Peck provides a number of sample registration files where each registration file contains up to 8 different songs or song-types. Frank Blecha has written detailed step-by-step instructions on how you could create such a registration file on the PSR-3000. Frank's method incorporates a trick introduced by Leo Dunne that saves the name of the song in the SONG cell of the MAIN screen. Recent model keyboards allow the user to name each registration button and that name is displayed in the REGIST cell of the MAIN screen to help you identify what song the registration is for.
While saving many songs in a registration file may seem more convenient, it does introduce potential problems. Eddie Shoemaker provides some cautions a user should be aware of when using 8 songs in a registration file versus the alternative one song per registration file.
Where To Next?
For many people, a picture is worth a thousand words and Fred Smith has put together a number of videos to show what registrations can do and how you can take advantage of this feature. The next lesson provides a gateway to Fred's registration videos.
Since registrations have proved to be so confusing, Gary Diamond put together an article explaining everything you need to know to create your own registrations. That's the very next lesson in this section.
For a detailed step-by-step presentation, check out Frank's article on registrations on the PSR-3000. The sample files he provides will only work on the PSR-3000, but everyone should be able to follow his steps no matter what keyboard you have.
Tyros (and PSR-S) owners should check out the tutorials on Setup Registrations and the Registration Workshop in the Workshop section of Lessons.
This page updated on February 15, 2024 .