If you have downloaded the "corrected" Music Finder database, or if you have an entirely different Music Finder database that you would like to use, the next step is to load it into your keyboard. This lesson explains how to load an external Music Finder database into your PSR or Tyros keyboard.
Loading the Corrected Database
The first thing we are going to do is to REPLACE the initial preset
Music Finder database with a corrected version. I mentioned earlier that
the Music Finder database is really just a file. In fact, the corrected "file" you
downloaded represents a complete database (with 1,850 records in the case
of the Tyros3). Fortunately, Yamaha has provided users with the ability to save and load Music
Finder databases. That means you can have several different Music Finder
databases. You can replace the currently loaded database with a new one any
time you want.
Note: Tyros3/4/5 keyboards and the PSR-S950/S910/S900 keyboards can hold a maximum of 2,500 records in the Music Finder database. PSR-S750/S710/S700 are limited to a maximum of 1,200 records.
I use the them "replace" but be aware that the original version of the database with the incorrect song titles is built into the permanent memory of the keyboard. Just like the internal styles and voices, you can never DELETE that internal Music Finder database. No matter what you do with the Music Finder, you can always go back and load the original Music Finder database that came with your keyboard. So, if you are nervous about replacing your database, don't worry. You can not hurt the original.
 Although you can have many different Music Finder Databases (MFDs), right
now, we aren't going to worry about "many."
We are just going to install one new file.
Although you can have many different Music Finder Databases (MFDs), right
now, we aren't going to worry about "many."
We are just going to install one new file.
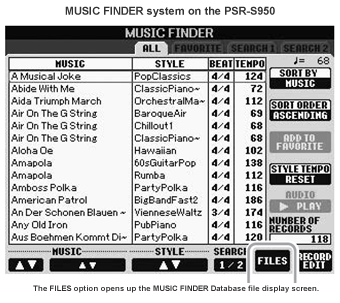
If you have a PSR-S model or a Tyros3, Tyros4, or Tyros5 model, at the bottom of the Music Finder screen you will see a option called "FILES". If you press that button, you will go immediately to the MUSIC FINDER files display screen (see below). Earlier models had to use the Function menu method described next. This method also works in the newer models, so you have two ways to get to the MUSIC FINDER files display screen.
Call Up the FUNCTION Menu
 The
process starts by calling up the FUNCTION MENU screen. Find the [FUNCTION]
button on your keyboard panel. It is within a group of buttons labeled MENU.
Press that button to bring up the FUNCTION MENU screen. The Tyros3 screen
is shown on the right. The PSR-2000 screen is shown below. Note how similar
the screens are.
The
process starts by calling up the FUNCTION MENU screen. Find the [FUNCTION]
button on your keyboard panel. It is within a group of buttons labeled MENU.
Press that button to bring up the FUNCTION MENU screen. The Tyros3 screen
is shown on the right. The PSR-2000 screen is shown below. Note how similar
the screens are.
One of the folders shown on this screen will be labeled
UTILITY. The Music Finder management tools are located in the UTILITY folder
along with other utilities provided by Yamaha. So, we will be going to the
UTILITY menus. Press the [I] button to open up the UTILITY SCREEN.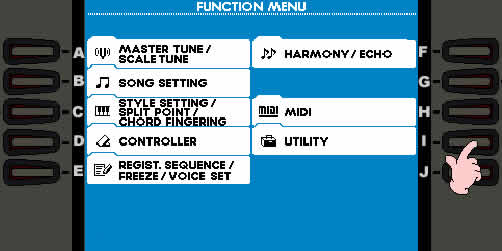
The UTILITY Screen
 The
UTILITY screen has five different tabs. When you first bring it up, you will
be looking at the CONFIG1 tab. The Utility screen that we need to use is
found under the SYSTEM RESET tab. Press the <TAB>
button to move through the CONFIG 2, DISK, and OWNER tabs and get to the
SYSTEM RESET tab options. The Tyros3 version of that screen is shown on the
right and the PSR-2000 version is shown with the next paragraph.
The
UTILITY screen has five different tabs. When you first bring it up, you will
be looking at the CONFIG1 tab. The Utility screen that we need to use is
found under the SYSTEM RESET tab. Press the <TAB>
button to move through the CONFIG 2, DISK, and OWNER tabs and get to the
SYSTEM RESET tab options. The Tyros3 version of that screen is shown on the
right and the PSR-2000 version is shown with the next paragraph.
 On
the left side of the screen you can perform some Factory Resets on
various parts of your system. We ARE NOT going to do that.
On
the left side of the screen you can perform some Factory Resets on
various parts of your system. We ARE NOT going to do that.
On the right side of the screen, there are four options available. The fourth option is MUSIC FINDER. That is the option you want. Press the [I] button to launch the MUSIC FINDER File screen.
MUSIC FINDER Display Screen
 The MUSIC FINDER file display screen shows you Music Finder database files, just as the STYLE display screen shows you styles and the SONG display screen shows you midi files. When
this screen is first opened, you are looking at the PRESET area. There is only one file there and it is called MusicFinderPreset.
The MUSIC FINDER file display screen shows you Music Finder database files, just as the STYLE display screen shows you styles and the SONG display screen shows you midi files. When
this screen is first opened, you are looking at the PRESET area. There is only one file there and it is called MusicFinderPreset.
The MUSIC FINDER files screen operates just like any other files screen. The tabs at the top show the different file storage options (PRESET, USER, HD, USB1) and the files displayed are only those relevant to the file screen, in this case, Music Finder databases. You can always go to the PRESET area to reload the MFD that came with your keyboard. However, I want to replace this database. Note also that in the PRESET area the only file option available is to COPY the file.
 In
the Yamaha Files lessons, I provided a
sample zip file that had a variety of files in it. Some of those files were
Music Finder databases. In the Tyros3 screen shot shown here, I have tabbed
over to the USB file area. I am looking in the ExFiles folder
where I see three Music Finder database files. If you have downloaded your "corrected" Music
Finder database and put it on your USB drive (or Floppy), you will see that
file listed on your screen. Note that in this USB area, I can create additional
folders, save a database file or delete a database file, or rename the file
if I want.
In
the Yamaha Files lessons, I provided a
sample zip file that had a variety of files in it. Some of those files were
Music Finder databases. In the Tyros3 screen shot shown here, I have tabbed
over to the USB file area. I am looking in the ExFiles folder
where I see three Music Finder database files. If you have downloaded your "corrected" Music
Finder database and put it on your USB drive (or Floppy), you will see that
file listed on your screen. Note that in this USB area, I can create additional
folders, save a database file or delete a database file, or rename the file
if I want.
I want the Tyros3MF database, so I select (open) that entry by pressing the [D] button on the left side of the screen.
 A
message window pops up asking you whether you want to:
A
message window pops up asking you whether you want to:
- REPLACE the current Music Finder database with the one you selected [G],
- APPEND your selected file to the currently loaded Music Finder database [H], or
- CANCEL the whole operation [I].
I definitely want to REPLACE the database with the incorrect song titles and put this new one in its place. I press [G] to select the REPLACE option.
 Since
this operation will replace all the current Music Finder records with the
records from the new file, I am prompted to confirm this action. If I had
made changes to the current database that I wanted to keep, I would first
SAVE that database under whatever name I want and then replace it. No need
to save the preset database, it's always there, so I select the YES option.
Since
this operation will replace all the current Music Finder records with the
records from the new file, I am prompted to confirm this action. If I had
made changes to the current database that I wanted to keep, I would first
SAVE that database under whatever name I want and then replace it. No need
to save the preset database, it's always there, so I select the YES option.
 You
will get a confirmation notice when the records have been replaced and are
now loaded into your Music Finder system. Selecting YES at
this point would open up your Music Finder display screen so you can view
the new records.
You
will get a confirmation notice when the records have been replaced and are
now loaded into your Music Finder system. Selecting YES at
this point would open up your Music Finder display screen so you can view
the new records.
That's it. Your new database is now in place. Press the [EXIT] button as many times as you need to get back to the MAIN Screen. If you press the Music Finder button now, you will see that the song names are all correct. We will use the corrected database in future illustrations in this section.
Practice Loading & Saving Your MFD
If you want to practice this operation, you can always repeat it and put the Preset database back into the Music Finder. If you want to experiment with the system, edit records, or try to add new records, you might consider copying the corrected version of the Music Finder database from the USB area and pasting it to the USER area of the Music Finder file screen. This way, you can modify the records in that database any way you want but, if you make a serious mistake, you can simply reload the copy of the corrected version from the USER area and you will be back where you started. Of course, if you downloaded the file on your PC, there is still a correct version sitting on your PC.
This page updated on February 15, 2024 .